> ## Documentation Index
> Fetch the complete documentation index at: https://docs.dodopayments.com/llms.txt
> Use this file to discover all available pages before exploring further.

# Build an AI Chat App with AI SDK & LLM Blueprint

> Build an AI chat app with the AI SDK and Google Gemini. The LLM Blueprint tracks token usage, and Dodo Payments bills customers for the tokens they use.

<Tip>
  To have your coding agent write the integration, install the [Dodo Agent Plugin](/developer-resources/build-with-ai-coding-agents). It adds the Dodo Payments skills and MCP servers to Claude Code, Codex CLI, Cursor, VS Code / GitHub Copilot, Kiro, and OpenCode.
</Tip>

You'll build an **AI chat application** that bills customers for the tokens they use. You create the billing meter, the product, and the application code that runs conversations and reports token usage as it happens.

<Note>
  This tutorial builds a complete application with a backend and a frontend. The chat app uses Google Gemini, and the LLM Blueprint reports token usage for each response, so you don't count tokens yourself.
</Note>

When you finish, you'll have a chat application that:

* Runs AI conversations with Google Gemini through the AI SDK.
* Tracks token usage automatically, with no counting code.
* Charges customers for the tokens they actually use.
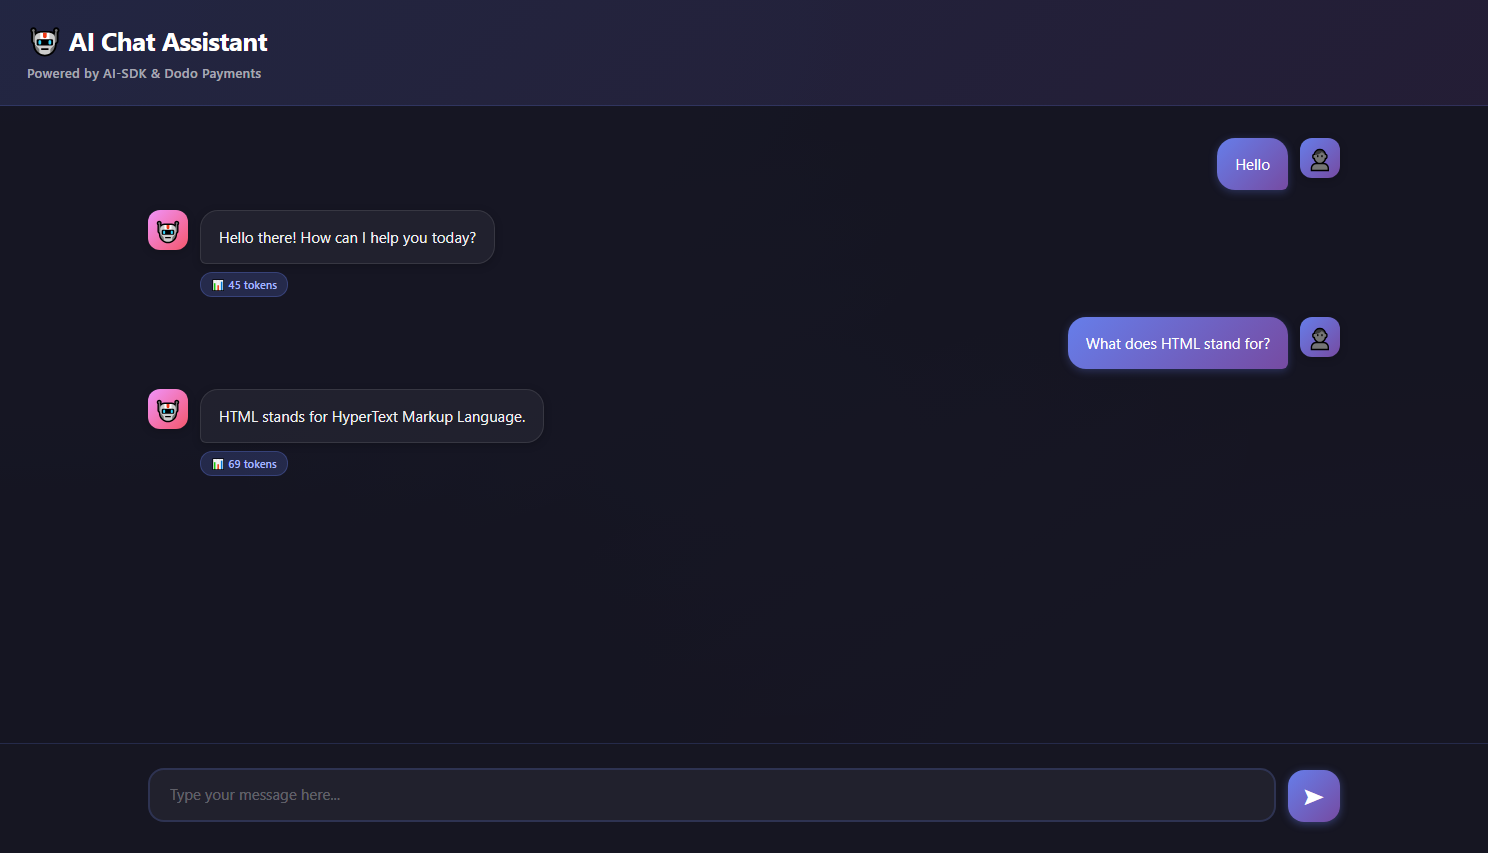
* Includes a chat interface that keeps the conversation history.

<Frame>
  <img src="https://mintcdn.com/dodopayments/oig3NPG69DDpua_S/images/cookbooks/ai-chat-app/ai-chat-demo.png?fit=max&auto=format&n=oig3NPG69DDpua_S&q=85&s=9d9932fb528b64632cfbedaad98c09f3" alt="Chat interface of the finished AI chat app, showing a conversation with token counts under each response" style={{ maxHeight: '500px', width: 'auto' }} width="1488" height="853" data-path="images/cookbooks/ai-chat-app/ai-chat-demo.png" />
</Frame>

## What We're Building

The chat service works like this:

* **Service**: AI chat with Google Gemini through the AI SDK
* **Pricing Model**: Pay per token (\$0.01 per 1,000 tokens)
* **Free Tier**: 10,000 free tokens per customer per month
* **Features**: Conversation history and automatic token tracking

Before you start, you need:

* A Dodo Payments account.
* A Google AI API key. [Get one from Google AI Studio](https://aistudio.google.com/api-keys).
* Node.js 22 or later.

***

## Step 1: Create Your Usage Meter

Create a meter in the Dodo Payments dashboard to track AI token usage.

<Tip>
  **What you're building**: A meter named "AI Token Usage Meter" that adds up the tokens used in chat conversations.
</Tip>

<Steps>
  <Step title="Open the Meters Section">
    1. Log in to the Dodo Payments dashboard.
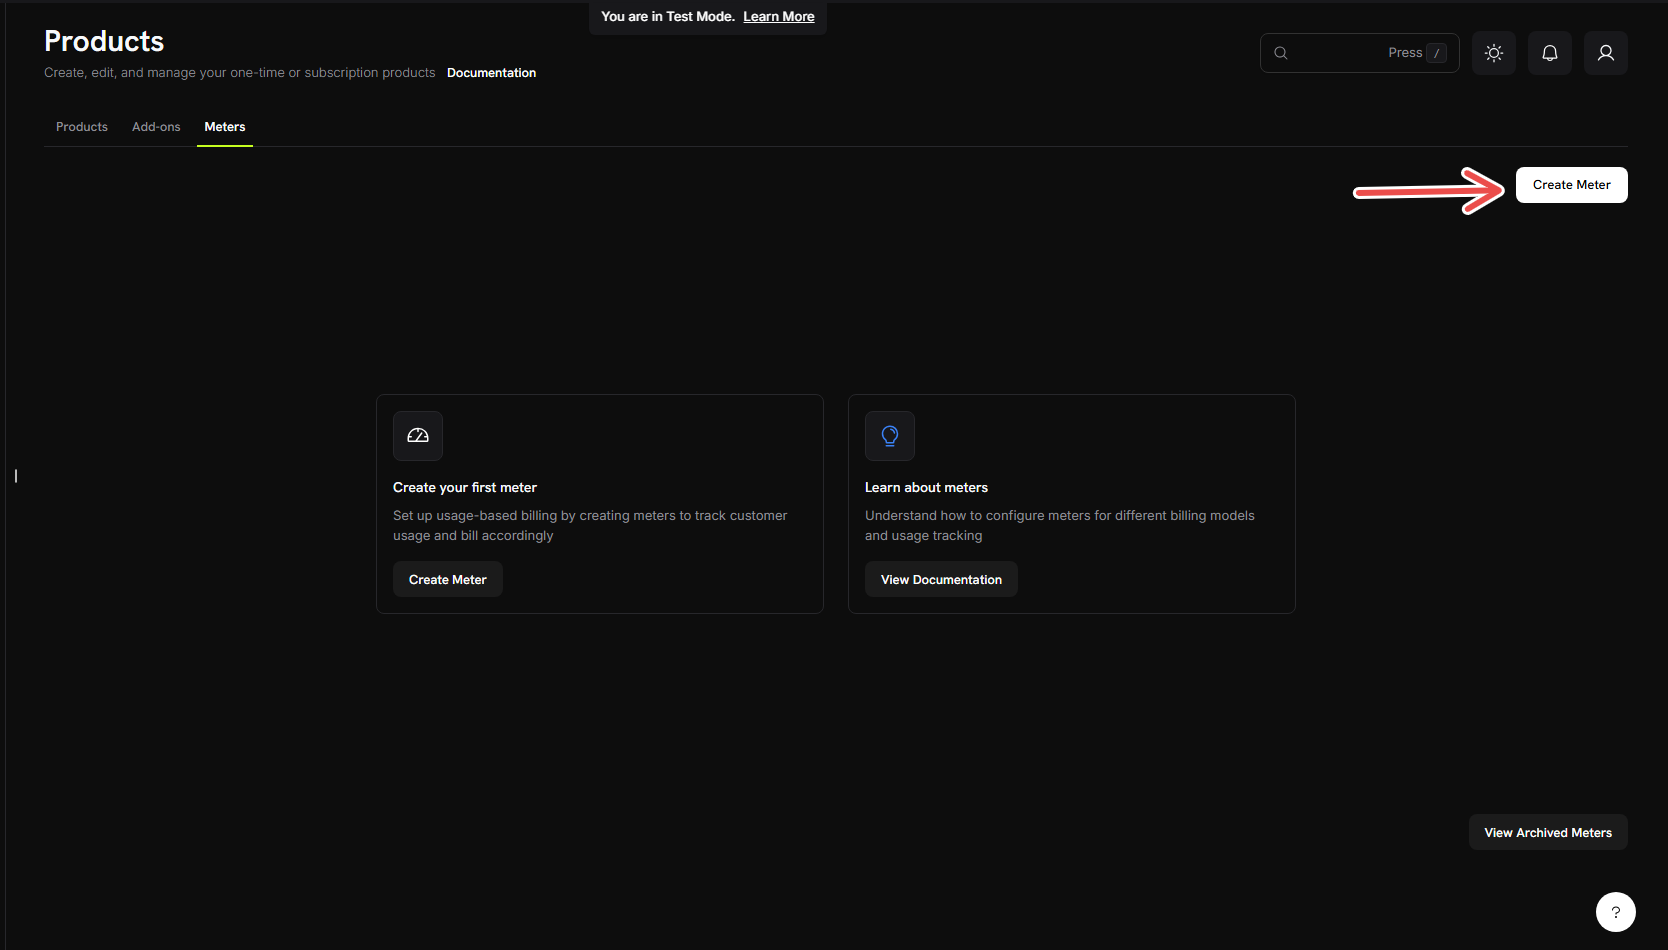
    2. Click **Products** in the sidebar.
    3. Click **Meters**.
    4. Click **Create Meter**.

    <Frame>
      <img src="https://mintcdn.com/dodopayments/oig3NPG69DDpua_S/images/cookbooks/ai-chat-app/create-meter.png?fit=max&auto=format&n=oig3NPG69DDpua_S&q=85&s=e5aa342d55a4a9c7323cf68015f737e4" alt="Meters page in the Dodo Payments dashboard with the Create Meter button" style={{ maxHeight: '500px', width: 'auto' }} width="1668" height="950" data-path="images/cookbooks/ai-chat-app/create-meter.png" />
    </Frame>

    The meter form opens.
  </Step>

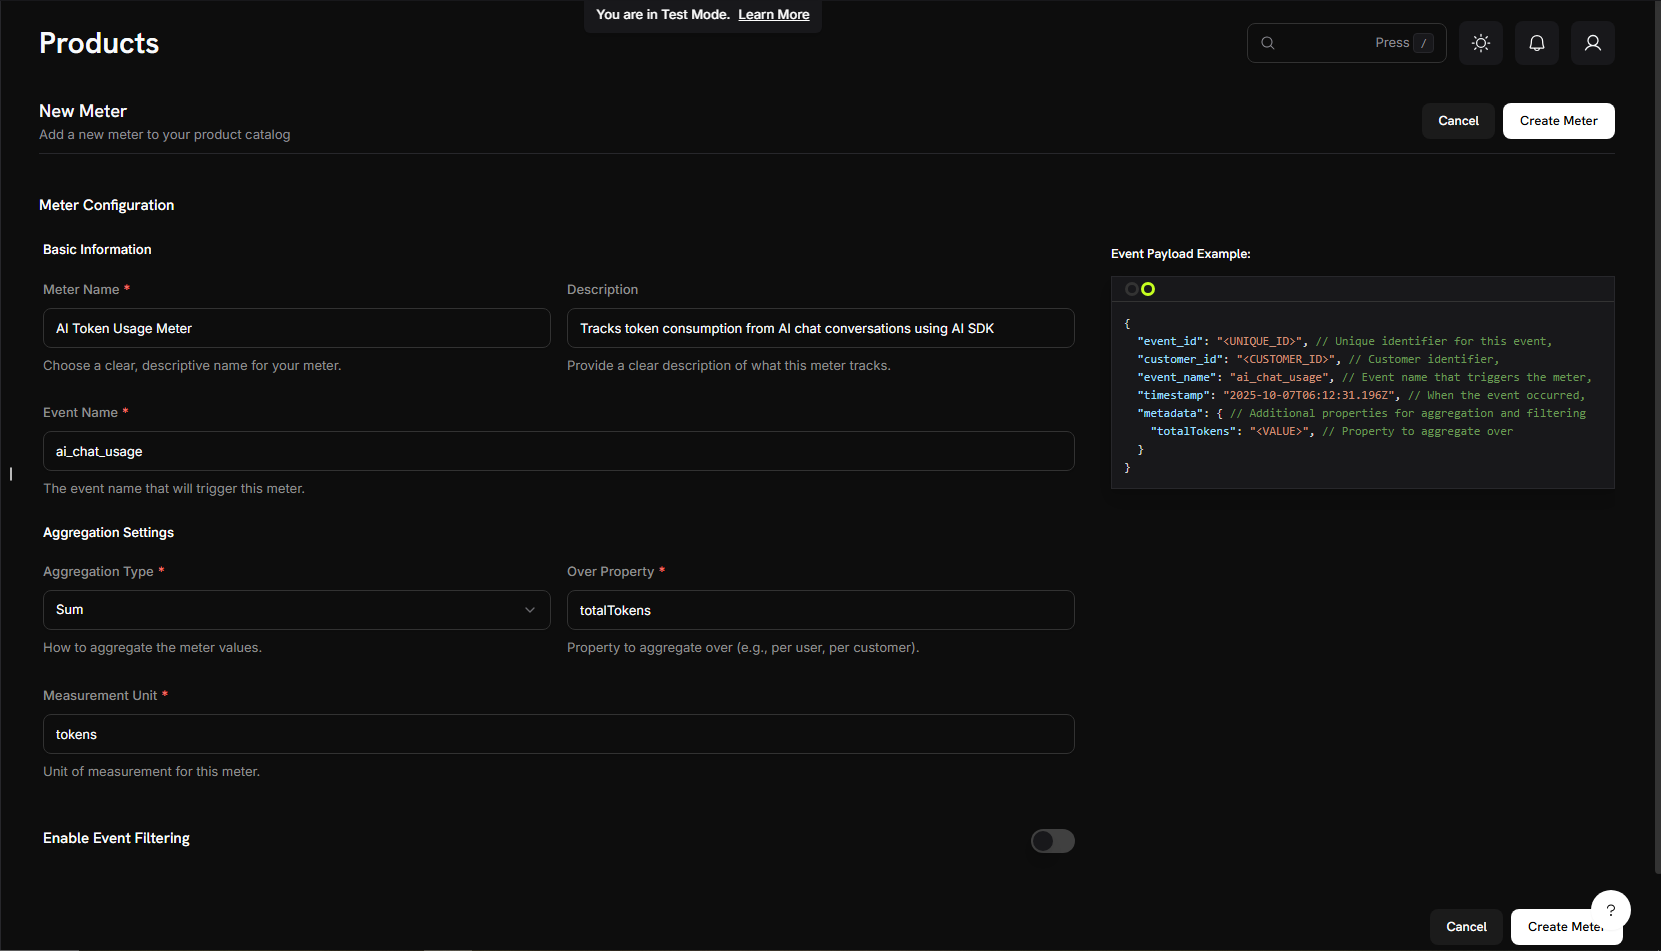
  <Step title="Enter the Meter Details">
    Enter the details for the chat service:

    **Meter Name** → `AI Token Usage Meter`

    **Description** → `Tracks token consumption from AI chat conversations using AI SDK`

    **Event Name** → `ai_chat_usage`

    <Warning>
      The event name `ai_chat_usage` must match the event name the application code sends. Event names are case-sensitive.
    </Warning>
  </Step>

  <Step title="Configure How Tokens Are Counted">
    Set the aggregation, which controls how the meter combines events:

    **Aggregation Type**: **Sum**

    **Over Property**: `totalTokens`

    **Measurement Unit**: `tokens`

    <Info>
      **Sum** adds up the tokens from every chat message. The LLM Blueprint sends `inputTokens`, `outputTokens`, and `totalTokens` in each event's metadata, and this meter sums `totalTokens`.
    </Info>
  </Step>

  <Step title="Create the Meter">
    1. Check that every setting matches the values above. You can't edit a meter after you create it.
    2. Click **Create Meter**.

    <Frame>
      <img src="https://mintcdn.com/dodopayments/4L3_sb2jJa5trJWD/images/cookbooks/ai-chat-app/meter-configuration.png?fit=max&auto=format&n=4L3_sb2jJa5trJWD&q=85&s=c5b4f56326b6825847c9fc7666056102" alt="Meter form filled in with the AI Token Usage Meter name, the ai_chat_usage event, and Sum aggregation" style={{ maxHeight: '500px', width: 'auto' }} width="1661" height="951" data-path="images/cookbooks/ai-chat-app/meter-configuration.png" />
    </Frame>

    <Check>
      **Meter created.** The "AI Token Usage Meter" is ready to count tokens. Next, connect it to a billing product.
    </Check>
  </Step>
</Steps>

## Step 2: Get Your API Keys

Collect the two API keys the app needs.

<Steps>
  <Step title="Get a Dodo Payments API Key">
    1. In the Dodo Payments dashboard, go to **Developer → API Keys**.
    2. Click **Add API Key**.
    3. Copy the API key.

    <Note>
      Create the key in test mode: a test mode key works only with test mode. You add the key to the `.env` file in Step 5.
    </Note>
  </Step>

  <Step title="Get a Google AI API Key">
    1. Go to [aistudio.google.com](https://aistudio.google.com/api-keys).
    2. Click **Get API Key**.
    3. Create an API key or use an existing one.
    4. Copy the key.

    <Note>
      Keep this key private. You add it to the `.env` file in Step 5.
    </Note>
  </Step>
</Steps>

***

## Step 3: Create Your Billing Product

Create a product that defines the pricing: \$0.01 per 1,000 tokens, with 10,000 free tokens. The product connects the meter to billing.

<Tip>
  **What you're building**: A product called "AI Chat Service" that charges for token usage above a free tier.
</Tip>

<Steps>
  <Step title="Navigate to Products">
    1. In the Dodo Payments dashboard, click **Products** in the sidebar.
    2. Click **Add Product**.
    3. Under **Pricing Type**, select **Usage Based Billing**.

    With this pricing type, Dodo Payments bills from meter usage instead of a fixed subscription price.
  </Step>

  <Step title="Enter Product Details">
    Fill in the required details:

    **Product Name**: → `AI Chat Service`

    **Description**: → `AI-powered chat service with automatic token-based billing`

    **Product Image**: Upload a relevant image.

    <Info>
      The name and description appear on customer invoices.
    </Info>
  </Step>

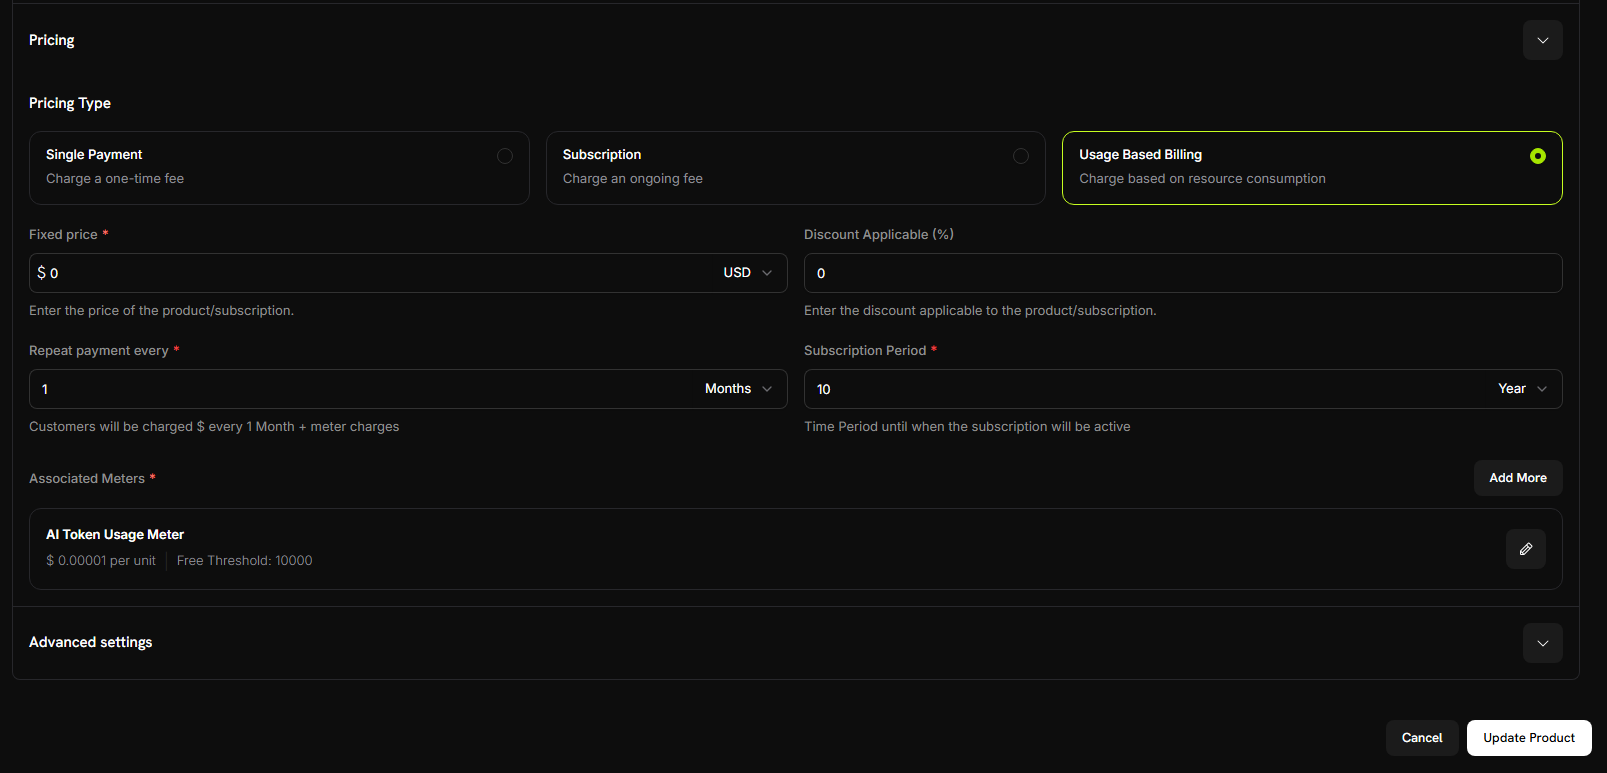
  <Step title="Connect Your Meter">
    Check that the product's pricing type is **Usage Based Billing**.

    Set the **Price** to `0`, so customers pay only for usage, with no base fee.

    Then link the meter you created:

    1. Scroll to the **Associated Meters** section.
    2. Click **Add meters**.
    3. Select **"AI Token Usage Meter"** from the dropdown.
    4. Confirm that the meter appears in the product configuration.

    <Check>
      The meter is connected to the product.
    </Check>
  </Step>

  <Step title="Set Your Pricing">
    Define the per-token price and the free tier:

    **Price per unit**: → `0.00001`. That's \$0.00001 per token, or \$0.01 per 1,000 tokens.

    **Free Threshold**: → `10000`. Each customer gets 10,000 free tokens per month.

    <Frame>
      <img src="https://mintcdn.com/dodopayments/4L3_sb2jJa5trJWD/images/cookbooks/ai-chat-app/product-pricing.png?fit=max&auto=format&n=4L3_sb2jJa5trJWD&q=85&s=e92dcb98316e970c1b921e0572f10b43" alt="Meter pricing on the AI Chat Service product, with price per unit and free threshold filled in" style={{ maxHeight: '500px', width: 'auto' }} width="1607" height="773" data-path="images/cookbooks/ai-chat-app/product-pricing.png" />
    </Frame>

    <Tip>
      **How billing works**: A customer who uses 25,000 tokens in a month pays for 15,000 tokens (25,000 − 10,000 free). 15,000 × \$0.00001 = \$0.15.
    </Tip>
  </Step>

  <Step title="Save Your Product">
    1. Review the settings:
       * Name: AI Chat Service
       * Meter: AI Token Usage Meter
       * Price: \$0.01 per 1,000 tokens
       * Free tier: 10,000 tokens
    2. Click **Save Changes**.

    <Check>
      **Product created.** Billing is configured, and customers are charged for the tokens they use.
    </Check>
  </Step>
</Steps>

## Step 4: Make a Test Purchase

Create a test customer by buying the product. The app sends usage events for this customer.

<Steps>
  <Step title="Get Your Payment Link">
    1. In the Dodo Payments dashboard, go to **Products**.
    2. Find the "AI Chat Service" product.
    3. Click **Share** next to the product.
    4. Copy the payment link.
  </Step>

  <Step title="Complete a Test Purchase">
    1. Open the payment link in a new browser tab.
    2. Enter [test payment details](/miscellaneous/testing-process) and complete the purchase.

    <Check>
      After the payment succeeds, the purchase creates a customer. The application code uses that customer's ID.
    </Check>
  </Step>

  <Step title="Find Your Customer ID">
    1. Go back to the Dodo Payments dashboard.
    2. Go to **Sales → Customers** in the sidebar.
    3. Find the customer you created, by its test email address.
    4. Copy the customer ID. It starts with `cus_`.

    <Note>
      Save this customer ID. You use it when you test the chat application.
    </Note>
  </Step>
</Steps>

## Step 5: Build the Chat Application

With billing set up and a test customer created, build the chat application.

<Steps>
  <Step title="Set Up Your Project">
    Create a directory and initialize the project:

    ```bash theme={null}
    mkdir ai-chat-app
    cd ai-chat-app
    npm init -y
    ```
  </Step>

  <Step title="Install Dependencies">
    Install the packages:

    ```bash theme={null}
    npm install express ai@5 @ai-sdk/google@2 @dodopayments/ingestion-blueprints dotenv
    npm install --save-dev typescript @types/express @types/node tsx
    ```
  </Step>

  <Step title="Configure TypeScript">
    Create `tsconfig.json`:

    ```json tsconfig.json theme={null}
    {
      "compilerOptions": {
        "target": "ES2020",
        "module": "ESNext",
        "moduleResolution": "node",
        "esModuleInterop": true,
        "strict": true,
        "skipLibCheck": true,
        "outDir": "./dist",
        "rootDir": "./src"
      },
      "include": ["src/**/*"],
      "exclude": ["node_modules"]
    }
    ```

    Update `package.json` to add the module type and scripts:

    ```json package.json theme={null}
    {
      "type": "module",
      "scripts": {
        "dev": "tsx src/server.ts",
        "build": "tsc",
        "start": "node dist/server.js"
      }
    }
    ```
  </Step>

  <Step title="Create the Project Structure">
    Create the source and static-file folders:

    ```bash theme={null}
    mkdir src public
    ```
  </Step>

  <Step title="Set Up Environment Variables">
    Create a `.env` file in the project root:

    ```bash .env theme={null}
    DODO_PAYMENTS_API_KEY=your_dodo_api_key_here
    DODO_PAYMENTS_ENVIRONMENT=test_mode
    GOOGLE_GENERATIVE_AI_API_KEY=your_google_api_key_here
    PORT=3000
    ```

    Replace the placeholder values with the API keys from Step 2. The Google provider for the AI SDK reads `GOOGLE_GENERATIVE_AI_API_KEY` by default.
  </Step>

  <Step title="Create the Backend Server">
    Create `src/server.ts` and paste in the server code below.
  </Step>
</Steps>

The complete chat server with billing, plus the matching `.env` and `package.json`:

<CodeGroup>
  ```typescript src/server.ts expandable theme={null}
  import express, { Request, Response } from 'express';
  import { generateText } from 'ai';
  import { google } from '@ai-sdk/google';
  import { createLLMTracker } from '@dodopayments/ingestion-blueprints';
  import 'dotenv/config';

  const app = express();
  app.use(express.json());
  app.use(express.static('public'));

  // Replace with your test customer ID
  const CUSTOMER_ID = 'cus_123';

  // Create tracker once with your meter event name
  const llmTracker = createLLMTracker({
    apiKey: process.env.DODO_PAYMENTS_API_KEY!,
    environment: process.env.DODO_PAYMENTS_ENVIRONMENT as 'test_mode' | 'live_mode',
    eventName: 'ai_chat_usage', // Must match your meter configuration
  });

  // Chat endpoint with conversation support
  app.post('/chat', async (req: Request, res: Response) => {
    try {
      const { messages } = req.body;

      if (!messages || !Array.isArray(messages)) {
        return res.status(400).json({ 
          error: 'Missing required field: messages (array)' 
        });
      }

      // Wrap AI SDK with automatic token tracking
      const trackedClient = llmTracker.wrap({
        client: { generateText },
        customerId: CUSTOMER_ID
      });

      // Generate AI response - tokens are automatically tracked!
      const response = await trackedClient.generateText({
        model: google('gemini-2.5-flash'),
        messages: messages
      });

      res.json({
        message: response.text,
        usage: {
          totalTokens: response.usage.totalTokens
        }
      });

    } catch (error: any) {
      console.error('Chat error:', error);
      res.status(500).json({ 
        error: 'Failed to process chat',
        details: error.message 
      });
    }
  });

  const PORT = process.env.PORT || 3000;
  app.listen(PORT, () => {
    console.log(`🚀 Server running at http://localhost:${PORT}`);
    console.log(`📊 Tracking event: ai_chat_usage`);
    console.log(`👤 Customer ID: ${CUSTOMER_ID}`);
    console.log(`🔧 Environment: ${process.env.DODO_PAYMENTS_ENVIRONMENT}`);
  });
  ```

  ```bash .env theme={null}
  # Add your API keys here
  DODO_PAYMENTS_API_KEY=your_dodo_api_key_here
  DODO_PAYMENTS_ENVIRONMENT=test_mode
  GOOGLE_GENERATIVE_AI_API_KEY=your_google_api_key_here
  PORT=3000
  ```

  ```json package.json expandable theme={null}
  {
    "name": "ai-chat-app",
    "version": "1.0.0",
    "type": "module",
    "scripts": {
      "dev": "tsx src/server.ts",
      "build": "tsc",
      "start": "node dist/server.js"
    },
    "dependencies": {
      "express": "^4.18.2",
      "ai": "^5.0.51",
      "@ai-sdk/google": "^2.0.16",
      "@dodopayments/ingestion-blueprints": "latest",
      "dotenv": "^16.0.3"
    },
    "devDependencies": {
      "typescript": "^5.0.0",
      "@types/express": "^4.17.17",
      "@types/node": "^20.0.0",
      "tsx": "^3.12.7"
    }
  }
  ```
</CodeGroup>

***

## Step 6: Add the Chat Interface

Add a chat interface that keeps the full conversation history. Create `public/index.html`:

```html public/index.html expandable theme={null}
<!DOCTYPE html>
<html lang="en">
  <head>
    <meta charset="UTF-8" />
    <meta name="viewport" content="width=device-width, initial-scale=1.0" />
    <title>AI Chat with Usage Billing</title>
    <style>
      * {
        margin: 0;
        padding: 0;
        box-sizing: border-box;
      }

      body {
        font-family: "Inter", -apple-system, BlinkMacSystemFont, "Segoe UI",
          Roboto, sans-serif;
        background: #0f0f1e;
        background-image: radial-gradient(
            at 0% 0%,
            rgba(102, 126, 234, 0.15) 0px,
            transparent 50%
          ),
          radial-gradient(
            at 100% 100%,
            rgba(118, 75, 162, 0.15) 0px,
            transparent 50%
          ),
          radial-gradient(
            at 50% 50%,
            rgba(102, 126, 234, 0.05) 0px,
            transparent 50%
          );
        height: 100vh;
        display: flex;
        justify-content: center;
        align-items: center;
        padding: 0;
        position: relative;
        overflow: hidden;
        margin: 0;
      }

      .chat-container {
        background: rgba(22, 22, 35, 0.95);
        border: 1px solid rgba(102, 126, 234, 0.2);
        border-radius: 0;
        box-shadow: 0 10px 40px rgba(0, 0, 0, 0.5);
        width: 100%;
        max-width: 100%;
        height: 100vh;
        display: flex;
        flex-direction: column;
        overflow: hidden;
        position: relative;
        z-index: 1;
      }

      .chat-header {
        background: linear-gradient(
          135deg,
          rgba(102, 126, 234, 0.15) 0%,
          rgba(118, 75, 162, 0.15) 100%
        );
        border-bottom: 1px solid rgba(102, 126, 234, 0.2);
        color: white;
        padding: 24px 28px;
        position: relative;
        overflow: hidden;
      }

      .chat-header h1 {
        font-size: 26px;
        margin-bottom: 6px;
        font-weight: 700;
        letter-spacing: -0.5px;
        color: #fff;
      }

      .chat-header p {
        font-size: 13px;
        opacity: 0.6;
        font-weight: 500;
        letter-spacing: 0.3px;
      }

      .chat-messages {
        flex: 1;
        overflow-y: auto;
        padding: 32px 10%;
        background: transparent;
        will-change: scroll-position;
        scroll-behavior: smooth;
      }

      .chat-messages::-webkit-scrollbar {
        width: 6px;
      }

      .chat-messages::-webkit-scrollbar-track {
        background: rgba(255, 255, 255, 0.05);
      }

      .chat-messages::-webkit-scrollbar-thumb {
        background: rgba(102, 126, 234, 0.3);
        border-radius: 3px;
      }

      .chat-messages::-webkit-scrollbar-thumb:hover {
        background: rgba(102, 126, 234, 0.5);
      }

      .message {
        margin-bottom: 20px;
        display: flex;
        gap: 12px;
        animation: slideIn 0.2s ease-out;
      }

      @keyframes slideIn {
        from {
          opacity: 0;
          transform: translateY(10px);
        }

        to {
          opacity: 1;
          transform: translateY(0);
        }
      }

      .message.user {
        flex-direction: row-reverse;
      }

      .message-avatar {
        width: 40px;
        height: 40px;
        border-radius: 12px;
        display: flex;
        align-items: center;
        justify-content: center;
        font-size: 20px;
        flex-shrink: 0;
        box-shadow: 0 2px 8px rgba(0, 0, 0, 0.2);
      }

      .message.user .message-avatar {
        background: linear-gradient(135deg, #667eea 0%, #764ba2 100%);
      }

      .message.assistant .message-avatar {
        background: linear-gradient(135deg, #f093fb 0%, #f5576c 100%);
      }

      .message-content {
        max-width: 65%;
      }

      .message-bubble {
        padding: 14px 18px;
        border-radius: 18px;
        line-height: 1.6;
        word-wrap: break-word;
        font-size: 15px;
        position: relative;
      }

      .message.user .message-bubble {
        background: linear-gradient(135deg, #667eea 0%, #764ba2 100%);
        color: white;
        border-bottom-right-radius: 6px;
        box-shadow: 0 2px 8px rgba(102, 126, 234, 0.3);
      }

      .message.assistant .message-bubble {
        background: rgba(255, 255, 255, 0.05);
        color: rgba(255, 255, 255, 0.95);
        border: 1px solid rgba(255, 255, 255, 0.1);
        border-bottom-left-radius: 6px;
        box-shadow: 0 2px 8px rgba(0, 0, 0, 0.2);
      }

      .message-meta {
        display: flex;
        gap: 10px;
        margin-top: 8px;
        font-size: 11px;
        color: rgba(255, 255, 255, 0.4);
        font-weight: 500;
      }

      .message.user .message-meta {
        justify-content: flex-end;
      }

      .token-badge {
        background: rgba(102, 126, 234, 0.2);
        color: #a8b9ff;
        padding: 4px 10px;
        border-radius: 12px;
        font-weight: 600;
        border: 1px solid rgba(102, 126, 234, 0.3);
      }

      .chat-input-area {
        padding: 24px 10% 32px;
        background: rgba(22, 22, 35, 0.95);
        border-top: 1px solid rgba(102, 126, 234, 0.2);
      }

      .input-wrapper {
        display: flex;
        gap: 12px;
        align-items: flex-end;
      }

      #messageInput {
        flex: 1;
        background: rgba(255, 255, 255, 0.05);
        border: 2px solid rgba(102, 126, 234, 0.2);
        border-radius: 16px;
        padding: 14px 20px;
        font-size: 15px;
        font-family: inherit;
        resize: none;
        max-height: 120px;
        transition: border-color 0.2s ease, background 0.2s ease;
        color: white;
        will-change: border-color;
        overflow: hidden;
        scrollbar-width: none;
        /* Firefox */
      }

      #messageInput::-webkit-scrollbar {
        display: none;
      }

      #messageInput::placeholder {
        color: rgba(255, 255, 255, 0.3);
      }

      #messageInput:focus {
        outline: none;
        border-color: #667eea;
        background: rgba(255, 255, 255, 0.08);
      }

      #sendBtn {
        background: linear-gradient(135deg, #667eea 0%, #764ba2 100%);
        color: white;
        border: none;
        width: 52px;
        height: 52px;
        border-radius: 16px;
        cursor: pointer;
        display: flex;
        align-items: center;
        justify-content: center;
        font-size: 22px;
        transition: transform 0.1s ease, box-shadow 0.1s ease;
        flex-shrink: 0;
        box-shadow: 0 2px 8px rgba(102, 126, 234, 0.4);
        position: relative;
      }

      #sendBtn:hover:not(:disabled) {
        transform: translateY(-1px);
        box-shadow: 0 4px 12px rgba(102, 126, 234, 0.5);
      }

      #sendBtn:active:not(:disabled) {
        transform: translateY(0);
      }

      #sendBtn:disabled {
        opacity: 0.4;
        cursor: not-allowed;
        box-shadow: none;
      }

      .typing-indicator {
        display: none;
        padding: 14px 18px;
        background: rgba(255, 255, 255, 0.05);
        border: 1px solid rgba(255, 255, 255, 0.1);
        border-radius: 18px;
        border-bottom-left-radius: 6px;
        box-shadow: 0 2px 8px rgba(0, 0, 0, 0.2);
        width: fit-content;
      }

      .typing-indicator.show {
        display: block;
      }

      .typing-dots {
        display: flex;
        gap: 6px;
      }

      .typing-dots span {
        width: 10px;
        height: 10px;
        border-radius: 50%;
        background: #667eea;
        animation: typing 1.4s infinite ease-in-out;
        will-change: transform, opacity;
      }

      .typing-dots span:nth-child(2) {
        animation-delay: 0.2s;
      }

      .typing-dots span:nth-child(3) {
        animation-delay: 0.4s;
      }

      @keyframes typing {
        0%,
        60%,
        100% {
          transform: translateY(0) scale(1);
          opacity: 0.6;
        }

        30% {
          transform: translateY(-12px) scale(1.1);
          opacity: 1;
        }
      }

      .error-message {
        background: rgba(239, 68, 68, 0.15);
        color: #fca5a5;
        padding: 14px 18px;
        border-radius: 12px;
        margin-bottom: 12px;
        display: none;
        border: 1px solid rgba(239, 68, 68, 0.3);
        font-size: 14px;
        font-weight: 500;
      }

      .error-message.show {
        display: block;
        animation: slideIn 0.3s ease;
      }

      .empty-state {
        text-align: center;
        padding: 80px 20px;
        color: rgba(255, 255, 255, 0.5);
      }

      .empty-state-icon {
        font-size: 72px;
        margin-bottom: 20px;
        animation: float 3s ease-in-out infinite;
      }

      @keyframes float {
        0%,
        100% {
          transform: translateY(0px);
        }

        50% {
          transform: translateY(-10px);
        }
      }

      .empty-state h2 {
        font-size: 24px;
        margin-bottom: 10px;
        color: rgba(255, 255, 255, 0.9);
        font-weight: 700;
        letter-spacing: -0.5px;
      }

      .empty-state p {
        font-size: 15px;
        color: rgba(255, 255, 255, 0.4);
        font-weight: 500;
      }
    </style>
  </head>

  <body>
    <div class="chat-container">
      <div class="chat-header">
        <h1>🤖 AI Chat Assistant</h1>
        <p>Powered by AI-SDK & Dodo Payments</p>
      </div>

      <div class="chat-messages" id="chatMessages">
        <div class="empty-state" id="emptyState">
          <div class="empty-state-icon">💬</div>
          <h2>Start a Conversation</h2>
          <p>Ask me anything! Your token usage is automatically tracked.</p>
        </div>
      </div>

      <div class="chat-input-area">
        <div class="error-message" id="errorMessage"></div>
        <div class="input-wrapper">
          <textarea
            id="messageInput"
            placeholder="Type your message here..."
            rows="1"
          ></textarea>
          <button id="sendBtn" onclick="sendMessage()">➤</button>
        </div>
      </div>
    </div>

    <script>
      let conversationHistory = [];

      const messageInput = document.getElementById("messageInput");
      let resizeTimeout;
      messageInput.addEventListener("input", function () {
        clearTimeout(resizeTimeout);
        resizeTimeout = setTimeout(() => {
          this.style.height = "auto";
          this.style.height = Math.min(this.scrollHeight, 120) + "px";
        }, 10);
      });

      // Send message on Enter (Shift+Enter for new line)
      messageInput.addEventListener("keydown", function (e) {
        if (e.key === "Enter" && !e.shiftKey) {
          e.preventDefault();
          sendMessage();
        }
      });

      async function sendMessage() {
        const input = document.getElementById("messageInput");
        const message = input.value.trim();

        if (!message) return;

        // Hide empty state
        document.getElementById("emptyState").style.display = "none";

        // Hide error
        document.getElementById("errorMessage").classList.remove("show");

        // Add user message to UI
        addMessage("user", message);

        // Add to conversation history
        conversationHistory.push({
          role: "user",
          content: message,
        });

        // Clear input
        input.value = "";
        input.style.height = "auto";

        // Show typing indicator
        showTypingIndicator();

        // Disable send button
        const sendBtn = document.getElementById("sendBtn");
        sendBtn.disabled = true;

        try {
          const response = await fetch("/chat", {
            method: "POST",
            headers: {
              "Content-Type": "application/json",
            },
            body: JSON.stringify({
              messages: conversationHistory,
            }),
          });

          const data = await response.json();

          if (!response.ok) {
            throw new Error(data.error || "Failed to get response");
          }

          // Hide typing indicator
          hideTypingIndicator();

          // Add assistant response to UI
          addMessage("assistant", data.message, data.usage);

          // Add to conversation history
          conversationHistory.push({
            role: "assistant",
            content: data.message,
          });
        } catch (error) {
          hideTypingIndicator();
          showError(error.message);
          // Remove the last user message from history since it failed
          conversationHistory.pop();
        } finally {
          sendBtn.disabled = false;
        }
      }

      function addMessage(role, content, usage = null) {
        const messagesDiv = document.getElementById("chatMessages");

        const messageDiv = document.createElement("div");
        messageDiv.className = `message ${role}`;

        const avatar = role === "user" ? "👤" : "🤖";

        let metaHTML = "";
        if (usage) {
          metaHTML = `
                    <div class="message-meta">
                        <span class="token-badge">📊 ${usage.totalTokens} tokens</span>
                    </div>
                `;
        }

        messageDiv.innerHTML = `
                <div class="message-avatar">${avatar}</div>
                <div class="message-content">
                    <div class="message-bubble">${escapeHtml(content)}</div>
                    ${metaHTML}
                </div>
            `;

        messagesDiv.appendChild(messageDiv);
        requestAnimationFrame(() => {
          messagesDiv.scrollTop = messagesDiv.scrollHeight;
        });
      }

      function showTypingIndicator() {
        const messagesDiv = document.getElementById("chatMessages");

        const typingDiv = document.createElement("div");
        typingDiv.className = "message assistant";
        typingDiv.id = "typingIndicator";
        typingDiv.innerHTML = `
                <div class="message-avatar">🤖</div>
                <div class="typing-indicator show">
                    <div class="typing-dots">
                        <span></span>
                        <span></span>
                        <span></span>
                    </div>
                </div>
            `;

        messagesDiv.appendChild(typingDiv);
        requestAnimationFrame(() => {
          messagesDiv.scrollTop = messagesDiv.scrollHeight;
        });
      }

      function hideTypingIndicator() {
        const typingIndicator = document.getElementById("typingIndicator");
        if (typingIndicator) {
          typingIndicator.remove();
        }
      }

      function showError(message) {
        const errorDiv = document.getElementById("errorMessage");
        errorDiv.textContent = "❌ " + message;
        errorDiv.classList.add("show");
      }

      function escapeHtml(text) {
        const div = document.createElement("div");
        div.textContent = text;
        return div.innerHTML.replace(/\n/g, "<br>");
      }
    </script>
  </body>
</html>
```

***

## Step 7: Test Your Chat Application

Test the chat app end to end and watch the usage reach Dodo Payments.

<Tip>
  **What you're testing**: You chat with the AI, confirm that the token events reach Dodo Payments, and check the billing calculation.
</Tip>

<Steps>
  <Step title="Start the Server">
    1. Check that the `.env` file has both API keys from Step 2.
    2. Start the development server:

    ```bash theme={null}
    npm run dev
    ```

    The server logs:

    ```text theme={null}
    🚀 Server running at http://localhost:3000
    📊 Tracking event: ai_chat_usage
    👤 Customer ID: {YOUR CUSTOMER_ID}
    🔧 Environment: test_mode
    ```

    <Check>
      The server is running.
    </Check>
  </Step>

  <Step title="Open the Chat Interface">
    1. Open your browser.
    2. Go to `http://localhost:3000`. The chat interface loads.

    <Note>
      Before you chat, set `CUSTOMER_ID` in `server.ts` to the test customer ID from Step 4, then restart the server.
    </Note>
  </Step>

  <Step title="Have Your First Conversation">
    Send these messages:

    1. **"What is artificial intelligence?"**
    2. **"How does machine learning work?"**
    3. **"Can you explain neural networks?"**

    Each response shows the number of tokens it used.

    <Check>
      If the AI responds and token counts appear, the app works.
    </Check>
  </Step>

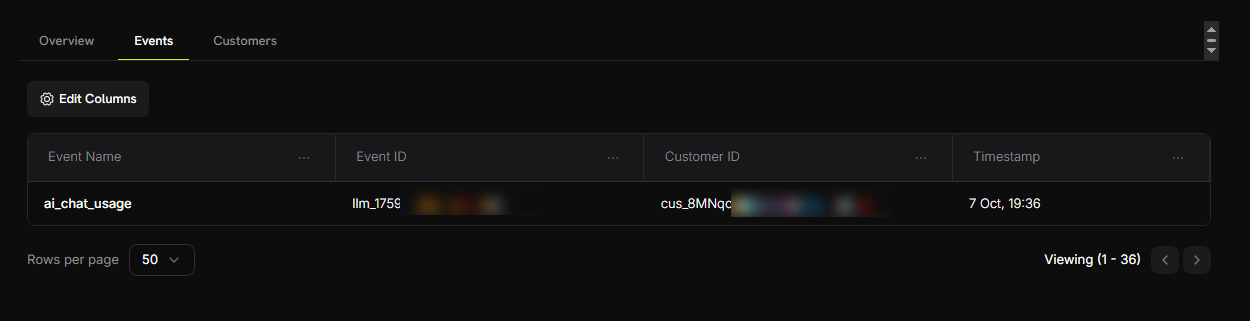
  <Step title="Check Your Dodo Payments Dashboard">
    Confirm that Dodo Payments receives the events:

    1. Open the Dodo Payments dashboard.
    2. Go to **Products → Meters** and open **AI Token Usage Meter**.
    3. Select the **Events** tab.
    4. Find your chat events in the list.

    **What to look for:**

    * Event name: `ai_chat_usage`
    * Customer ID: your test customer ID

    <Frame>
      <img src="https://mintcdn.com/dodopayments/4L3_sb2jJa5trJWD/images/cookbooks/ai-chat-app/meter-event.png?fit=max&auto=format&n=4L3_sb2jJa5trJWD&q=85&s=041f2bd60ce174a0e67f051e206d25b0" alt="Events tab of the AI Token Usage Meter listing ai_chat_usage events" style={{ maxHeight: '500px', width: 'auto' }} width="1250" height="321" data-path="images/cookbooks/ai-chat-app/meter-event.png" />
    </Frame>

    <Check>
      The list has one event for each message you sent.
    </Check>
  </Step>

  <Step title="Verify Token Counting">
    Send a few more messages, then check the aggregation:

    1. In the meter, select the **Customers** tab.
    2. Find your test customer.
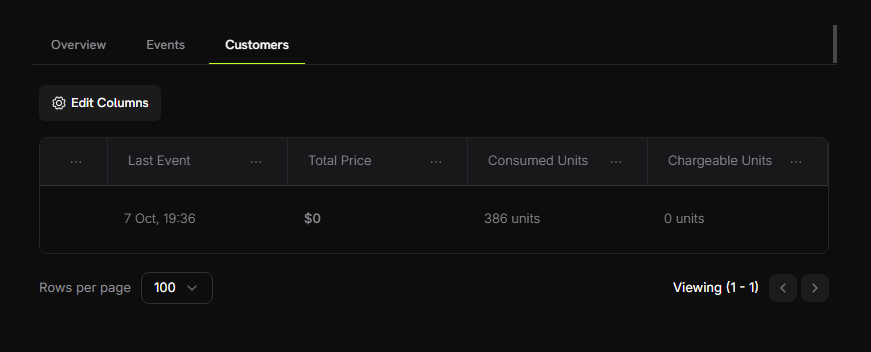
    3. Check the **Consumed Units** column. It shows the total tokens used.

    <Frame>
      <img src="https://mintcdn.com/dodopayments/oig3NPG69DDpua_S/images/cookbooks/ai-chat-app/aggregation.png?fit=max&auto=format&n=oig3NPG69DDpua_S&q=85&s=58fa883c91fae2d4e7d59e266ca8913b" alt="Customers tab of the meter showing consumed units for the test customer" style={{ maxHeight: '500px', width: 'auto' }} width="871" height="352" data-path="images/cookbooks/ai-chat-app/aggregation.png" />
    </Frame>

    <Info>
      The meter sums the `totalTokens` value from every event.
    </Info>
  </Step>

  <Step title="Test the Free Tier">
    Use enough tokens to pass the free tier:

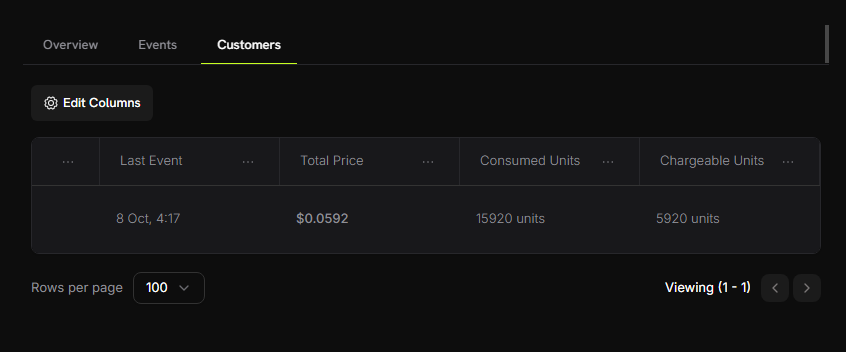
    1. Have several more conversations, until the total passes about 15,000 tokens.
    2. Open the meter's **Customers** tab again.
    3. Check the values:
       * Consumed Units: 15,000+ tokens
       * Chargeable Units: 5,000 (10,000 free tokens applied)
       * Total Price: \~\$0.05

    <Frame>
      <img src="https://mintcdn.com/dodopayments/oig3NPG69DDpua_S/images/cookbooks/ai-chat-app/free-tier-test.png?fit=max&auto=format&n=oig3NPG69DDpua_S&q=85&s=5ffc1f234acfbaaa2ab0c34805812785" alt="Customers tab of the meter showing consumed units, chargeable units, and total price after the free tier" style={{ maxHeight: '500px', width: 'auto' }} width="846" height="352" data-path="images/cookbooks/ai-chat-app/free-tier-test.png" />
    </Frame>

    <Check>
      **Usage-based billing works.** Customers are charged for the tokens they use.
    </Check>
  </Step>
</Steps>

***

## Troubleshooting

Common problems and their fixes:

<AccordionGroup>
  <Accordion title="Events not appearing in dashboard">
    **Possible causes:**

    * Event name doesn't match meter configuration exactly
    * Customer ID doesn't exist in your account
    * API key is invalid or expired
    * Network connectivity issues

    **Solutions:**

    1. Check that the event name matches the meter exactly. It's case-sensitive: `ai_chat_usage`.
    2. Check that the customer ID exists in the Dodo Payments dashboard.
    3. Test the API key with a simple API call.
    4. Check the server logs for errors.
  </Accordion>

  <Accordion title="Token counts showing zero">
    **Possible causes:**

    * Model not returning usage information
    * Incorrect SDK version

    **Solutions:**

    1. Check whether the model returns usage:

    ```typescript theme={null}
    const response = await generateText({ model: google('gemini-2.5-flash'), prompt: 'Hello' });
    console.log('Usage:', response.usage);
    ```

    2. Update the Blueprints package: `npm install @dodopayments/ingestion-blueprints@latest`
  </Accordion>

  <Accordion title="API key invalid error">
    **Possible causes:**

    * The API key belongs to the other mode.
    * The `.env` file has extra spaces or quotes.

    **Solutions:**

    * A key works only in the mode it was created in. Use a test mode key with `DODO_PAYMENTS_ENVIRONMENT=test_mode`, and a live mode key with `live_mode`.
    * Remove any quotes around keys in the `.env` file.
    * Generate a new key if needed.
  </Accordion>
</AccordionGroup>

Need help?

* [Discord Community](https://discord.gg/bYqAp4ayYh)
* [support@dodopayments.com](mailto:support@dodopayments.com)

***

## Congratulations! You Built an AI Chat App

You have a working AI chat application that tracks token usage and bills customers for it through Dodo Payments.

### Learn More

<CardGroup cols={2}>
  <Card title="LLM Blueprint" icon="robot" href="/developer-resources/ingestion-blueprints/llm">
    Track LLM token usage with the LLM Ingestion Blueprint.
  </Card>

  <Card title="Ingestion Blueprints SDK" icon="github" href="https://github.com/dodopayments/ingestion-blueprints">
    More examples in the GitHub repository.
  </Card>

  <Card title="Join Community" icon="discord" href="https://discord.gg/bYqAp4ayYh">
    Get help and share your projects on Discord.
  </Card>
</CardGroup>


This documentation is built and hosted on [Mintlify](https://mintlify.com), a developer documentation platform.