> ## Documentation Index
> Fetch the complete documentation index at: https://docs.dodopayments.com/llms.txt
> Use this file to discover all available pages before exploring further.

# Inline Checkout

> Embed Dodo Payments checkout directly into your page layout. The inline checkout SDK renders a secure payment form that matches your page design.

Inline checkout embeds a secure payment form directly into your page layout. Unlike [overlay checkout](/developer-resources/overlay-checkout), which opens as a modal, inline checkout becomes part of your page. You control the layout and can display your own order summary alongside the checkout form.

<Frame>
  <img src="https://mintcdn.com/dodopayments/HpxJAc8zNlxzewa_/images/inline-checkout/cover.png?fit=max&auto=format&n=HpxJAc8zNlxzewa_&q=85&s=99c1a92ef01680248a421d3f057b02cd" alt="Inline checkout form embedded in a product page with order summary" style={{ maxHeight: '500px', width: 'auto' }} width="839" height="565" data-path="images/inline-checkout/cover.png" />
</Frame>

## How It Works

Inline checkout renders a secure Dodo Payments frame into a container on your page. The frame handles collecting customer information and payment details. Your page displays items, totals, and other information. The SDK lets your page and the checkout frame communicate with each other.

When checkout completes, Dodo Payments creates the payment, or the subscription for a subscription product, and sends a webhook so you can provision access.
<Note>
  The inline checkout frame securely handles all sensitive payment information, ensuring PCI compliance without additional certification on your end.
</Note>

## What Makes a Good Inline Checkout

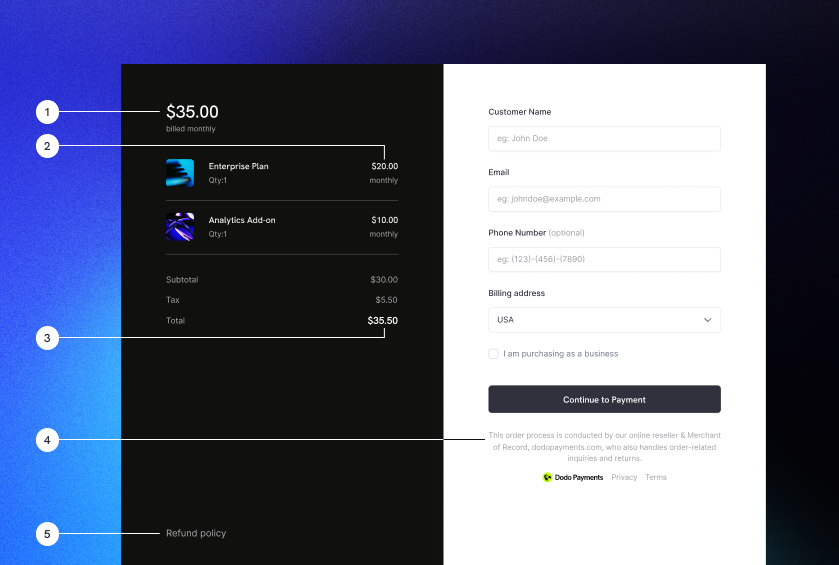
Customers need to know who they're buying from, what they're buying, and how much they're paying. Your implementation must include:

<Frame caption="Example inline checkout layout showing required elements">
  <img src="https://mintcdn.com/dodopayments/HpxJAc8zNlxzewa_/images/inline-checkout/example.png?fit=max&auto=format&n=HpxJAc8zNlxzewa_&q=85&s=c7c00fb01b76f7fb3d9831fc922b9fe9" alt="Inline checkout example with required elements labeled" style={{ maxHeight: '500px', width: 'auto' }} width="839" height="565" data-path="images/inline-checkout/example.png" />
</Frame>

1. **Recurring information**: If recurring, show how often it recurs and the total to pay on renewal. If a trial, show the trial duration.
2. **Item descriptions**: A description of what's being purchased.
3. **Transaction totals**: Subtotal, total tax, and grand total, including currency.
4. **Dodo Payments footer**: The complete inline checkout frame, including the footer with Dodo Payments information, terms of sale, and privacy policy.
5. **Refund policy**: A link to your refund policy, if it differs from the Dodo Payments standard refund policy.
<Warning>
  Always display the complete inline checkout frame, including the footer. Removing or hiding legal information violates compliance requirements.
</Warning>

## Customer Journey

The checkout flow depends on your checkout session configuration. Depending on how you configure the session, customers may see all information on a single page or across multiple steps.

<Steps>
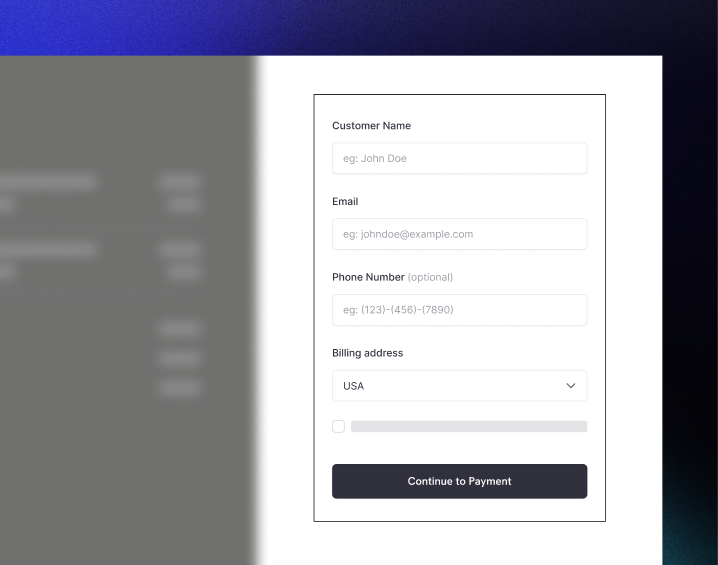
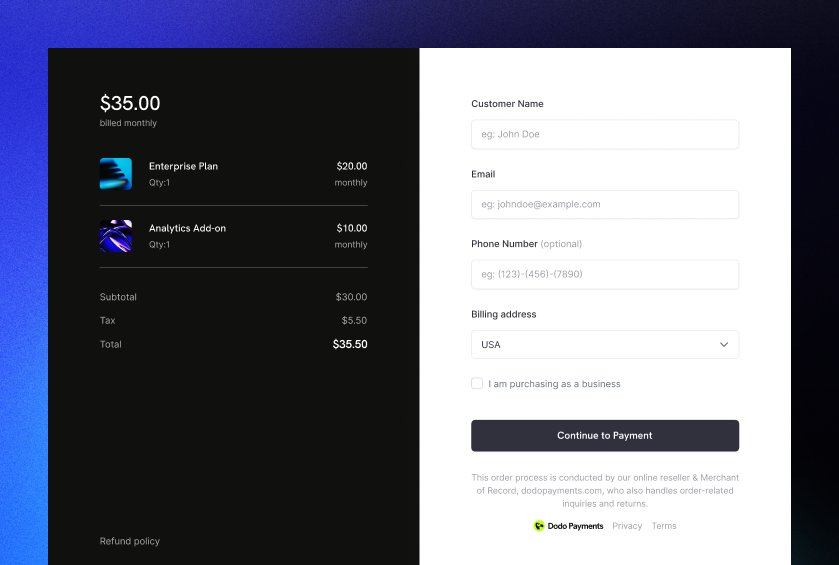
  <Step title="Customer opens checkout">
    You open inline checkout by passing a checkout URL. Use SDK events, such as `checkout.breakdown`, to show and update on-page information.

    <img src="https://mintcdn.com/dodopayments/HpxJAc8zNlxzewa_/images/inline-checkout/1.png?fit=max&auto=format&n=HpxJAc8zNlxzewa_&q=85&s=b3def4e750c3c487196d22519503ae2a" alt="Initial checkout page with items list and payment form" style={{ maxHeight: '500px', width: 'auto' }} width="718" height="565" data-path="images/inline-checkout/1.png" />
  </Step>

  <Step title="Customer enters their details">
    Inline checkout first asks customers to enter their email address, select their country, and (where required) enter their ZIP or postal code. This step gathers all necessary information to determine taxes and available payment options.

    You can prefill customer details and present saved addresses to streamline the experience.
  </Step>

  <Step title="Customer selects payment method">
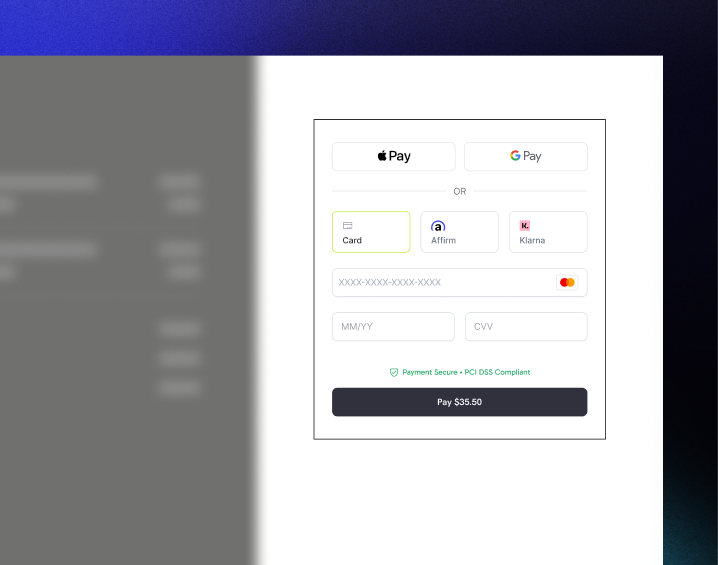
    After entering their details, customers are presented with available payment methods and the payment form. Options may include credit or debit card, PayPal, Apple Pay, Google Pay, and other local payment methods based on their location.

    Display saved payment methods if available to speed up checkout.

    <img src="https://mintcdn.com/dodopayments/HpxJAc8zNlxzewa_/images/inline-checkout/2.png?fit=max&auto=format&n=HpxJAc8zNlxzewa_&q=85&s=cbfa4958d0892feaa3aa474c4fe42c48" alt="Available payment methods and card details form" style={{ maxHeight: '500px', width: 'auto' }} width="718" height="565" data-path="images/inline-checkout/2.png" />
  </Step>

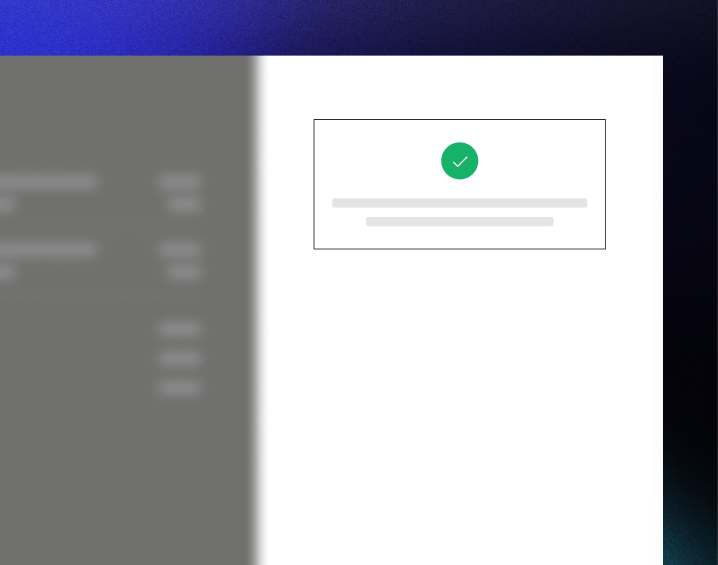
  <Step title="Checkout completed">
    Dodo Payments routes every payment to the best acquirer for that sale to get the best possible chance of success. Customers enter a success workflow that you can build.

    <img src="https://mintcdn.com/dodopayments/HpxJAc8zNlxzewa_/images/inline-checkout/3.png?fit=max&auto=format&n=HpxJAc8zNlxzewa_&q=85&s=b75ac3d25abf7dc18a226904af72641b" alt="Success screen with confirmation checkmark" style={{ maxHeight: '500px', width: 'auto' }} width="718" height="565" data-path="images/inline-checkout/3.png" />
  </Step>

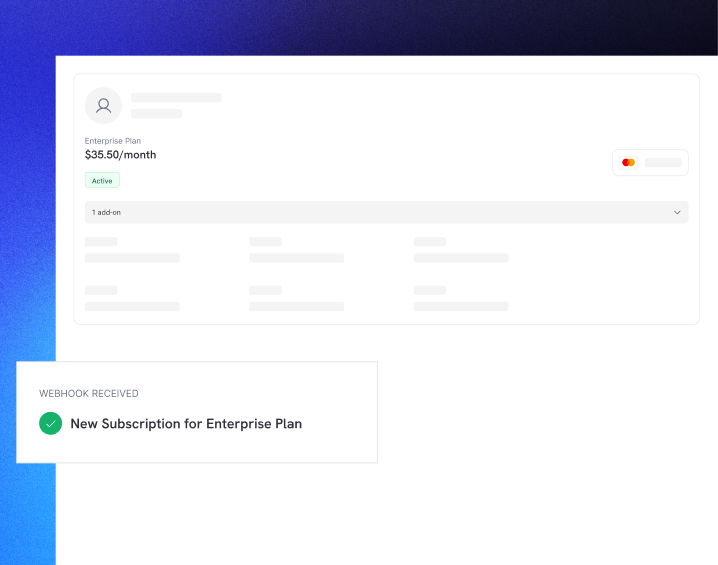
  <Step title="Dodo Payments creates the payment or subscription">
    Dodo Payments creates the payment, or the subscription for a subscription product, and sends a webhook so you can provision access. The payment method the customer used is held on file for renewals or subscription changes.

    <img src="https://mintcdn.com/dodopayments/HpxJAc8zNlxzewa_/images/inline-checkout/4.png?fit=max&auto=format&n=HpxJAc8zNlxzewa_&q=85&s=645d66da0aa02ac842384f85814c5922" alt="Subscription created with webhook notification" style={{ maxHeight: '500px', width: 'auto' }} width="718" height="565" data-path="images/inline-checkout/4.png" />
  </Step>
</Steps>

## Quick Start

Install the SDK, initialize it for inline mode, and open checkout in a container element:

```typescript theme={null}
import { DodoPayments } from "dodopayments-checkout";

DodoPayments.Initialize({
  mode: "test",
  displayType: "inline",
  onEvent: (event) => {
    console.log("Checkout event:", event);
  },
});

DodoPayments.Checkout.open({
  checkoutUrl: "https://test.checkout.dodopayments.com/session/cks_123",
  elementId: "dodo-inline-checkout"
});
```

<Tip>
  Ensure you have a container element with the corresponding `id` on your page: `<div id="dodo-inline-checkout"></div>`.
</Tip>

## Step-by-Step Integration

<Steps>
  <Step title="Install the SDK">
    Install via npm, yarn, or pnpm:

    <CodeGroup>
      ```bash npm theme={null}
      npm install dodopayments-checkout
      ```

      ```bash yarn theme={null}
      yarn add dodopayments-checkout
      ```

      ```bash pnpm theme={null}
      pnpm add dodopayments-checkout
      ```
    </CodeGroup>
  </Step>

  <Step title="Initialize the SDK for Inline Display">
    Initialize the SDK and specify `displayType: 'inline'`. Listen for the `checkout.breakdown` event to update your UI with real-time tax and total calculations:

    ```typescript theme={null}
    import { DodoPayments } from "dodopayments-checkout";

    DodoPayments.Initialize({
      mode: "test",
      displayType: "inline",
      onEvent: (event) => {
        if (event.event_type === "checkout.breakdown") {
          const breakdown = event.data?.message;
          // Update your UI with breakdown.subTotal, breakdown.tax, breakdown.total, etc.
        }
      },
    });
    ```
  </Step>

  <Step title="Create a Container Element">
    Add an element to your HTML where the checkout frame will be injected:

    ```html theme={null}
    <div id="dodo-inline-checkout"></div>
    ```
  </Step>

  <Step title="Open the Checkout">
    Call `DodoPayments.Checkout.open()` with the `checkoutUrl` and the `elementId` of your container:

    ```typescript theme={null}
    DodoPayments.Checkout.open({
      checkoutUrl: "https://test.checkout.dodopayments.com/session/cks_123",
      elementId: "dodo-inline-checkout"
    });
    ```
  </Step>

  <Step title="Test Your Integration">
    1. Start your development server:

    ```bash theme={null}
    npm run dev
    ```

    2. Test the checkout flow:
       * Enter your email and address details in the inline frame
       * Verify that your custom order summary updates in real-time
       * Test the payment flow using test credentials
       * Confirm redirects work correctly

    <Check>
      You should see `checkout.breakdown` events logged in your browser console if you added a console log in the `onEvent` callback.
    </Check>
  </Step>

  <Step title="Go Live">
    When ready for production:

    1. Change the mode to `'live'`:

    ```typescript theme={null}
    DodoPayments.Initialize({
      mode: "live",
      displayType: "inline",
      onEvent: (event) => {
        // Handle events
      }
    });
    ```

    2. Update your checkout URLs to use live checkout sessions from your backend
    3. Test the complete flow in production
  </Step>
</Steps>

## Complete React Example

This example demonstrates how to implement a custom order summary alongside the inline checkout, keeping them in sync using the `checkout.breakdown` event:

```tsx theme={null}
"use client";

import { useEffect, useState } from 'react';
import { DodoPayments, CheckoutBreakdownData } from 'dodopayments-checkout';

export default function CheckoutPage() {
  const [breakdown, setBreakdown] = useState<Partial<CheckoutBreakdownData>>({});

  useEffect(() => {
    // 1. Initialize the SDK
    DodoPayments.Initialize({
      mode: 'test',
      displayType: 'inline',
      onEvent: (event) => {
        // 2. Listen for the 'checkout.breakdown' event
        if (event.event_type === "checkout.breakdown") {
          const message = event.data?.message as CheckoutBreakdownData;
          if (message) setBreakdown(message);
        }
      }
    });

    // 3. Open the checkout in the specified container
    DodoPayments.Checkout.open({
      checkoutUrl: 'https://test.checkout.dodopayments.com/session/cks_123',
      elementId: 'dodo-inline-checkout'
    });

    return () => DodoPayments.Checkout.close();
  }, []);

  const format = (amt: number | null | undefined, curr: string | null | undefined) => 
    amt != null && curr ? `${curr} ${(amt/100).toFixed(2)}` : '0.00';

  const currency = breakdown.currency ?? breakdown.finalTotalCurrency ?? '';

  return (
    <div className="flex flex-col md:flex-row min-h-screen">
      {/* Left Side - Checkout Form */}
      <div className="w-full md:w-1/2 flex items-center">
        <div id="dodo-inline-checkout" className='w-full' />
      </div>

      {/* Right Side - Custom Order Summary */}
      <div className="w-full md:w-1/2 p-8 bg-gray-50">
        <h2 className="text-2xl font-bold mb-4">Order Summary</h2>
        <div className="space-y-2">
          {breakdown.subTotal != null && (
            <div className="flex justify-between">
              <span>Subtotal</span>
              <span>{format(breakdown.subTotal, currency)}</span>
            </div>
          )}
          {breakdown.discount != null && breakdown.discount > 0 && (
            <div className="flex justify-between">
              <span>Discount</span>
              <span>{format(breakdown.discount, currency)}</span>
            </div>
          )}
          {breakdown.tax != null && (
            <div className="flex justify-between">
              <span>Tax</span>
              <span>{format(breakdown.tax, currency)}</span>
            </div>
          )}
          <hr />
          {(breakdown.finalTotal ?? breakdown.total) != null && (
            <div className="flex justify-between font-bold text-xl">
              <span>Total</span>
              <span>{format(breakdown.finalTotal ?? breakdown.total, breakdown.finalTotalCurrency ?? currency)}</span>
            </div>
          )}
        </div>
      </div>
    </div>
  );
}
```

## API Reference

### Initialize

Call `Initialize` once to set up the SDK:

```typescript theme={null}
interface InitializeOptions {
  mode: "test" | "live";
  displayType?: "overlay" | "inline";
  onEvent: (event: CheckoutEvent) => void;
}

DodoPayments.Initialize(options);
```

| Option | Type | Required | Description |
| - | - | - | - |
| `mode` | `"test" \| "live"` | Yes | Environment mode. |
| `displayType` | `"inline" \| "overlay"` | Yes | Must be set to `"inline"` to embed the checkout. |
| `onEvent` | `function` | Yes | Callback function for handling checkout events. |

### Open Checkout

Open the checkout frame in a container:

```typescript theme={null}
export type FontSize = "xs" | "sm" | "md" | "lg" | "xl" | "2xl";
export type FontWeight = "normal" | "medium" | "bold" | "extraBold";

interface CheckoutOptions {
  checkoutUrl: string;
  elementId: string;
  options?: {
    showTimer?: boolean;
    showSecurityBadge?: boolean;
    manualRedirect?: boolean;
    payButtonText?: string;
    fontSize?: FontSize;
    fontWeight?: FontWeight;
  };
}

DodoPayments.Checkout.open(options);
```

| Option | Type | Required | Description |
| - | - | - | - |
| `checkoutUrl` | `string` | Yes | Checkout session URL from the [create checkout session API](/api-reference/checkout-sessions/create) |
| `elementId` | `string` | Yes | The `id` of the DOM element where the checkout should be rendered |
| `options.showTimer` | `boolean` | No | Show or hide the session timer. Defaults to `true`. When set to `false`, you receive the `checkout.link_expired` event when the session expires. |
| `options.showSecurityBadge` | `boolean` | No | Show or hide the security badge. Defaults to `true` |
| `options.manualRedirect` | `boolean` | No | When `true`, prevent automatic redirects. Checkout emits `checkout.status` with the payment outcome and `checkout.redirect_requested` with the URL to open, and you handle navigation |
| `options.payButtonText` | `string` | No | Custom text for the pay button |
| `options.fontSize` | `"xs" \| "sm" \| "md" \| "lg" \| "xl" \| "2xl"` | No | Global font size for the checkout |
| `options.fontWeight` | `"normal" \| "medium" \| "bold" \| "extraBold"` | No | Global font weight for the checkout |

### Close Checkout

Programmatically remove the checkout frame and clean up event listeners:

```typescript theme={null}
DodoPayments.Checkout.close();
```

### Check Status

Check if the checkout frame is currently injected:

```typescript theme={null}
const isOpen = DodoPayments.Checkout.isOpen();
// Returns: boolean
```

### Events

The SDK provides real-time events through the `onEvent` callback. For inline checkout, `checkout.breakdown` is particularly useful for syncing your UI:

```typescript theme={null}
DodoPayments.Initialize({
  mode: "test",
  displayType: "inline",
  onEvent: (event: CheckoutEvent) => {
    switch (event.event_type) {
      case "checkout.opened":
        // Frame has loaded
        break;
      case "checkout.form_ready":
        // Form is ready for user input
        break;
      case "checkout.breakdown":
        // Prices, taxes, or discounts updated
        break;
      case "checkout.customer_details_submitted":
        // Customer details submitted
        break;
      case "checkout.pay_button_clicked":
        // Customer clicked pay button
        break;
      case "checkout.redirect":
        // Checkout will redirect
        break;
      case "checkout.error":
        console.error("Error:", event.data?.message);
        break;
      case "checkout.link_expired":
        // Session expired (only when showTimer is false)
        break;
    }
  }
});
```

| Event | Description |
| - | - |
| `checkout.opened` | Checkout frame has been loaded |
| `checkout.form_ready` | Form is ready for user input. Use this to hide loading states |
| `checkout.breakdown` | Prices, taxes, or discounts updated |
| `checkout.customer_details_submitted` | Customer details submitted |
| `checkout.pay_button_clicked` | Customer clicked the pay button. Useful for analytics and tracking conversion funnels |
| `checkout.redirect` | Checkout will redirect (e.g., to a bank page) |
| `checkout.error` | An error occurred during checkout |
| `checkout.link_expired` | The checkout session expired. Only received when `showTimer` is set to `false` |

### Checkout Breakdown Data

The `checkout.breakdown` event provides pricing and tax information:

```typescript theme={null}
interface CheckoutBreakdownData {
  subTotal?: number;          // Amount in cents
  discount?: number;          // Amount in cents
  tax?: number;               // Amount in cents
  total?: number;             // Amount in cents
  currency?: string;          // e.g., "USD"
  finalTotal?: number;        // Final amount including adjustments
  finalTotalCurrency?: string; // Currency for the final total
}
```

The event fires when the checkout frame loads, and again whenever the price is recalculated, for example when the customer selects a country or enters a postal code that changes the tax.

**Field Details:**

| Field | Description |
| - | - |
| `subTotal` | Sum of all line items before discounts or taxes |
| `discount` | Total value of all applied discounts |
| `tax` | Calculated tax amount. Updates dynamically as the user interacts with address fields |
| `total` | Result of `subTotal - discount + tax` in the session's base currency |
| `currency` | The ISO currency code (e.g., `"USD"`) for the standard subtotal, discount, and tax values. |
| `finalTotal` | The actual amount the customer is charged. This may include additional foreign exchange adjustments or local payment method fees that aren't part of the basic price breakdown. |
| `finalTotalCurrency` | The currency in which the customer is actually paying. This can differ from `currency` if [purchasing power parity](/features/purchasing-power-parity) or local currency conversion is active. |

**Integration Tips:**

1. **Currency Formatting**: Prices are integers in the smallest currency unit, for example cents for USD. For two-decimal currencies, divide by 100 before formatting with `Intl.NumberFormat`. Zero-decimal currencies such as JPY have no smaller unit, so don't divide them.
2. **Handling Initial States**: When the checkout first loads, `tax` and `discount` may be `0` or `null` until the user provides their billing information or applies a code. Handle these states gracefully (e.g., showing a dash `—` or hiding the row).
3. **The "Final Total" vs "Total"**: While `total` gives you the standard price calculation, `finalTotal` is the source of truth for the transaction. If `finalTotal` is present, it reflects exactly what will be charged to the customer's card.
4. **Real-time Feedback**: Use the `tax` field to show users that taxes are being calculated in real-time. This provides a "live" feel to your checkout page and reduces friction during the address entry step.

## CDN Implementation

For quick integration without a build step, load the SDK from CDN:

```html theme={null}
<!DOCTYPE html>
<html lang="en">
<head>
  <meta charset="UTF-8">
  <meta name="viewport" content="width=device-width, initial-scale=1.0">
  <title>Dodo Payments Inline Checkout</title>
  
  <script src="https://cdn.jsdelivr.net/npm/dodopayments-checkout@latest/dist/index.js"></script>
  <script>
    DodoPaymentsCheckout.DodoPayments.Initialize({
      mode: "test",
      displayType: "inline",
      onEvent: (event) => {
        console.log('Checkout event:', event);
      }
    });
  </script>
</head>
<body>
  <div id="dodo-inline-checkout"></div>

  <script>
    DodoPaymentsCheckout.DodoPayments.Checkout.open({
      checkoutUrl: "https://test.checkout.dodopayments.com/session/cks_123",
      elementId: "dodo-inline-checkout"
    });
  </script>
</body>
</html>
```

## Update Payment Method

Inline checkout supports payment method updates for subscriptions. When a customer needs to update their payment method for an active subscription or to reactivate an on-hold subscription, you can render the update flow directly within your page layout.

### How It Works

1. Call the [Update Payment Method API](/features/subscription#update-payment-method-for-active-subscription) to get a `payment_link`:

```typescript theme={null}
// On your server. `client` is the Dodo Payments server SDK (`new DodoPayments()` from the `dodopayments` package).
const response = await client.subscriptions.updatePaymentMethod('sub_123', {
  payment_method: { type: 'new', return_url: 'https://example.com/return' }
});
```

2. Pass the returned `payment_link` as the `checkoutUrl` to open inline checkout:

```typescript theme={null}
DodoPayments.Checkout.open({
  checkoutUrl: response.payment_link,
  elementId: "dodo-inline-checkout"
});
```

The inline frame renders only the payment method collection form. Customers can enter new card details or select a saved payment method without leaving your page.

### For On-Hold Subscriptions

When updating the payment method for a subscription in `on_hold` status, Dodo Payments automatically creates a charge for any remaining dues. Monitor the `payment.succeeded` and `subscription.active` webhooks to confirm reactivation.

```typescript theme={null}
const response = await client.subscriptions.updatePaymentMethod('sub_123', {
  payment_method: { type: 'new', return_url: 'https://example.com/return' }
});

if (response.payment_id) {
  // Charge created for remaining dues
  DodoPayments.Checkout.open({
    checkoutUrl: response.payment_link,
    elementId: "dodo-inline-checkout"
  });
}
```

<Tip>
  You can also use an existing saved payment method instead of collecting new details by passing `type: 'existing'` with a `payment_method_id` to the Update Payment Method API.
</Tip>

## Error Handling

Always implement error handling in your `onEvent` callback:

```typescript theme={null}
DodoPayments.Initialize({
  mode: "test",
  displayType: "inline",
  onEvent: (event: CheckoutEvent) => {
    if (event.event_type === "checkout.error") {
      console.error("Checkout error:", event.data?.message);
      // Show user-friendly error message
    }
  }
});
```

<Warning>
  Always handle the `checkout.error` event to provide a good user experience when errors occur.
</Warning>

## Best Practices

1. **Responsive Design**: Ensure your container element has enough width and height. The iframe will typically expand to fill its container.
2. **Synchronization**: Use the `checkout.breakdown` event to keep your custom order summary or pricing tables in sync with what the user sees in the checkout frame.
3. **Skeleton States**: Show a loading indicator in your container until the `checkout.opened` event fires.
4. **Cleanup**: Call `DodoPayments.Checkout.close()` when your component unmounts to clean up the iframe and event listeners.

<Info>
  For dark mode implementations, use `#0d0d0d` as the background color for optimal visual integration with the inline checkout frame.
</Info>

## Payment Status Validation

<Warning>
  Do not rely solely on inline checkout events to determine payment success or failure. Always implement server-side validation using webhooks and/or polling.
</Warning>

### Why Server-Side Validation is Essential

While inline checkout events provide real-time feedback, they should not be your only source of truth for payment status. Network issues, browser crashes, or users closing the page can cause events to be missed. To ensure reliable payment validation:

1. **Listen to webhook events** - Dodo Payments sends webhooks for payment status changes
2. **Implement a polling mechanism** - Your frontend should poll your server for status updates
3. **Combine both approaches** - Use webhooks as the primary source and polling as a fallback

### Recommended Architecture

```mermaid theme={null}
flowchart TB
    subgraph Frontend["Your Frontend"]
        IC[Inline Checkout<br/>Dodo iframe]
        CP[Your Checkout Page]
        IC -->|events| CP
    end

    subgraph Server["Your Server"]
        WH[Webhook Handler]
        DB[(Database)]
        API[Status API]
        WH --> DB
        API --> DB
    end

    subgraph Dodo["Dodo Payments"]
        PP[Payment Processor]
    end

    CP -->|Poll for status| API
    PP -->|Webhooks| WH
    IC -.->|Payment request| PP
```

### Implementation Steps

**1. Listen for checkout events** - When the user clicks pay, start preparing to verify the status:

```typescript theme={null}
onEvent: (event) => {
  if (event.event_type === 'checkout.pay_button_clicked') {
    // Start polling your server for confirmed status
    startPolling();
  }
}
```

**2. Poll your server** - Create an endpoint that checks your database for the payment status (updated by webhooks):

```typescript theme={null}
// Poll every 2 seconds until status is confirmed
const interval = setInterval(async () => {
  const { status } = await fetch(`/api/payments/${paymentId}/status`).then(r => r.json());
  if (status === 'succeeded' || status === 'failed') {
    clearInterval(interval);
    handlePaymentResult(status);
  }
}, 2000);
```

**3. Handle webhooks server-side** - Update your database when Dodo sends `payment.succeeded` or `payment.failed` webhooks. See our [Webhooks documentation](/developer-resources/webhooks) for details.

## Troubleshooting

<AccordionGroup>
  <Accordion title="Checkout frame is not appearing">
    * Verify that `elementId` matches the `id` of a `div` that actually exists in the DOM
    * Ensure `displayType: 'inline'` was passed to `Initialize`
    * Check that the `checkoutUrl` is valid
  </Accordion>

  <Accordion title="Taxes are not updating in my UI">
    * Ensure you are listening for the `checkout.breakdown` event
    * Taxes are only calculated after the user enters a valid country and postal code in the checkout frame
  </Accordion>
</AccordionGroup>

## Digital Wallets

For detailed information about setting up Apple Pay, Google Pay, and other digital wallets, see the [Digital Wallets](/features/payment-methods/digital-wallets) page.

### Quick Setup for Apple Pay

<Info>
  Domain verification is only required for inline (embedded) checkout. It is not required for hosted checkout.
</Info>

<Warning>
  Apple Pay is not available for overlay checkout.
</Warning>

Apple Pay is verified per-domain from the dashboard.

<Steps>
  <Step title="Open Wallet domains">
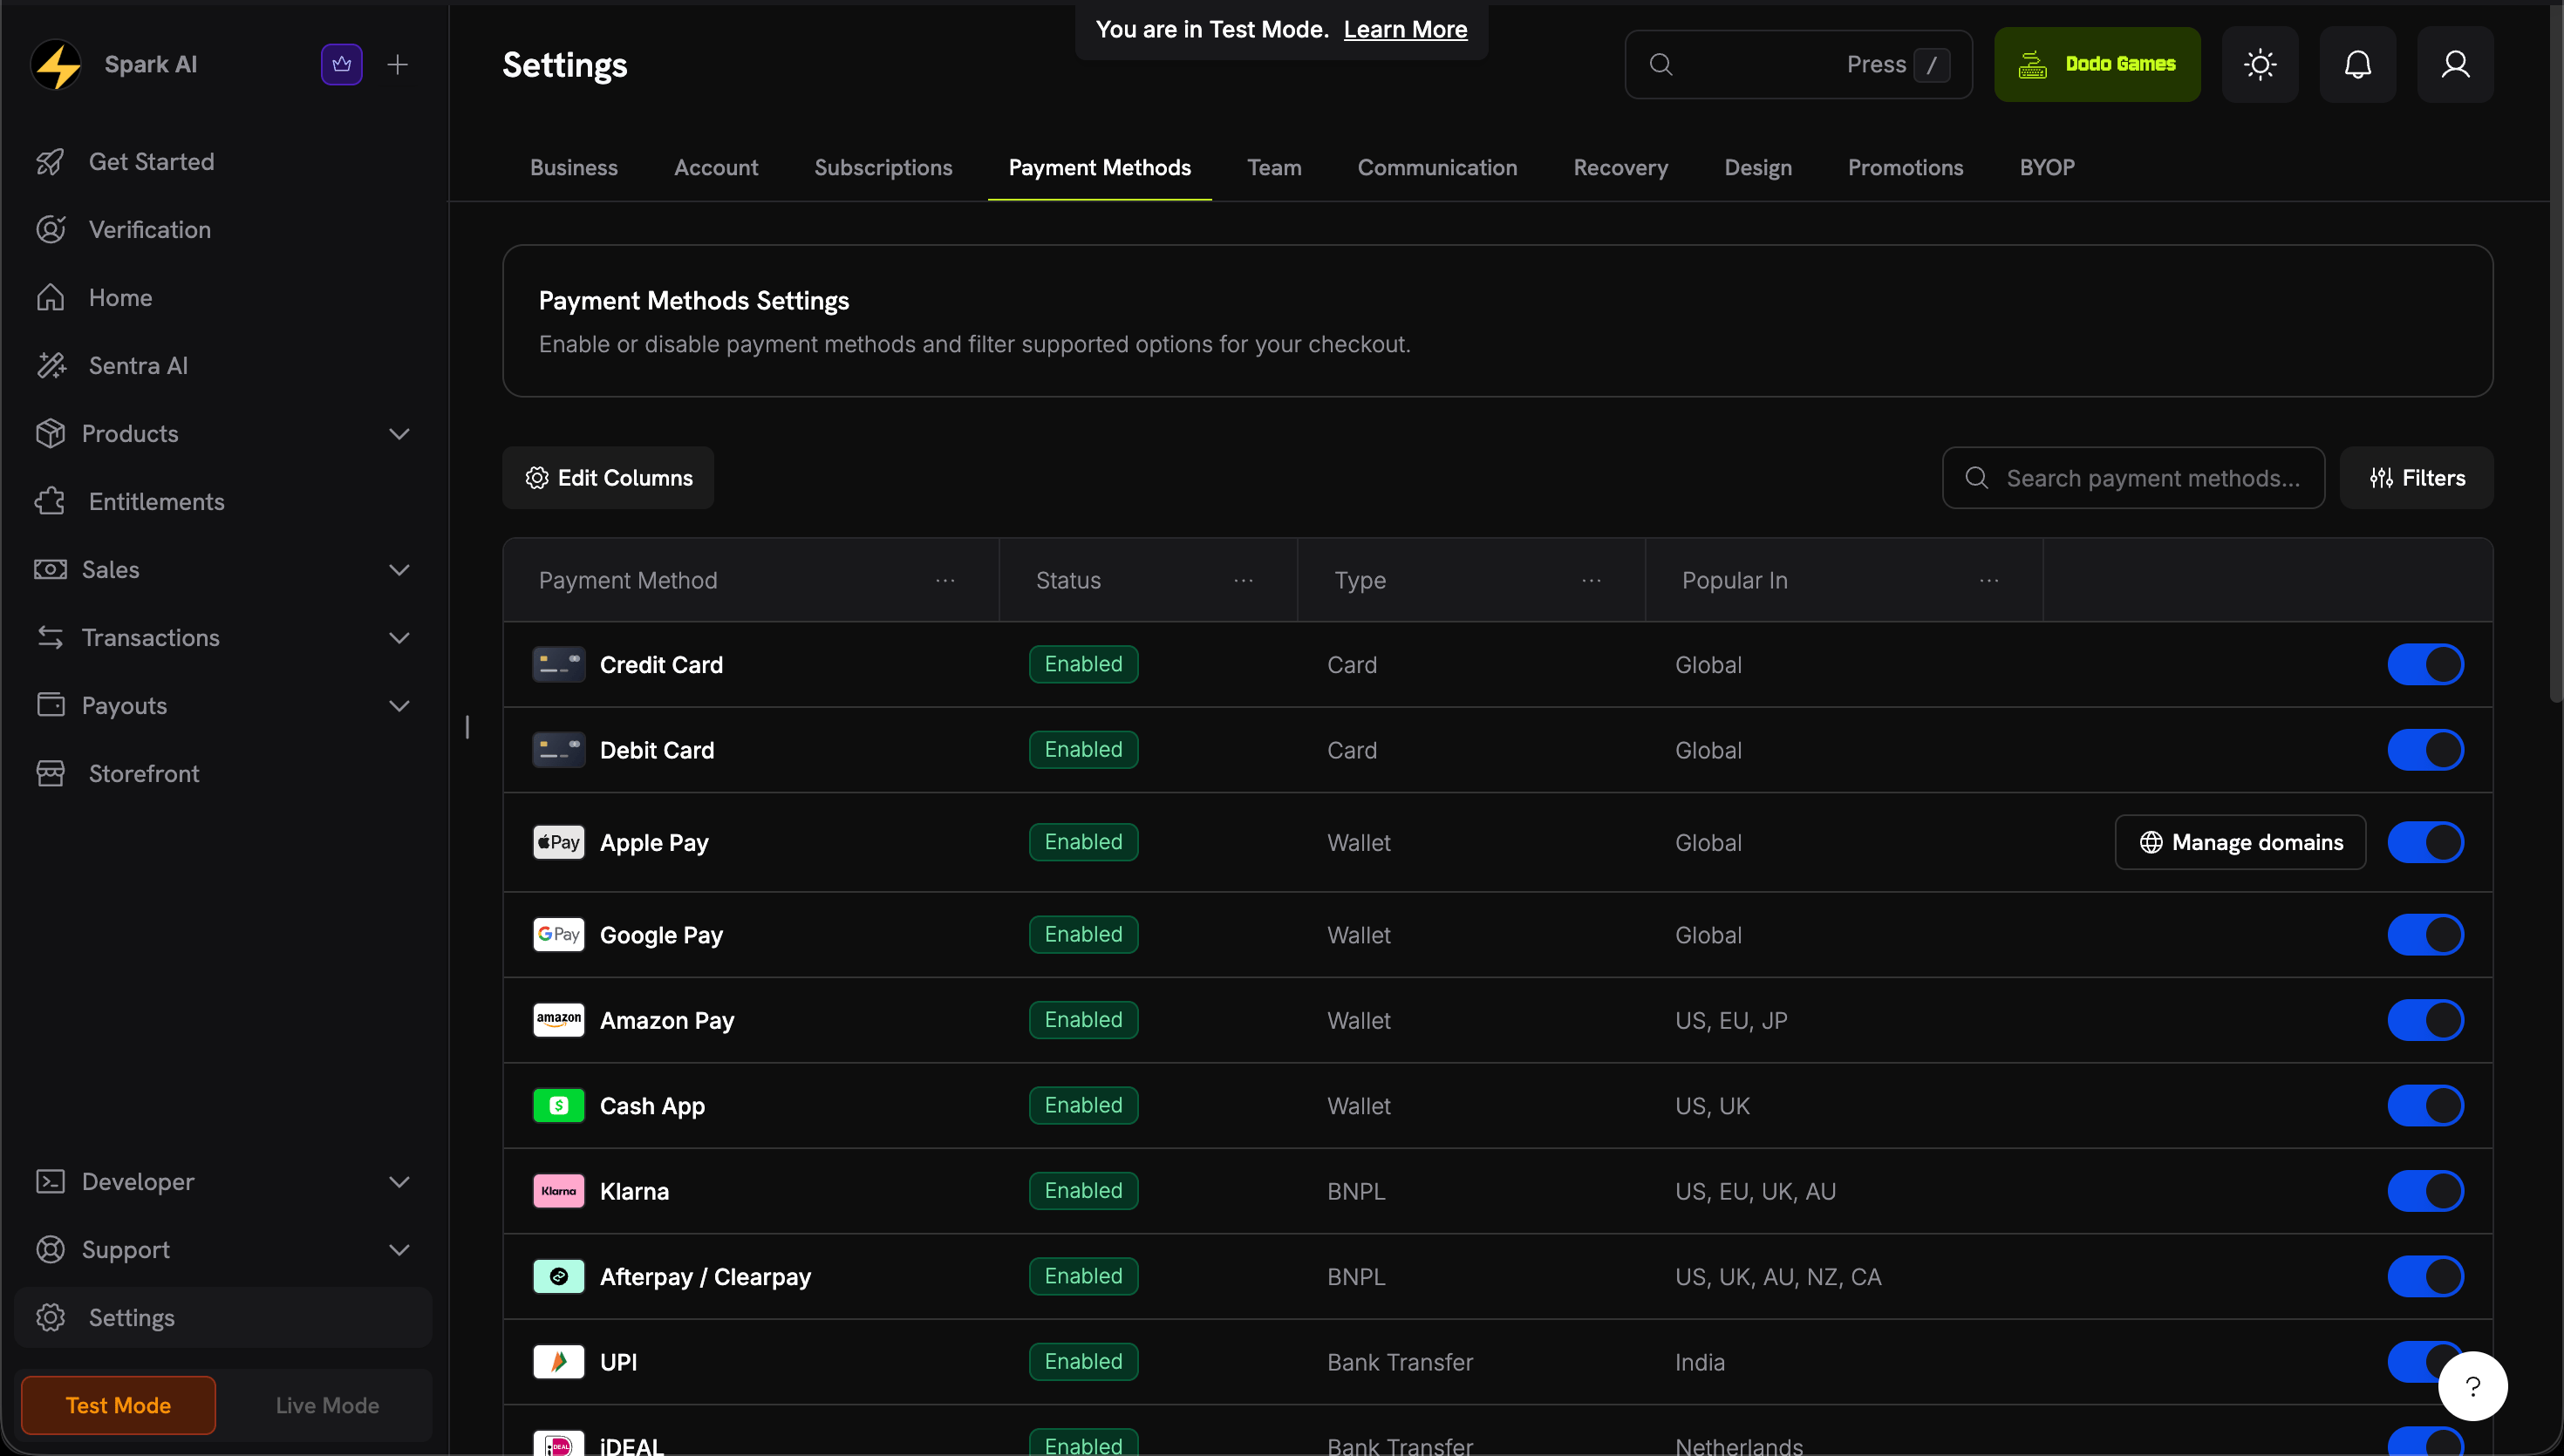
    Go to **Settings → Payment Methods** and, on the **Apple Pay** row, click **Manage domains**.

    <Frame caption="Open Wallet domains from the Apple Pay row">
      <img src="https://mintcdn.com/dodopayments/TklciB6vqCMDIBgH/images/apple-pay-domains/manage-domains.png?fit=max&auto=format&n=TklciB6vqCMDIBgH&q=85&s=a96c60ee0eef744336df955f5148c573" alt="Manage domains button on the Apple Pay row in Payment Methods settings" style={{ maxHeight: '500px', width: 'auto' }} width="2940" height="1670" data-path="images/apple-pay-domains/manage-domains.png" />
    </Frame>
  </Step>

  <Step title="Download the domain association file">
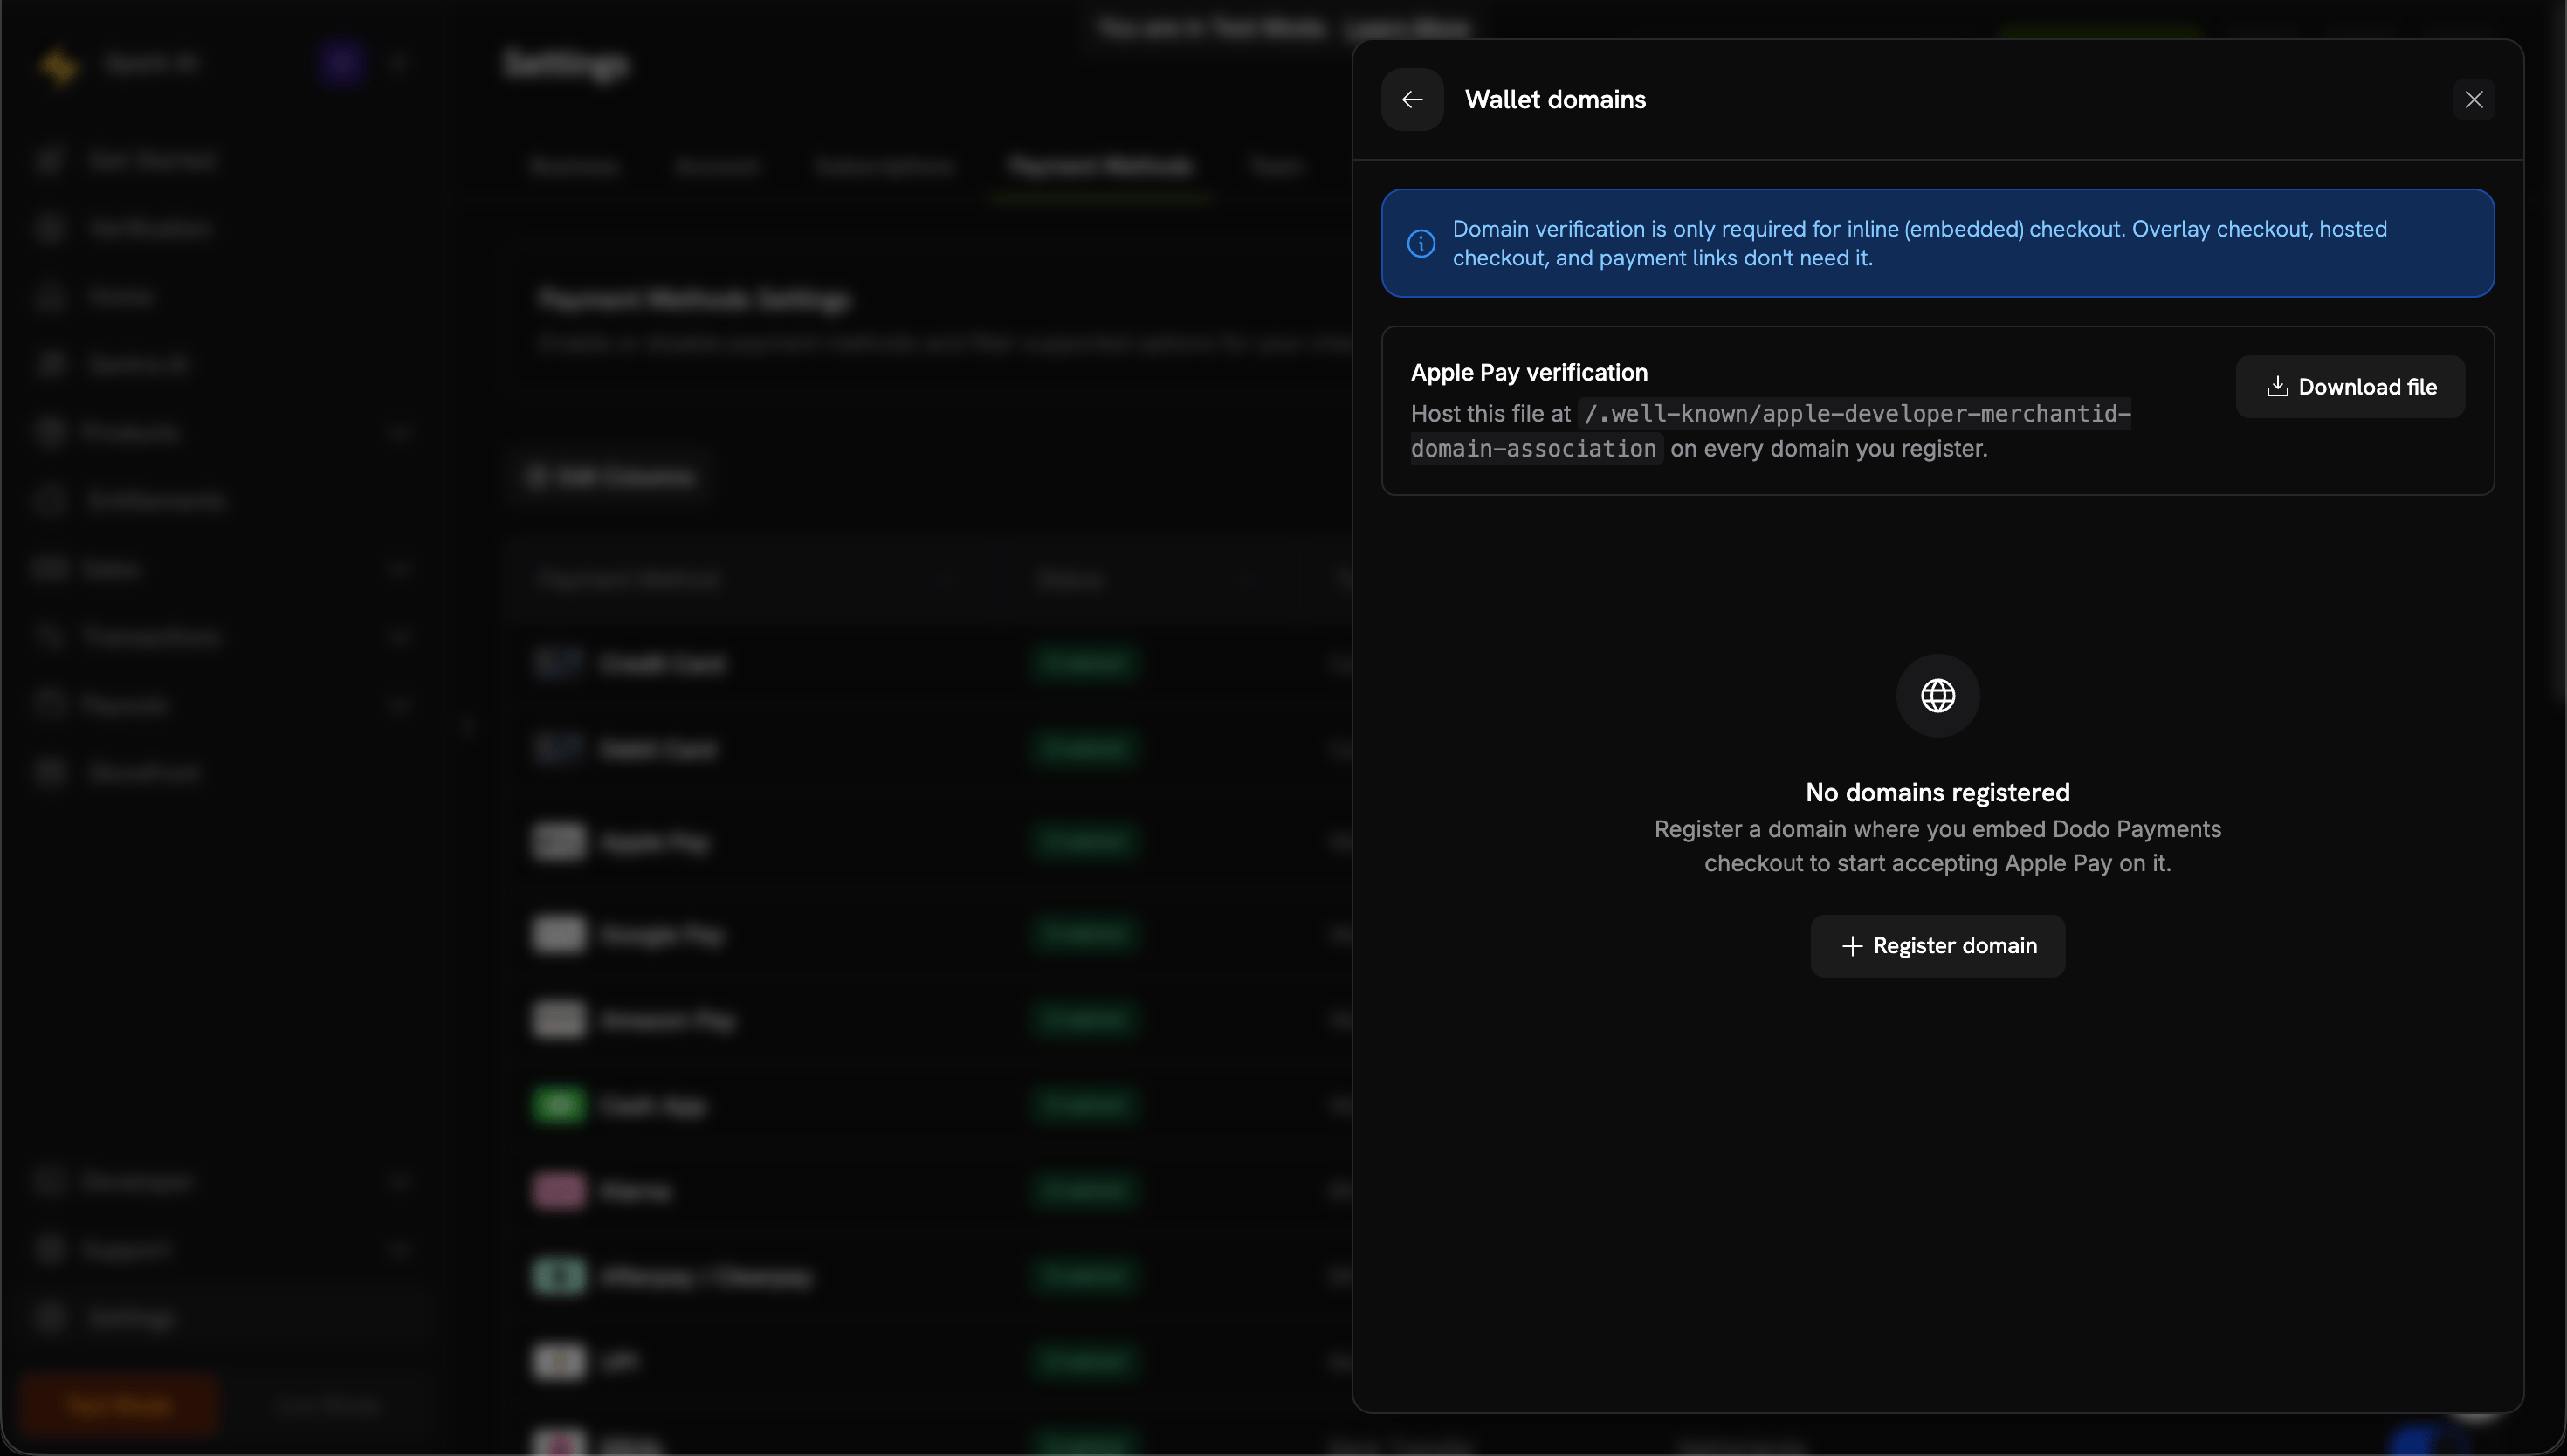
    From the Wallet domains panel, download the association file.

    <Frame caption="Download the Apple Pay domain association file">
      <img src="https://mintcdn.com/dodopayments/TklciB6vqCMDIBgH/images/apple-pay-domains/wallet-domains-panel.png?fit=max&auto=format&n=TklciB6vqCMDIBgH&q=85&s=fb37db780807c0e92ffaa57d2140b91d" alt="Wallet domains panel with the Download file button" style={{ maxHeight: '500px', width: 'auto' }} width="2940" height="1668" data-path="images/apple-pay-domains/wallet-domains-panel.png" />
    </Frame>
  </Step>

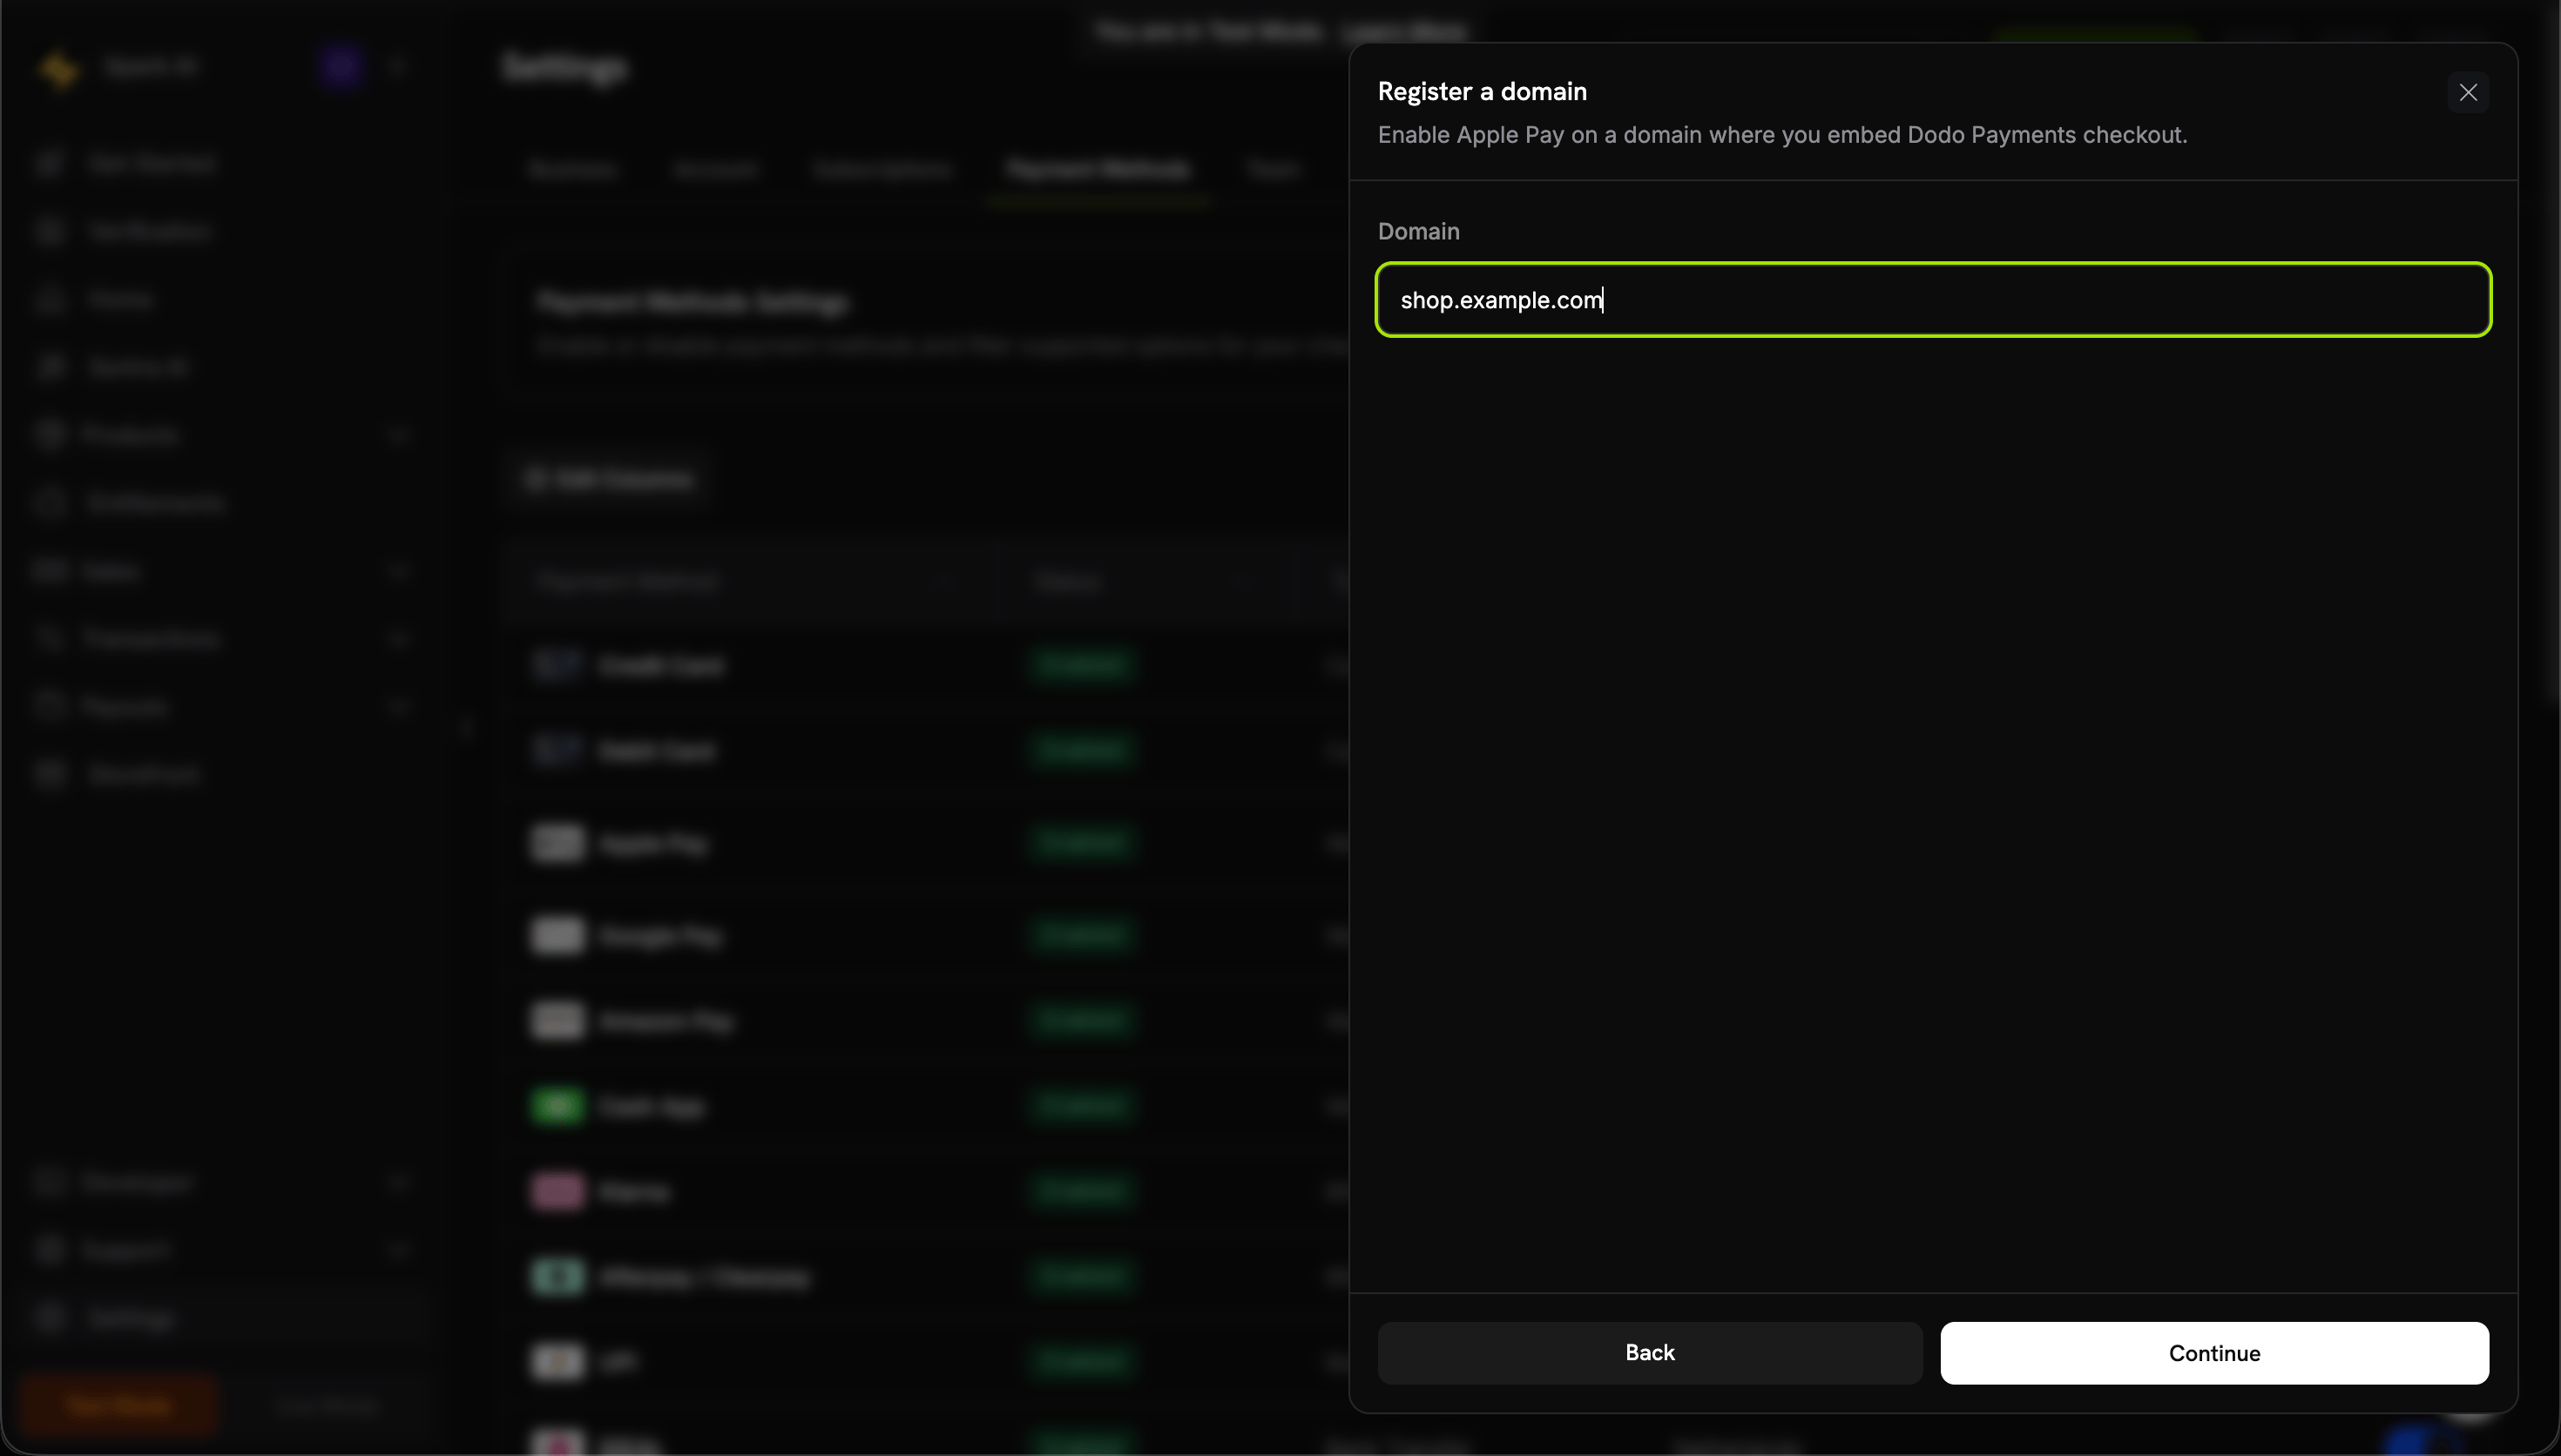
  <Step title="Register your domain">
    Click **Register domain** and enter the domain where you embed inline checkout (e.g. `shop.example.com`), then **Continue**.

    <Frame caption="Register the domain where you embed inline checkout">
      <img src="https://mintcdn.com/dodopayments/TklciB6vqCMDIBgH/images/apple-pay-domains/register-domain.png?fit=max&auto=format&n=TklciB6vqCMDIBgH&q=85&s=9c2bf22e51c8ff188a4e11b36b24c136" alt="Register a domain form with a domain entered" style={{ maxHeight: '500px', width: 'auto' }} width="2940" height="1672" data-path="images/apple-pay-domains/register-domain.png" />
    </Frame>
  </Step>

  <Step title="Host the file on your domain">
    Host it at:

    ```
    https://shop.example.com/.well-known/apple-developer-merchantid-domain-association
    ```

    It must be served over HTTPS, reachable without redirects, and served with `Content-Type: application/octet-stream` or `text/plain`.
  </Step>

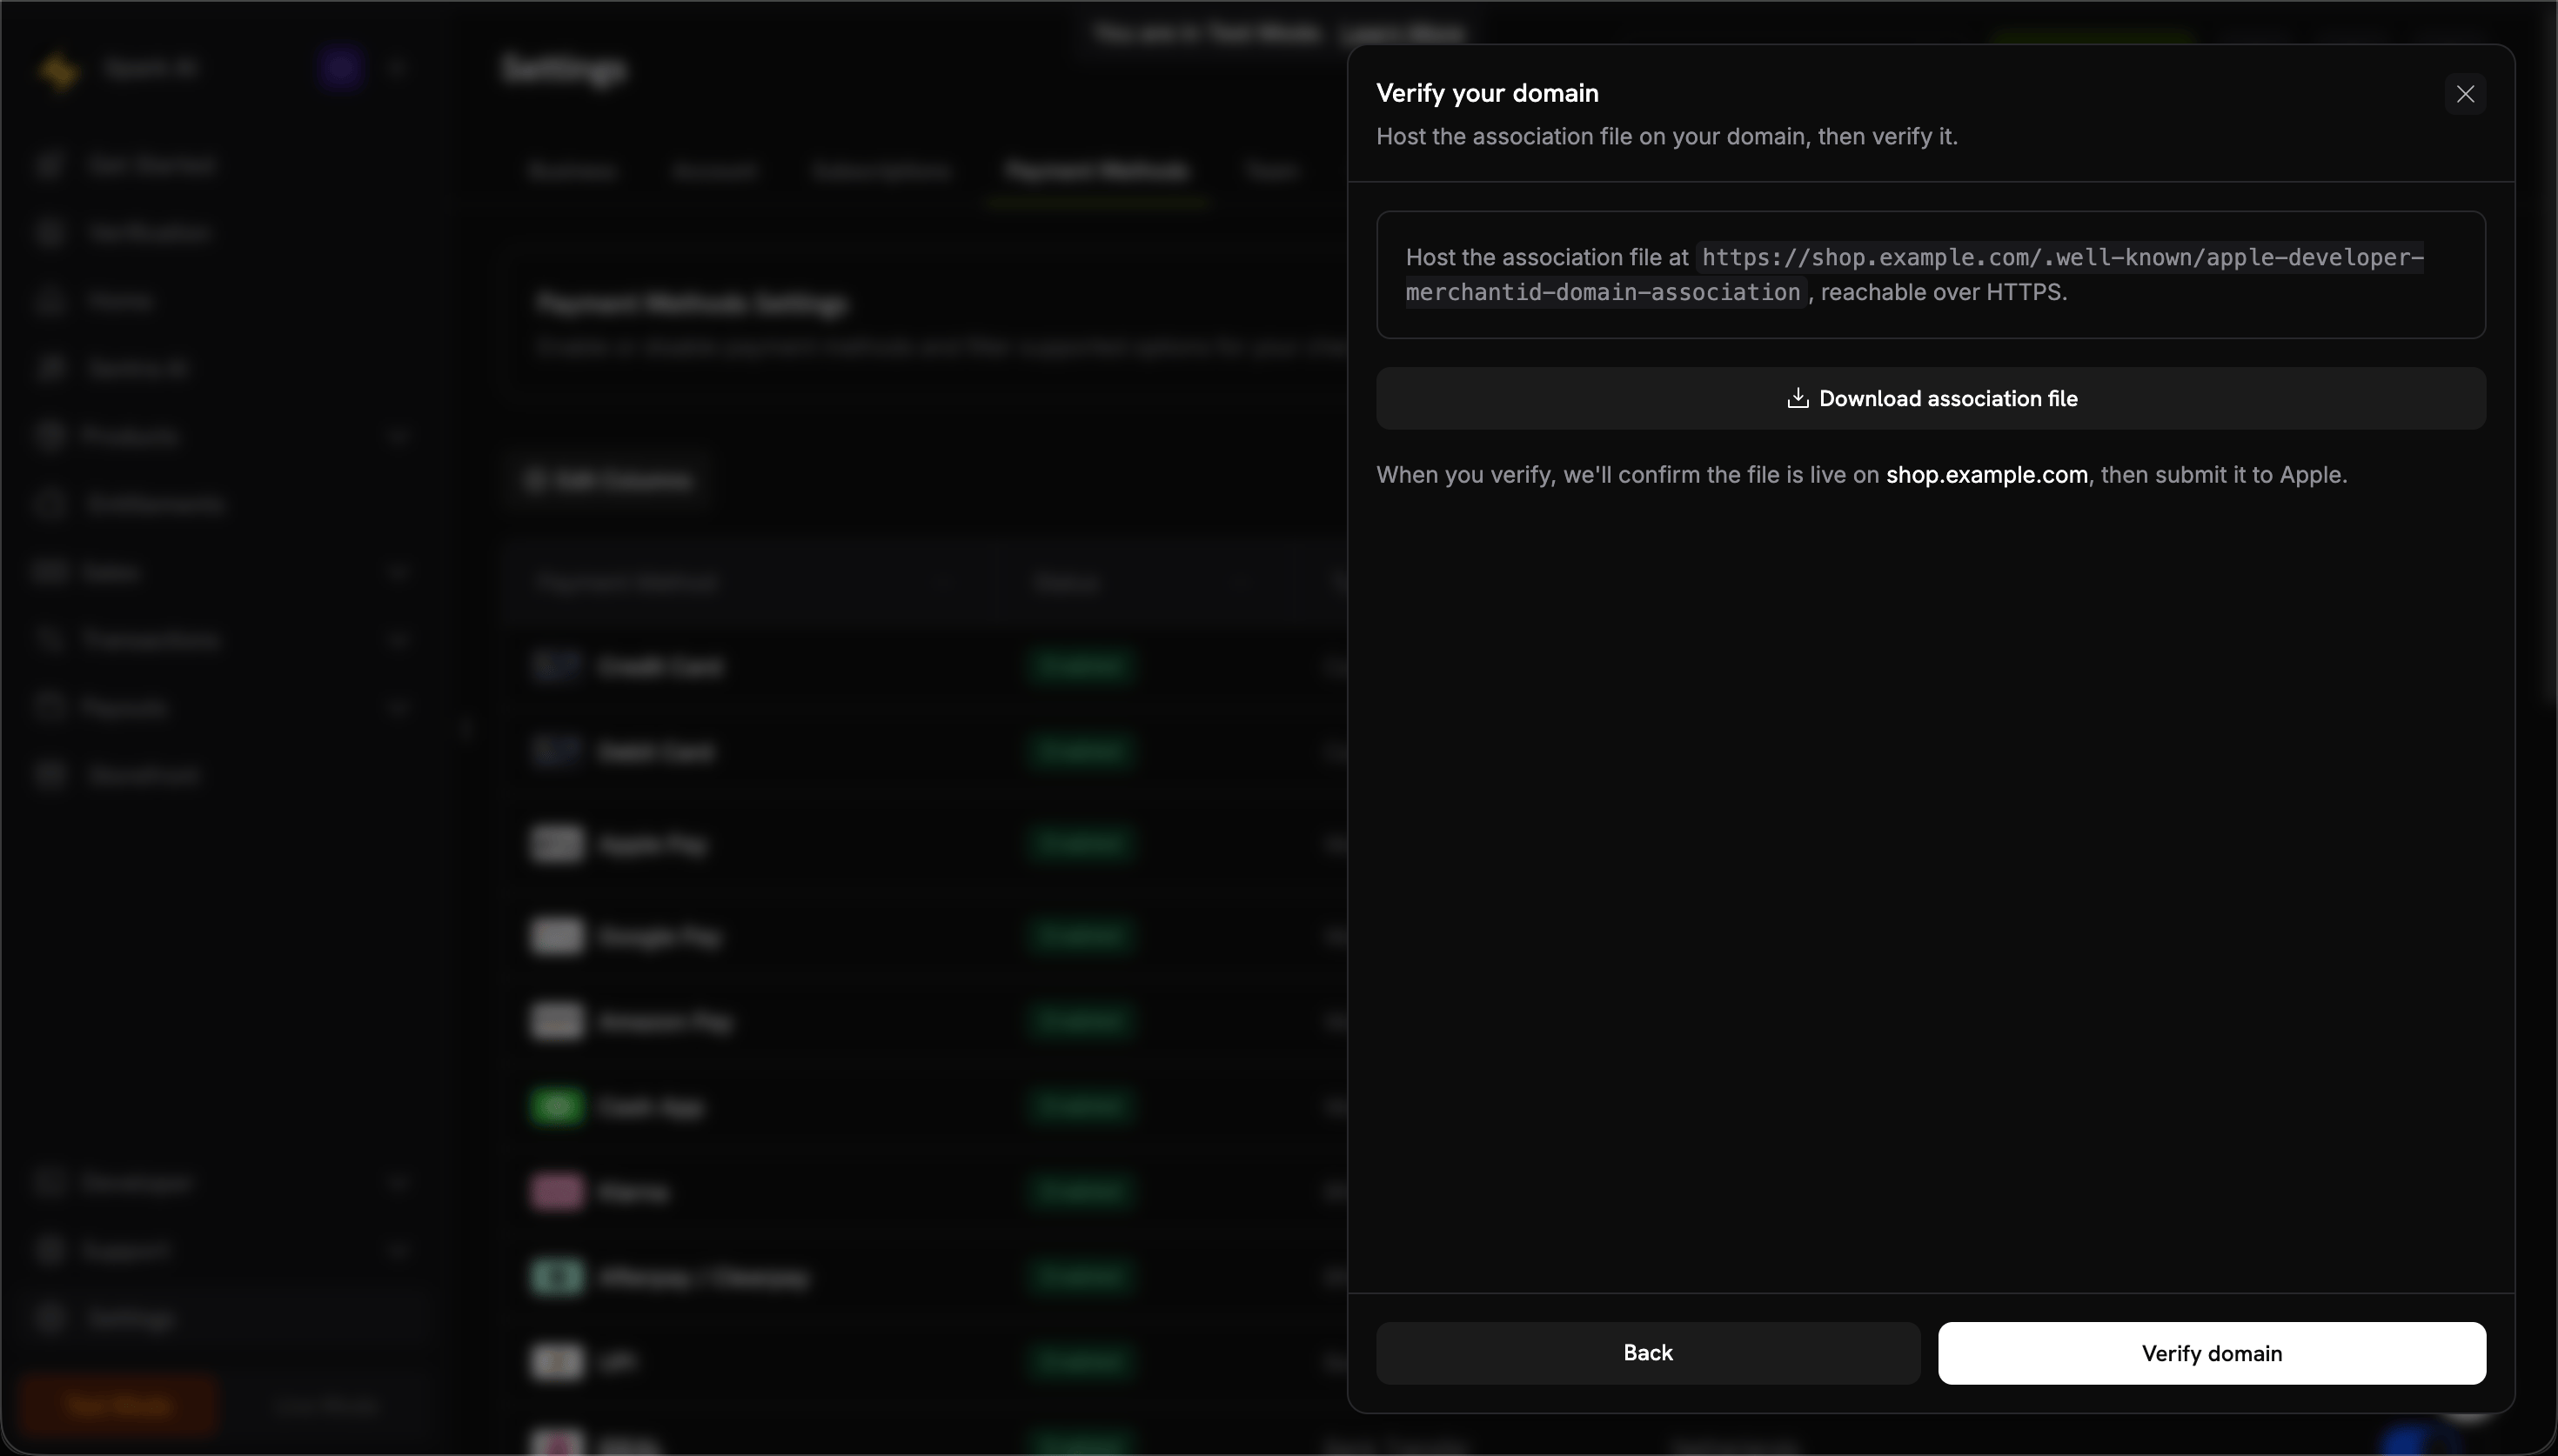
  <Step title="Verify the domain">
    Click **Verify domain**. Dodo Payments confirms the file is live and submits your domain to Apple.

    <Frame caption="Verify the hosted association file">
      <img src="https://mintcdn.com/dodopayments/TklciB6vqCMDIBgH/images/apple-pay-domains/verify-domain.png?fit=max&auto=format&n=TklciB6vqCMDIBgH&q=85&s=e9fcfe5b68320a0a22c644fb935c840b" alt="Verify your domain screen with the association file host path and Verify domain button" style={{ maxHeight: '500px', width: 'auto' }} width="2940" height="1674" data-path="images/apple-pay-domains/verify-domain.png" />
    </Frame>
  </Step>

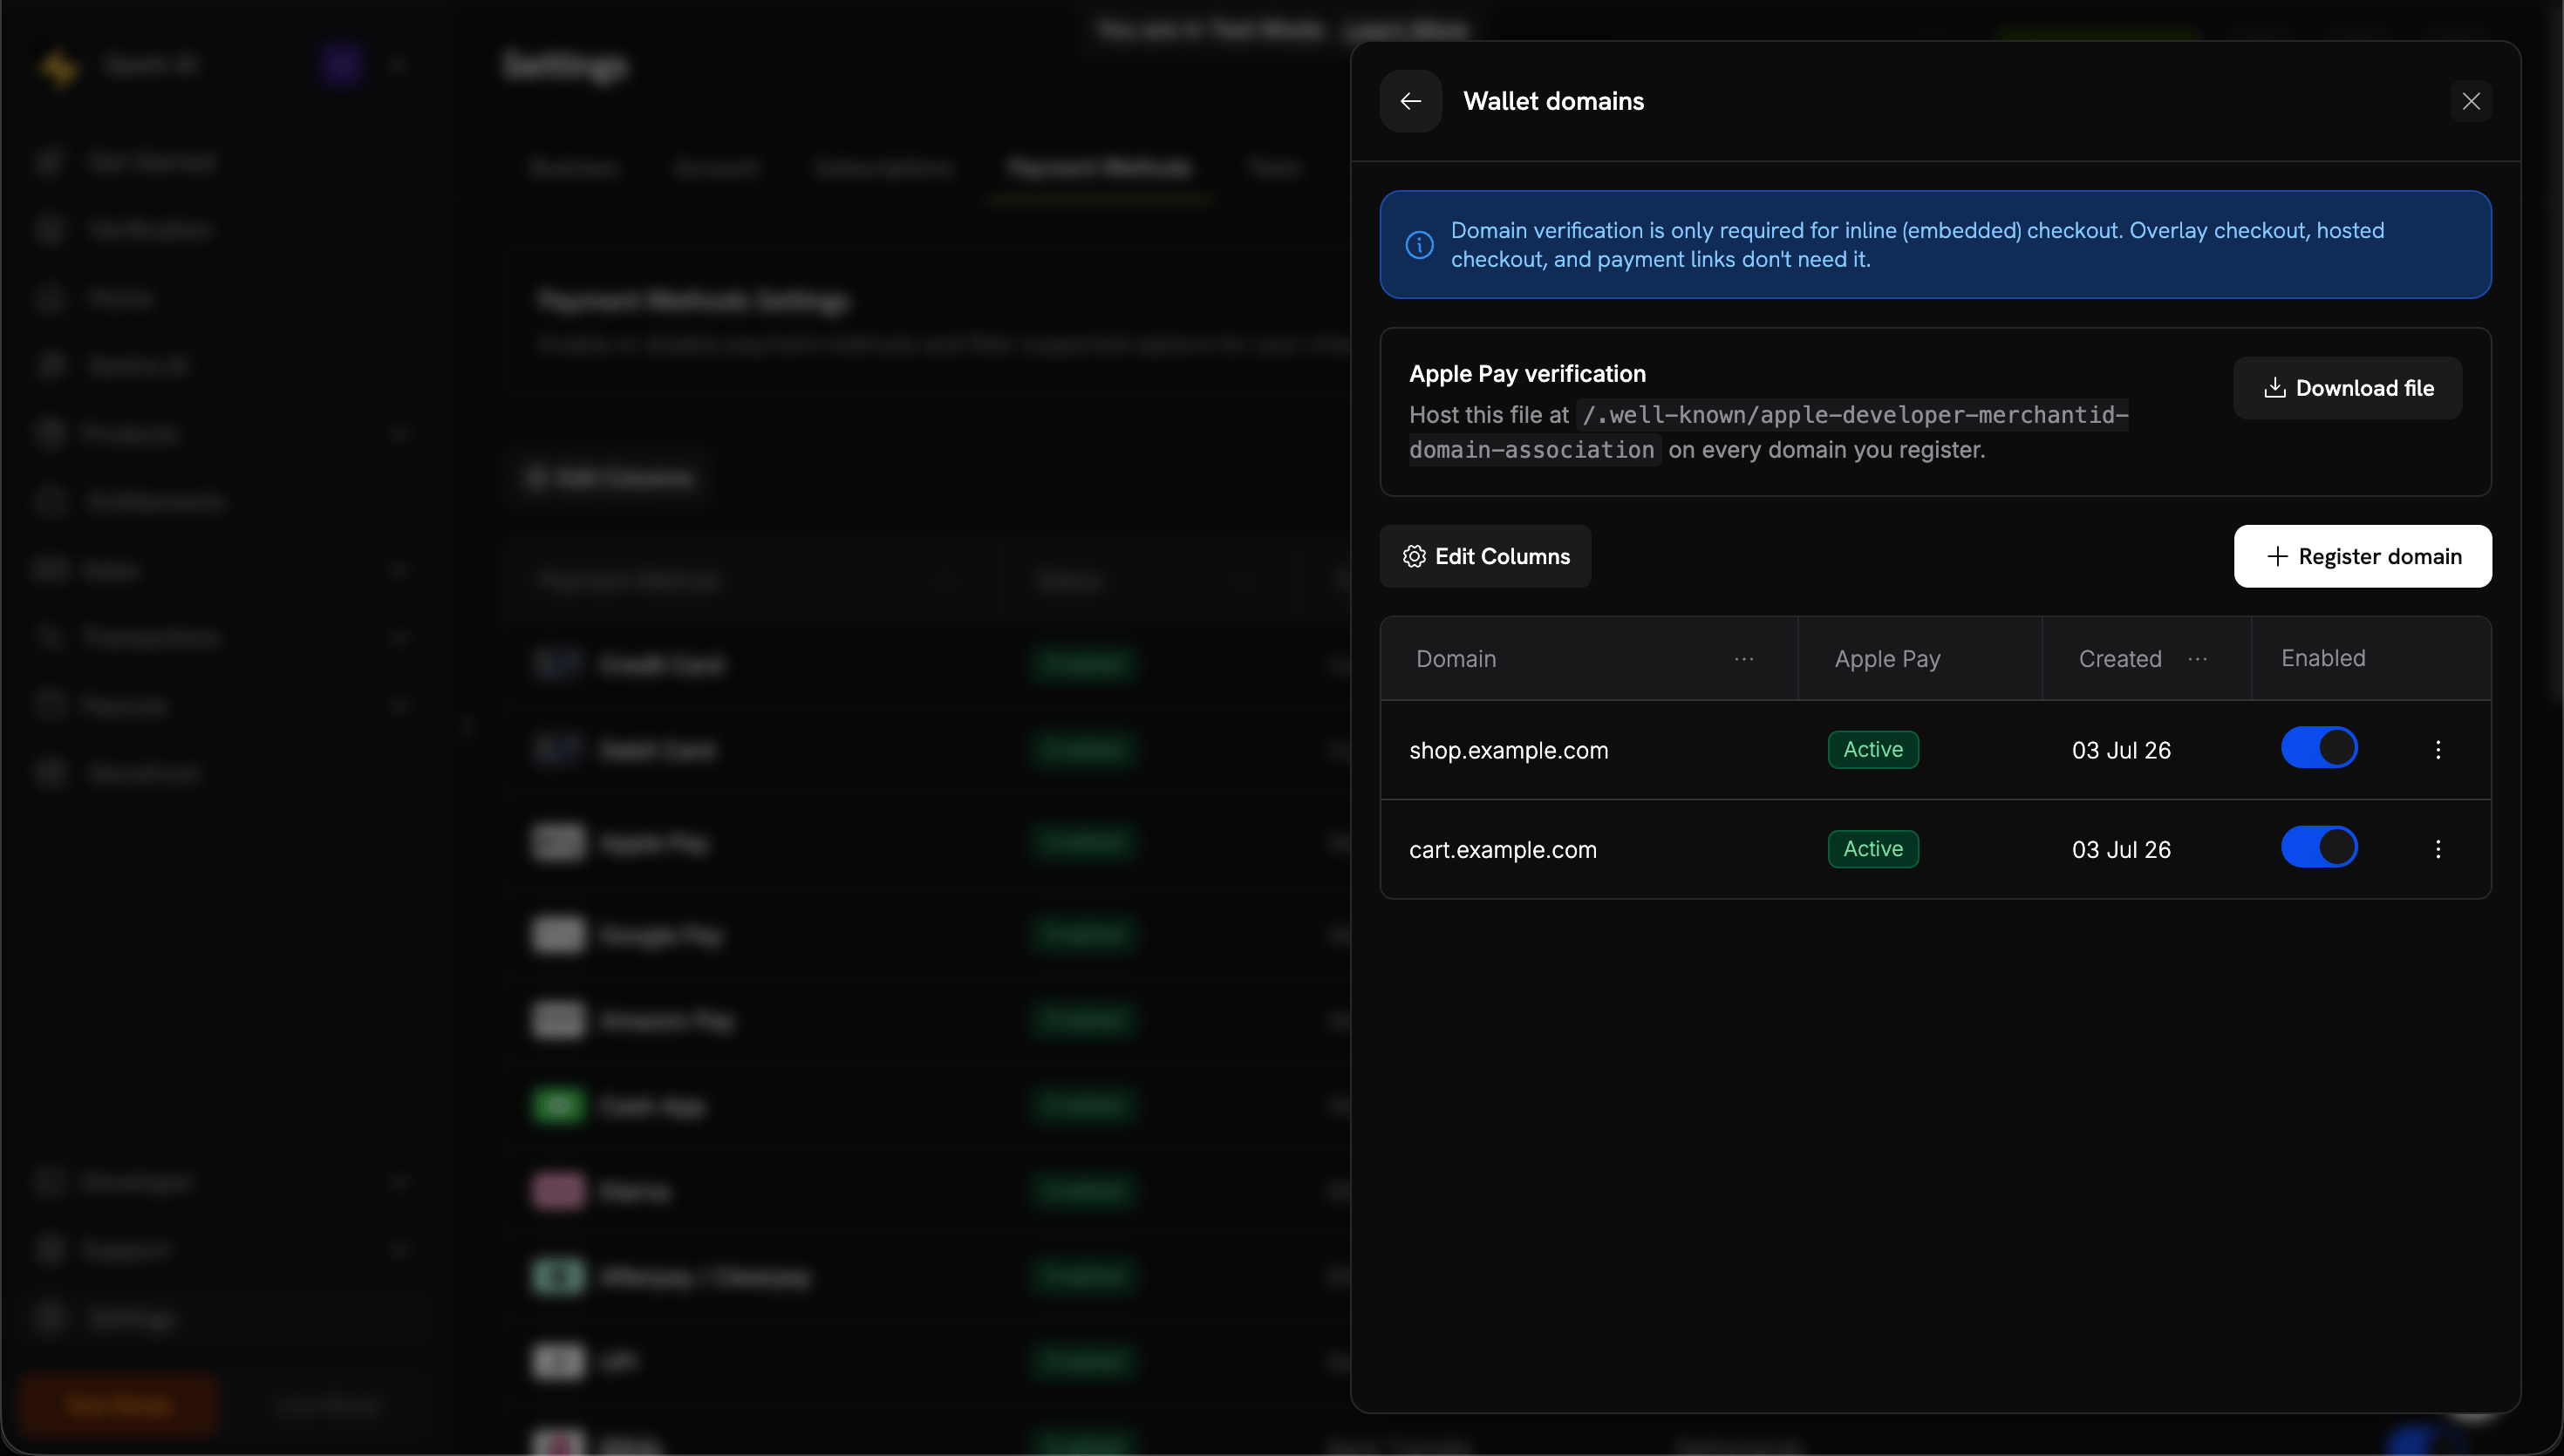
  <Step title="Confirm it's active">
    When the status shows **Active**, Apple Pay is enabled for that domain. Use the **Enabled** toggle to turn it on or off per domain.

    <Frame caption="Verified domains show an Active status">
      <img src="https://mintcdn.com/dodopayments/TklciB6vqCMDIBgH/images/apple-pay-domains/domains-active.png?fit=max&auto=format&n=TklciB6vqCMDIBgH&q=85&s=51a2bf473b1faf3db5776bbfa7140854" alt="Wallet domains list showing domains with an Active Apple Pay status and Enabled toggles" style={{ maxHeight: '500px', width: 'auto' }} width="2940" height="1670" data-path="images/apple-pay-domains/domains-active.png" />
    </Frame>
  </Step>

  <Step title="Test the integration">
    1. Open checkout on an Apple device
    2. Verify Apple Pay button appears
    3. Complete a test transaction
  </Step>
</Steps>

## Browser Support

The Dodo Payments Checkout SDK supports:

* Chrome (latest)
* Firefox (latest)
* Safari (latest)
* Edge (latest)
* IE11+

## Inline vs Overlay Checkout

Choose the right checkout type for your use case:

| Feature | Inline | Overlay |
| - | - | - |
| Integration depth | Fully embedded in page | Modal on top of page |
| Layout control | Full control | Limited |
| Branding | Matches your page | Separate from page |
| Implementation effort | Higher | Lower |
| Best for | Custom checkout pages, high-conversion flows | Quick integration, existing pages |

<Tip>
  Use inline checkout when you want maximum control over the checkout experience and consistent branding. Use overlay checkout for faster integration with minimal changes to your existing pages.
</Tip>

## Related Resources

<CardGroup cols={2}>
  <Card title="Overlay Checkout" icon="layer-group" href="/developer-resources/overlay-checkout">
    Use the overlay checkout for quick modal-based integration.
  </Card>

  <Card title="Checkout Sessions API" icon="code" href="/api-reference/checkout-sessions/create">
    Create checkout sessions to power your checkout experiences.
  </Card>

  <Card title="Webhooks" icon="webhook" href="/developer-resources/webhooks">
    Handle payment events server-side with webhooks.
  </Card>

  <Card title="Integration Guide" icon="book" href="/developer-resources/integration-guide">
    Complete guide to integrating Dodo Payments.
  </Card>
</CardGroup>

For more help, visit our [Discord community](https://discord.gg/bYqAp4ayYh) or contact our developer support team.


This documentation is built and hosted on [Mintlify](https://mintlify.com), a developer documentation platform.