> ## Documentation Index
> Fetch the complete documentation index at: https://docs.dodopayments.com/llms.txt
> Use this file to discover all available pages before exploring further.
# Mobile Integration Guide
> Open Dodo Payments hosted checkout from Android, iOS, React Native, and Flutter apps, customize it for mobile, and run subscription flows.
The four steps from your backend to the checkout and back.
Code for Android, iOS, React Native, and Flutter.
The 14 checkout session parameters that matter most on mobile.
Complete request bodies for 5 common mobile scenarios.
Your mobile app opens Dodo Payments hosted checkout in the platform's system browser surface and gets the customer back into the app when checkout ends. Your backend creates the checkout session and grants access from webhooks.
Dodo Payments ships an official checkout SDK for **Android, iOS, React Native, and Flutter**. Each SDK opens the checkout URL, captures the return, and parses the result behind one typed `start(...)` call, and each one includes abandoned-session recovery. Build the flow by hand only if none of the SDKs fits your stack.
## Prerequisites
Before you start, you need:
* A Dodo Payments account.
* An API key from **Developer → API Keys** and a webhook signing secret from **Developer → Webhooks**.
* An Android, iOS, React Native, or Flutter app.
* A backend server that creates checkout sessions. The API key stays on this server.
## Integration Workflow
Your backend makes every Dodo Payments API call. Your app only asks your backend for a checkout URL, opens it, and shows the result.
```mermaid theme={null}
sequenceDiagram
participant App as Mobile App
participant Backend as Your Backend
participant Dodo as Dodo Payments
participant Browser as System Browser
App->>Backend: Request checkout (user session token)
Backend->>Dodo: Create checkout session (API key)
Dodo-->>Backend: checkout_url
Backend-->>App: checkout_url
App->>Browser: Open checkout_url (Custom Tab / SFSafariViewController)
Browser->>Dodo: Customer pays
Dodo-->>Browser: Redirect to return_url
Browser-->>App: Deep link with status + payment_id (UI hint only)
Dodo->>Backend: payment.succeeded / subscription.active webhook
Backend->>Backend: Grant access (source of truth)
```
The `status` in the deep link tells your app what to show the customer. It is not proof of payment. Grant access from the `payment.succeeded` or `subscription.active` **webhook** on your backend, not from the mobile result.
Your backend creates a checkout session with your API key and returns its `checkout_url` to the app. Set the session's `return_url` to the deep link your app registers, for example `myapp://checkout/return`.
Create a checkout session from Node.js, Python, and other languages, with the full parameter reference.
**Security**: Create checkout sessions on your backend server, never in the mobile app. Anyone can extract an API key from an app binary.
Your app calls your backend to get the checkout URL. Authenticate this request with the signed-in user's own session token. In each example, `userSessionToken` is that token and `CheckoutResponse` is your own response type.
```swift theme={null}
func getCheckoutURL(productId: String, customerEmail: String, customerName: String) async throws -> String {
let url = URL(string: "https://your-backend.com/api/create-checkout-session")!
var request = URLRequest(url: url)
request.httpMethod = "POST"
request.setValue("application/json", forHTTPHeaderField: "Content-Type")
request.setValue("Bearer \(userSessionToken)", forHTTPHeaderField: "Authorization")
let requestData: [String: Any] = [
"productId": productId,
"customerEmail": customerEmail,
"customerName": customerName
]
request.httpBody = try JSONSerialization.data(withJSONObject: requestData)
let (data, _) = try await URLSession.shared.data(for: request)
let response = try JSONDecoder().decode(CheckoutResponse.self, from: data)
return response.checkout_url
}
```
```kotlin theme={null}
suspend fun getCheckoutURL(productId: String, customerEmail: String, customerName: String): String {
val client = OkHttpClient()
val requestBody = JSONObject().apply {
put("productId", productId)
put("customerEmail", customerEmail)
put("customerName", customerName)
}.toString().toRequestBody("application/json".toMediaType())
val request = Request.Builder()
.url("https://your-backend.com/api/create-checkout-session")
.header("Authorization", "Bearer $userSessionToken")
.post(requestBody)
.build()
val response = client.newCall(request).execute()
val responseBody = response.body?.string()
val jsonResponse = JSONObject(responseBody ?: "")
return jsonResponse.getString("checkout_url")
}
```
```javascript theme={null}
const getCheckoutURL = async (productId, customerEmail, customerName) => {
try {
const response = await fetch('https://your-backend.com/api/create-checkout-session', {
method: 'POST',
headers: {
'Content-Type': 'application/json',
'Authorization': `Bearer ${userSessionToken}`,
},
body: JSON.stringify({
productId,
customerEmail,
customerName
})
});
const data = await response.json();
return data.checkout_url;
} catch (error) {
console.error('Failed to get checkout URL:', error);
throw error;
}
};
```
```dart theme={null}
import 'dart:convert';
import 'package:http/http.dart' as http;
Future getCheckoutUrl({
required String productId,
required String customerEmail,
required String customerName,
}) async {
final response = await http.post(
Uri.parse('https://your-backend.com/api/create-checkout-session'),
headers: {
'Content-Type': 'application/json',
'Authorization': 'Bearer $userSessionToken',
},
body: jsonEncode({
'productId': productId,
'customerEmail': customerEmail,
'customerName': customerName,
}),
);
if (response.statusCode != 200) {
throw Exception('Failed to get checkout URL: ${response.statusCode}');
}
return jsonDecode(response.body)['checkout_url'] as String;
}
```
**Security**: The app talks only to your backend, never directly to the Dodo Payments API.
Open the checkout URL in the platform's system browser surface. The official checkout SDK for your platform does this for you and returns a typed result.
Install steps and setup instructions for Android, iOS, React Native, and Flutter.
Grant access when your backend receives the `payment.succeeded` or `subscription.active` webhook. Use the result from the return URL only to update the app's screen.
## Choose Your SDK
Every mobile SDK has the same contract. One `start(...)` call opens Dodo Payments hosted checkout in the platform's system browser surface and returns a typed `CheckoutResult` whose `status` is `succeeded`, `failed`, `cancelled`, `pending`, or `expired`. No SDK holds an API key or calls the Dodo Payments API, and all four support abandoned-session recovery.
`com.dodopayments.api:checkout-android` opens a Custom Tab. Requires `minSdk` 23.
`dodopayments-mobile-sdk-ios` opens `SFSafariViewController`. Requires iOS 16+.
`@dodopayments/react-native-checkout`, a Turbo Module over both native cores. Requires React Native 0.77+ with the New Architecture.
`dodopayments_checkout`, a Pigeon channel over both native cores. Requires Flutter 3.44+.
The returned `status` is a UI hint, not proof of payment. Confirm every payment on your backend from the `payment.succeeded` or `subscription.active` webhook, or by retrieving the payment with your API key. A `cancelled` status means the customer closed the browser before the return URL arrived, so the payment may still have succeeded. Don't show it as a failure.
### Registering a Callback URL Scheme
All four SDKs return control to your app through a custom URL scheme that you choose, for example `myapp://checkout/return`. Register it once per platform:
```kotlin android/app/build.gradle theme={null}
android {
defaultConfig {
manifestPlaceholders["dodoCallbackScheme"] = "myapp"
}
}
```
The SDK's own manifest already declares the redirect activity, so you add no manifest XML. The scheme must match the scheme of `returnUrl`.
```xml Info.plist theme={null}
CFBundleURLTypes
CFBundleURLName
myapp
CFBundleURLSchemes
myapp
```
On iOS, also forward incoming URLs into the SDK, because `SFSafariViewController` can't catch its own return URL. For the exact handler, see the [iOS](/developer-resources/sdks/ios) or [React Native](/developer-resources/sdks/react-native) page.
`@dodopayments/react-native-checkout` includes a config plugin that registers the scheme for both platforms during `prebuild`. Pass it a `scheme` option:
```json app.json theme={null}
{
"expo": {
"scheme": "myapp",
"plugins": [
[
"@dodopayments/react-native-checkout",
{ "scheme": "myappcheckout" }
]
]
}
}
```
`scheme` must match the scheme of `returnUrl` and must differ from `expo.scheme`, which Expo already registers on `MainActivity`. For details, see the [React Native SDK](/developer-resources/sdks/react-native) page.
The plugin edits the `defaultConfig { }` block of `android/app/build.gradle`. If your file has no standard `defaultConfig { }` block, set the placeholder by hand as shown in the Android tab.
The plugin works with development builds only, not Expo Go. Run `npx expo prebuild --clean` after you edit `app.json`.
To build the flow yourself, open the `checkout_url` in the platform's system browser surface (a Custom Tab on Android, `SFSafariViewController` on iOS), intercept the navigation to your `return_url`, and read the `status` and `payment_id` query parameters. The SDKs do this for you.
**Don't open checkout inside an embedded WebView (`WKWebView` or Android `WebView`).** An embedded WebView can break 3-D Secure challenges and saved-card autofill, so customers see more failed payments. Use the SDK, or open the `checkout_url` in the system browser surface. On iOS, open it in `SFSafariViewController` or `ASWebAuthenticationSession`, or in the system browser, so that Apple Pay is available. On Android, open it in a Custom Tab, which runs in the customer's browser, so Google Pay keeps working.
## Appearance Customization
Every SDK accepts an optional `customization` parameter on `start(...)` or `CheckoutParams`. It controls the system browser surface: the toolbar, the buttons, and how the browser is presented. The checkout page's own theme is separate. You set it on your server with [`customization.theme_config`](/developer-resources/checkout-session) when you create the checkout session.
The options are grouped by platform, because a Custom Tab on Android and `SFSafariViewController` on iOS expose different native controls. Every field is optional. An unset field leaves the platform's own default in place.
Toolbar background color.
Navigation bar color.
Divider color above the navigation bar.
`default` shows the system "X" icon; `back` draws a back arrow instead.
Which side of the toolbar the close button appears on.
Shows the toolbar's share icon.
Shows the page title under the URL in the toolbar.
Lets the toolbar auto-hide as the page scrolls.
Shows "Bookmark this page" in the overflow menu.
Shows "Download page" in the overflow menu.
Forces light or dark appearance regardless of the device's system setting.
Label or icon for the dismiss button.
`pageSheet` presents checkout as a card that the customer can swipe to dismiss. `fullScreen` covers the whole screen.
Lets the toolbar collapse on scroll. It has a visible effect only when `presentationStyle` is `fullScreen`. With `pageSheet`, the bars stay pinned.
Forces light or dark appearance regardless of the device's system setting.
The examples below set a toolbar color and close button on Android, and a full-screen dark presentation on iOS. React Native and Flutter take separate `android` and `ios` option groups. The native SDKs take only their own platform's options.
```typescript theme={null}
const result = await DodoCheckout.start({
checkoutUrl,
returnUrl: 'myapp://checkout/return',
customization: {
android: { toolbarColor: '#6366F1', closeButtonStyle: 'back' },
ios: { presentationStyle: 'fullScreen', colorScheme: 'dark' },
},
});
```
```dart theme={null}
final result = await DodoCheckout.instance.start(
CheckoutParams(
checkoutUrl: Uri.parse(checkoutUrl),
returnUrl: Uri.parse('myapp://checkout/return'),
customization: BrowserCustomization(
android: AndroidBrowserOptions(
toolbarColor: Color(0xFF6366F1),
closeButtonStyle: CloseButtonStyle.back,
),
ios: IosBrowserOptions(
presentationStyle: PresentationStyle.fullScreen,
colorScheme: BrowserColorScheme.dark,
),
),
),
);
```
```kotlin theme={null}
val result = DodoCheckout.start(
activity,
CheckoutParams(
checkoutUrl = checkoutUrl,
returnUrl = "myapp://checkout/return",
customization = BrowserCustomization(
toolbarColor = Color.parseColor("#6366F1"),
closeButtonStyle = BrowserCustomization.CloseButtonStyle.BACK,
)
)
) { event -> }
```
```swift theme={null}
let result = try await DodoCheckout.start(
checkoutUrl: checkoutUrl,
returnUrl: URL(string: "myapp://checkout/return")!,
customization: BrowserCustomization(
presentationStyle: .fullScreen,
colorScheme: .dark
)
)
```
## Checkout Page Customization
The checkout page itself (which fields appear, the theme, and which payment methods show) is set on your server when you create the checkout session. [Appearance Customization](#appearance-customization) covers only the browser surface around it. The parameters below have the most effect on mobile conversion.
These parameters sit in three places on the checkout session request: at the top level, in `customization`, or in `feature_flags`. The **Where it goes** column names the object for each one. Place each parameter in the object shown, because a parameter in the wrong object has no effect.
| Parameter | Where it goes | Mobile benefit | Default | Set when… |
| - | - | - | - | - |
| `show_order_details` | `customization` | `false` collapses the order summary, so payment methods appear at the top of the screen | `true` | Set `false` on mobile, so payment methods appear above the fold |
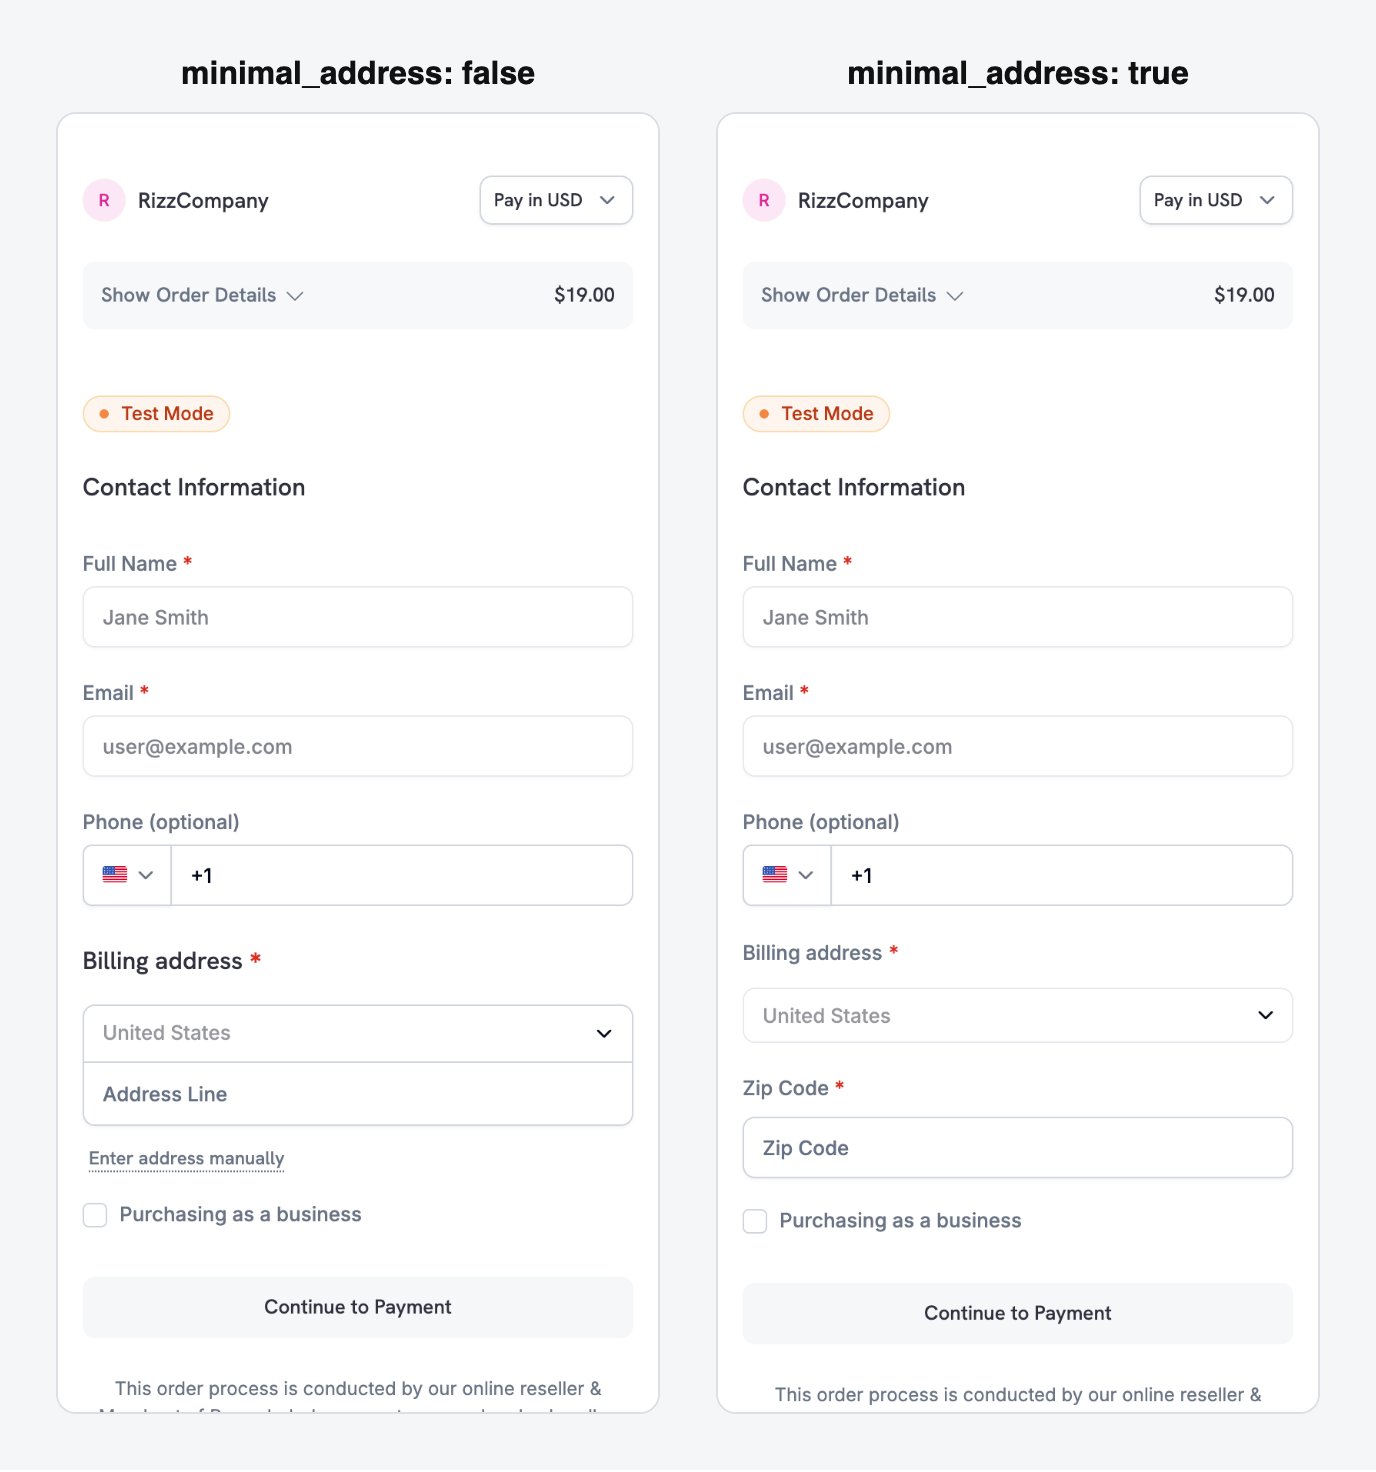
| `minimal_address` | top-level | Collects only a postcode, or a region in countries that require one, instead of the full street, city, and state fields | `false` | On most mobile checkouts, because each extra field adds work for the customer |
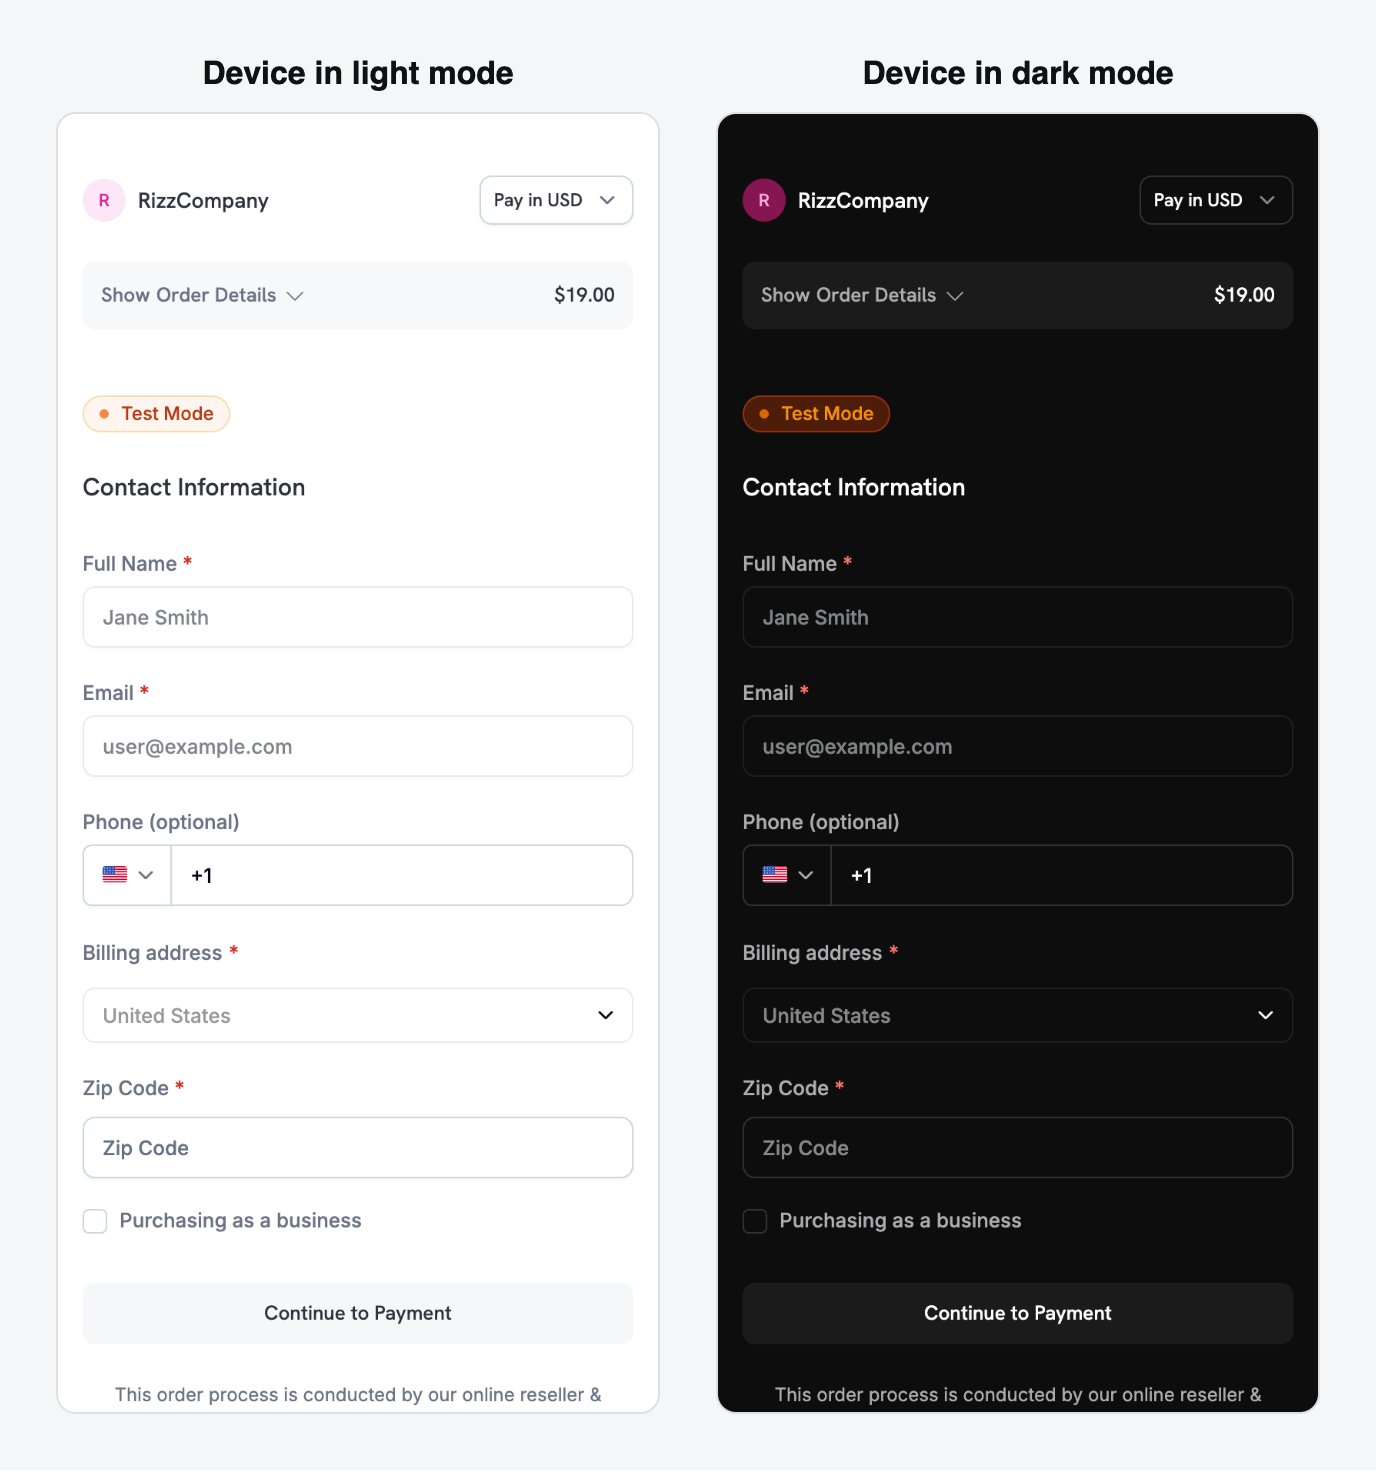
| `theme` | `customization` | Sets the checkout page to `light`, `dark`, or `system` | Business theme | Use `"system"` to follow the device setting |
| `theme_config` | `customization` | Sets your brand palette, fonts, border radius, and pay button label | None | When checkout must look like part of your app |
| `force_language` | `customization` | Overrides browser language detection, for example `en` or `es` | Auto-detect | Set it from your app's language instead of the browser's |
| `show_on_demand_tag` | `customization` | Shows or hides the on-demand label on the checkout page | `true` | Set `false` when you use on-demand billing only to save a card |
| `show_saved_payment_methods` | top-level | Shows a returning customer's saved payment methods | `false` | For signed-in customers who have paid before |
| `allow_discount_code` | `feature_flags` | Shows the discount code field | `true` | Set `false` to shorten the form |
| `allow_currency_selection` | `feature_flags` | Lets the customer change the billing currency | `true` | Set `false` when you fix the currency with `billing_currency` |
| `redirect_immediately` | `feature_flags` | Skips the success page and redirects to `return_url` | `false` | To return the customer to your app right after payment |
| `confirm` | top-level | Finalizes the session details at creation. The API returns an error if required data is missing | `false` | With `payment_method_id` for one-click checkout |
| `short_link` | top-level | Returns a shortened checkout URL | `false` | When the URL must fit in a push notification or SMS |
| `payment_method_id` | top-level | Charges a saved payment method. Requires `confirm: true` and an existing `customer_id` | None | For one-click checkout |
| `allowed_payment_method_types` | top-level | Limits checkout to the listed payment methods. A listed method still appears only when it is eligible | All enabled | To show only the methods that suit your product |
**Pass `billing_currency` and `billing_address.country` together.** If you omit either one, Adaptive Currency can pick the billing currency from the customer's IP address. For example, a US customer who travels to Europe can be billed in EUR when the billing country isn't set.
**Largest mobile conversion gain:** set `show_order_details: false` and `minimal_address: true`. Together they move payment methods above the fold and remove most address fields.
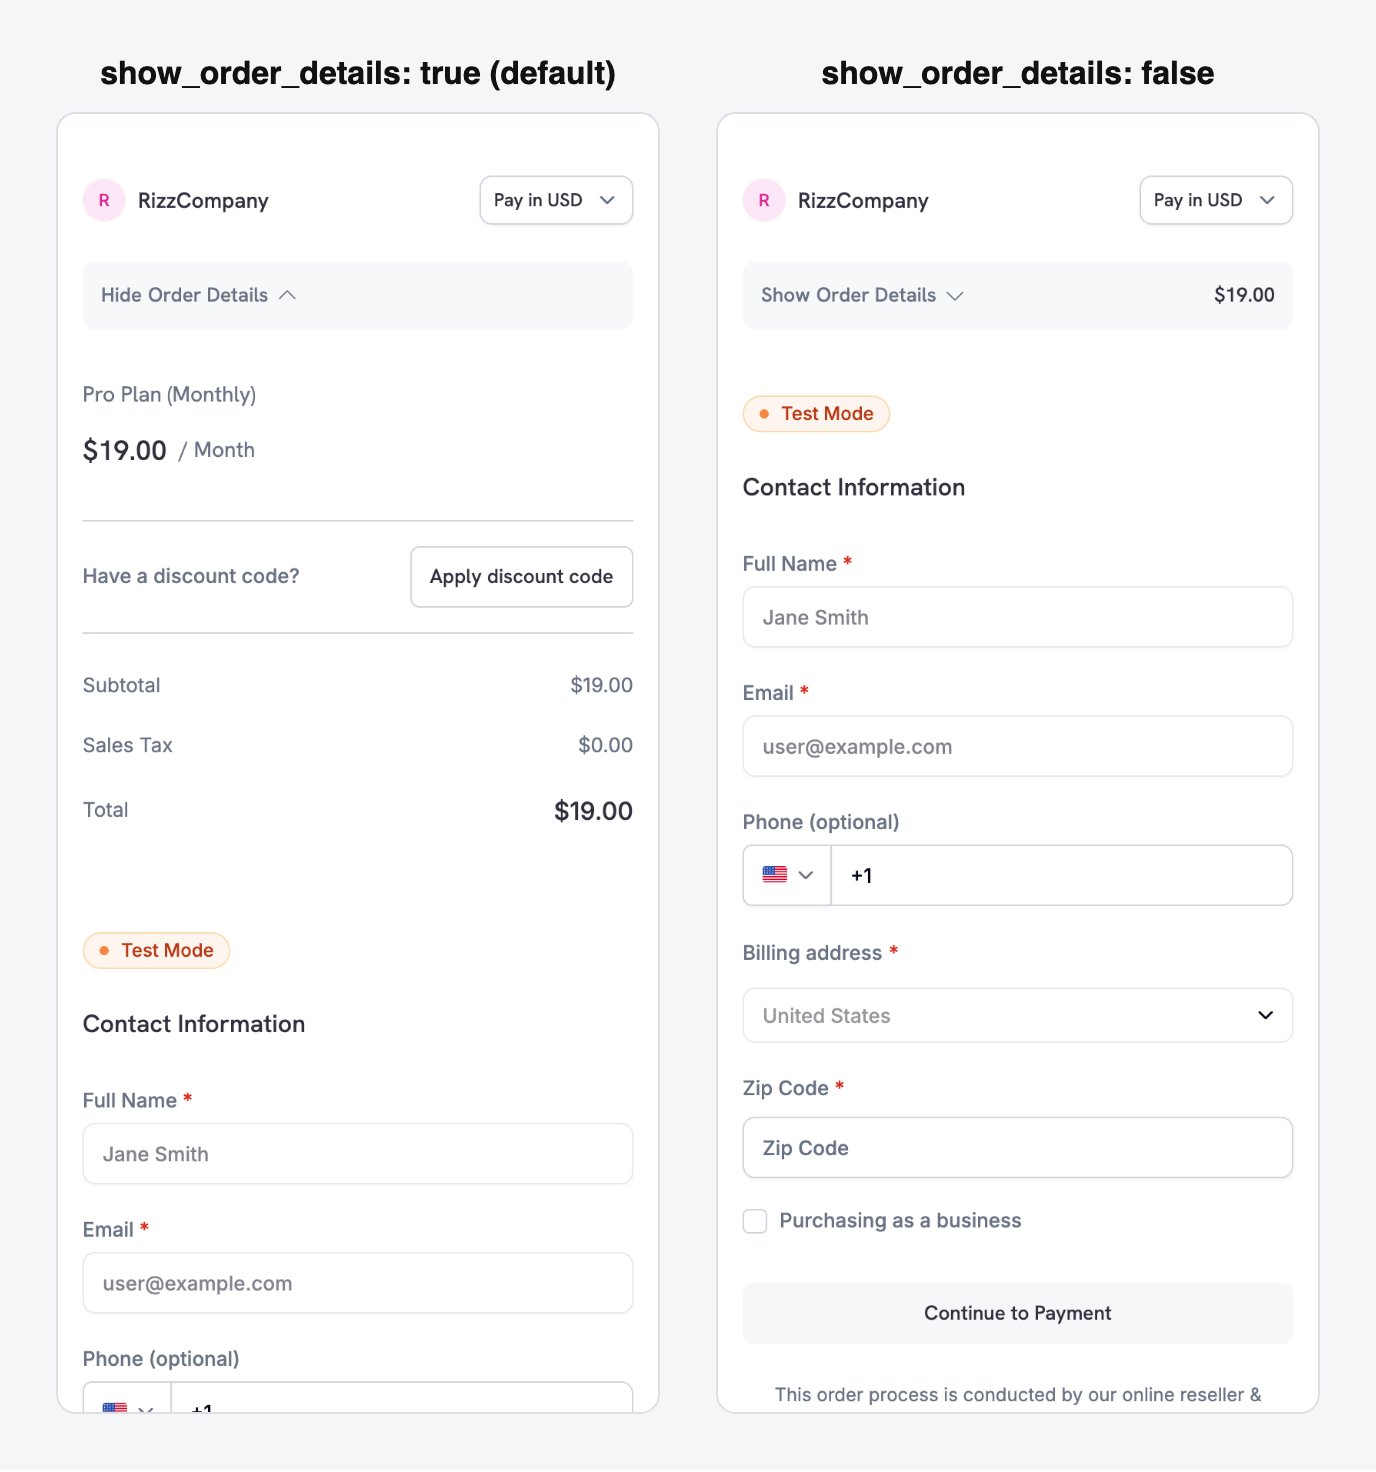 Set `minimal_address: true` to collect only a postcode instead of the full street, city, and state fields:
 Set `theme: "system"` so the checkout follows the device's light or dark mode preference:
 **Payment methods depend on the product type.** Apple Pay and Cash App Pay support non-zero recurring subscriptions. One-time payments can use every payment method enabled for your business. See [Payment Methods](/features/payment-methods).
Every parameter, type, and default value, in the Checkout Sessions guide.
## Mobile-Optimized Recipes
Each recipe is a complete checkout session request that your backend sends. Pick the one that matches your scenario and replace the product ID with your own. The Node.js and Python clients are set up in the first recipe, and the other recipes reuse them.
Use this recipe for the shortest form: payment methods at the top, only a postcode for the address, no discount field, and a theme that follows the device.
```javascript expandable theme={null}
import DodoPayments from 'dodopayments';
const client = new DodoPayments({
bearerToken: process.env.DODO_PAYMENTS_API_KEY,
environment: 'test_mode',
});
const session = await client.checkoutSessions.create({
product_cart: [{ product_id: 'pdt_your_product_id', quantity: 1 }],
customer: { email: 'user@example.com', name: 'Jane Smith' },
billing_address: { country: 'US' },
return_url: 'myapp://checkout/success',
cancel_url: 'myapp://checkout/cancelled',
billing_currency: 'USD',
minimal_address: true,
customization: {
show_order_details: false,
theme: 'system',
},
feature_flags: {
allow_discount_code: false,
allow_currency_selection: false,
},
});
console.log(session.checkout_url);
```
```python expandable theme={null}
import os
import dodopayments
client = dodopayments.DodoPayments(
bearer_token=os.environ.get("DODO_PAYMENTS_API_KEY"),
environment="test_mode",
)
session = client.checkout_sessions.create(
product_cart=[{"product_id": "pdt_your_product_id", "quantity": 1}],
customer={"email": "user@example.com", "name": "Jane Smith"},
billing_address={"country": "US"},
return_url="myapp://checkout/success",
cancel_url="myapp://checkout/cancelled",
billing_currency="USD",
minimal_address=True,
customization={
"show_order_details": False,
"theme": "system",
},
feature_flags={
"allow_discount_code": False,
"allow_currency_selection": False,
},
)
print(session.checkout_url)
```
See [Checkout Sessions](/developer-resources/checkout-session) for all available parameters and their defaults.
Use this recipe when the checkout page must look like part of your app. It sets your brand colors, a border radius, and a custom pay button label.
**Payment methods depend on the product type.** Apple Pay and Cash App Pay support non-zero recurring subscriptions. One-time payments can use every payment method enabled for your business. See [Payment Methods](/features/payment-methods).
Every parameter, type, and default value, in the Checkout Sessions guide.
## Mobile-Optimized Recipes
Each recipe is a complete checkout session request that your backend sends. Pick the one that matches your scenario and replace the product ID with your own. The Node.js and Python clients are set up in the first recipe, and the other recipes reuse them.
Use this recipe for the shortest form: payment methods at the top, only a postcode for the address, no discount field, and a theme that follows the device.
```javascript expandable theme={null}
import DodoPayments from 'dodopayments';
const client = new DodoPayments({
bearerToken: process.env.DODO_PAYMENTS_API_KEY,
environment: 'test_mode',
});
const session = await client.checkoutSessions.create({
product_cart: [{ product_id: 'pdt_your_product_id', quantity: 1 }],
customer: { email: 'user@example.com', name: 'Jane Smith' },
billing_address: { country: 'US' },
return_url: 'myapp://checkout/success',
cancel_url: 'myapp://checkout/cancelled',
billing_currency: 'USD',
minimal_address: true,
customization: {
show_order_details: false,
theme: 'system',
},
feature_flags: {
allow_discount_code: false,
allow_currency_selection: false,
},
});
console.log(session.checkout_url);
```
```python expandable theme={null}
import os
import dodopayments
client = dodopayments.DodoPayments(
bearer_token=os.environ.get("DODO_PAYMENTS_API_KEY"),
environment="test_mode",
)
session = client.checkout_sessions.create(
product_cart=[{"product_id": "pdt_your_product_id", "quantity": 1}],
customer={"email": "user@example.com", "name": "Jane Smith"},
billing_address={"country": "US"},
return_url="myapp://checkout/success",
cancel_url="myapp://checkout/cancelled",
billing_currency="USD",
minimal_address=True,
customization={
"show_order_details": False,
"theme": "system",
},
feature_flags={
"allow_discount_code": False,
"allow_currency_selection": False,
},
)
print(session.checkout_url)
```
See [Checkout Sessions](/developer-resources/checkout-session) for all available parameters and their defaults.
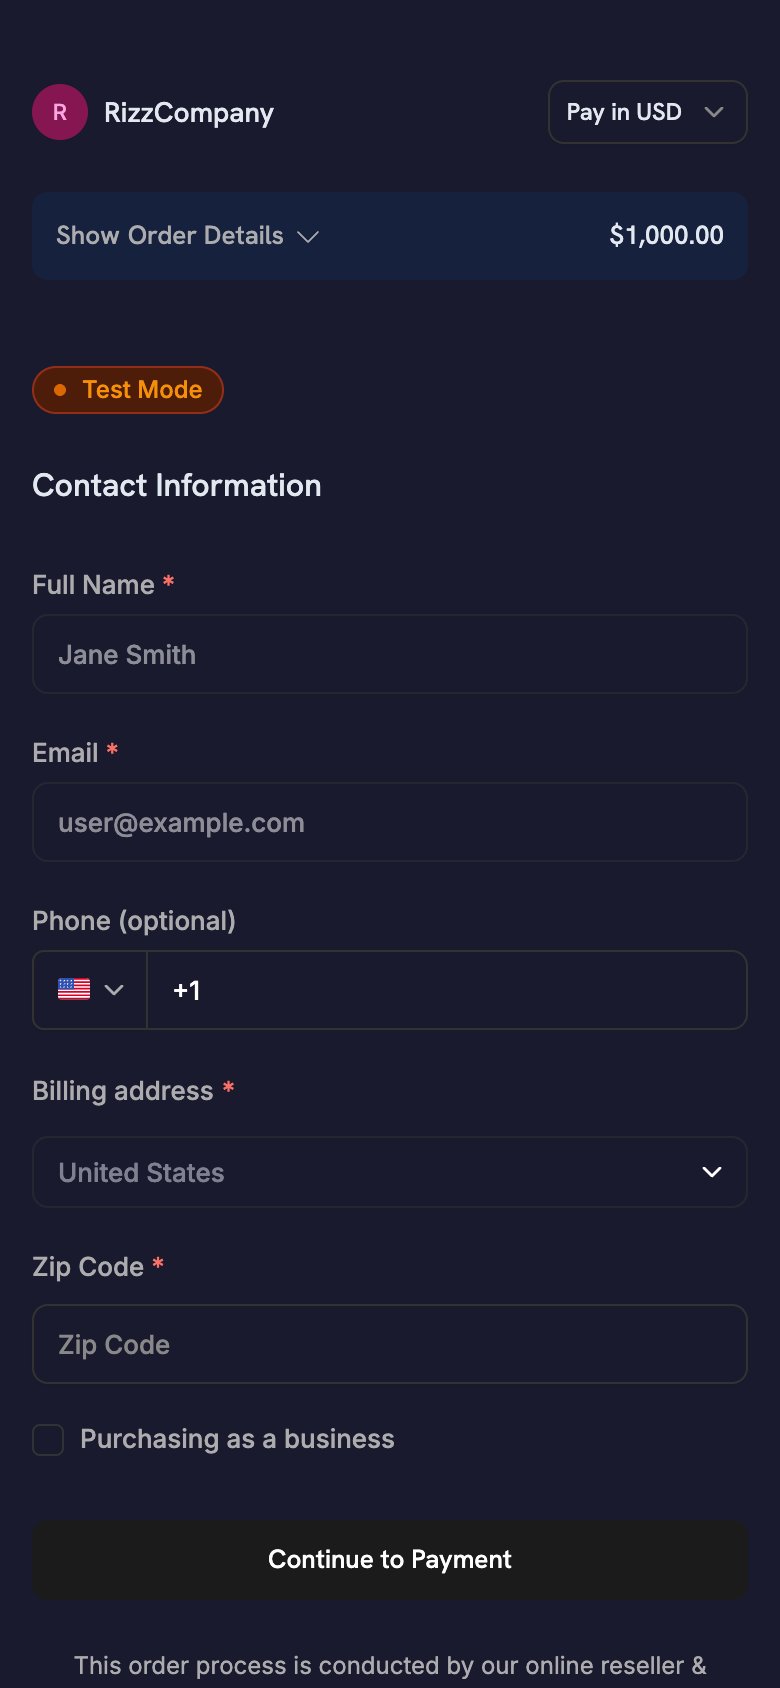
Use this recipe when the checkout page must look like part of your app. It sets your brand colors, a border radius, and a custom pay button label.
 ```javascript expandable theme={null}
const session = await client.checkoutSessions.create({
product_cart: [{ product_id: 'pdt_your_product_id', quantity: 1 }],
customer: { email: 'user@example.com', name: 'Jane Smith' },
billing_address: { country: 'US' },
billing_currency: 'USD',
return_url: 'myapp://checkout/success',
minimal_address: true,
customization: {
show_order_details: false,
theme: 'dark',
theme_config: {
dark: {
button_primary: '#7C3AED',
button_primary_hover: '#6D28D9',
button_text_primary: '#FFFFFF',
bg_primary: '#1A1A2E',
bg_secondary: '#16213E',
text_primary: '#E2E8F0',
},
pay_button_text: 'Complete Purchase',
radius: '8px',
},
},
});
```
```python expandable theme={null}
session = client.checkout_sessions.create(
product_cart=[{"product_id": "pdt_your_product_id", "quantity": 1}],
customer={"email": "user@example.com", "name": "Jane Smith"},
billing_address={"country": "US"},
billing_currency="USD",
return_url="myapp://checkout/success",
minimal_address=True,
customization={
"show_order_details": False,
"theme": "dark",
"theme_config": {
"dark": {
"button_primary": "#7C3AED",
"button_primary_hover": "#6D28D9",
"button_text_primary": "#FFFFFF",
"bg_primary": "#1A1A2E",
"bg_secondary": "#16213E",
"text_primary": "#E2E8F0",
},
"pay_button_text": "Complete Purchase",
"radius": "8px",
},
},
)
```
`theme_config` accepts separate `dark` and `light` objects, so the palette follows the device's appearance. For every color key and the font option, see [Checkout Sessions](/developer-resources/checkout-session).
Use this recipe for signed-in customers who have paid before. Pass the customer's `customer_id`, their saved `payment_method_id`, and `confirm: true` to skip the checkout form. With a `payment_method_id`, the session charges the saved method directly and returns no `checkout_url`, so your app has nothing to open. Learn the outcome from webhooks.
```javascript expandable theme={null}
const session = await client.checkoutSessions.create({
product_cart: [{ product_id: 'pdt_your_product_id', quantity: 1 }],
customer: { customer_id: 'cus_returning_customer_id' },
// confirm: true requires a complete billing address
billing_address: {
country: 'US',
state: 'CA',
city: 'San Francisco',
street: '123 Main St',
zipcode: '94102',
},
billing_currency: 'USD',
return_url: 'myapp://checkout/success',
payment_method_id: 'pm_saved_payment_method_id',
confirm: true,
show_saved_payment_methods: true, // top-level parameter
feature_flags: { redirect_immediately: true },
});
```
```python expandable theme={null}
session = client.checkout_sessions.create(
product_cart=[{"product_id": "pdt_your_product_id", "quantity": 1}],
customer={"customer_id": "cus_returning_customer_id"},
# confirm=True requires a complete billing address
billing_address={
"country": "US",
"state": "CA",
"city": "San Francisco",
"street": "123 Main St",
"zipcode": "94102",
},
billing_currency="USD",
return_url="myapp://checkout/success",
payment_method_id="pm_saved_payment_method_id",
confirm=True,
show_saved_payment_methods=True, # top-level parameter
feature_flags={"redirect_immediately": True},
)
```
Grant access when your backend receives the `payment.succeeded` webhook. Any `status` your app shows is a UI hint only.
Use this recipe for a subscription product with a free trial before the first charge. `trial_period_days` sets the trial length for this session.
```javascript expandable theme={null}
const session = await client.checkoutSessions.create({
product_cart: [{ product_id: 'pdt_your_subscription_product_id', quantity: 1 }],
customer: { email: 'user@example.com', name: 'Jane Smith' },
billing_address: { country: 'US' },
billing_currency: 'USD',
return_url: 'myapp://subscription/activated',
cancel_url: 'myapp://subscription/cancelled',
minimal_address: true,
customization: {
show_order_details: false,
theme: 'system',
},
subscription_data: { trial_period_days: 14 },
});
```
```python expandable theme={null}
session = client.checkout_sessions.create(
product_cart=[{"product_id": "pdt_your_subscription_product_id", "quantity": 1}],
customer={"email": "user@example.com", "name": "Jane Smith"},
billing_address={"country": "US"},
billing_currency="USD",
return_url="myapp://subscription/activated",
cancel_url="myapp://subscription/cancelled",
minimal_address=True,
customization={"show_order_details": False, "theme": "system"},
subscription_data={"trial_period_days": 14},
)
```
Grant access when your backend receives the `subscription.active` webhook, not when the mobile SDK returns. For the full webhook flow, see the [Subscription Integration Guide](/developer-resources/subscription-integration-guide).
Use this recipe to save a customer's payment method for later charges, such as wallet top-ups, pay-as-you-go, or BNPL, without showing a subscription label. The customer authorizes the payment method once, and you charge variable amounts later.
Apps that charge by usage follow this pattern. For example, an astrology app charges a pre-authorized card for each session instead of on a fixed schedule.
```javascript expandable theme={null}
// Step 1: Authorize the mandate (no charge yet)
const session = await client.checkoutSessions.create({
product_cart: [{ product_id: 'pdt_your_subscription_product_id', quantity: 1 }],
customer: { email: 'user@example.com', name: 'Jane Smith' },
billing_address: { country: 'US' },
billing_currency: 'USD',
return_url: 'myapp://mandate/authorized',
cancel_url: 'myapp://mandate/cancelled',
minimal_address: true,
customization: {
show_order_details: false,
show_on_demand_tag: false, // hides the "on-demand" / "subscription" label
theme: 'system',
},
subscription_data: {
on_demand: { mandate_only: true },
},
});
// Step 2: Later, charge any amount using the subscription ID
// (received via the subscription.active webhook after mandate authorization)
// await client.subscriptions.charge(subscriptionId, {
// product_price: 2000, // $20.00 in cents
// product_currency: 'USD',
// product_description: 'Session credits',
// });
```
```python expandable theme={null}
# Step 1: Authorize the mandate (no charge yet)
session = client.checkout_sessions.create(
product_cart=[{"product_id": "pdt_your_subscription_product_id", "quantity": 1}],
customer={"email": "user@example.com", "name": "Jane Smith"},
billing_address={"country": "US"},
billing_currency="USD",
return_url="myapp://mandate/authorized",
cancel_url="myapp://mandate/cancelled",
minimal_address=True,
customization={
"show_order_details": False,
"show_on_demand_tag": False, # hides the "on-demand" / "subscription" label
"theme": "system",
},
subscription_data={"on_demand": {"mandate_only": True}},
)
# Step 2: Later, charge any amount using the subscription ID
# client.subscriptions.charge(
# subscription_id,
# product_price=2000, # $20.00 in cents
# product_currency="USD",
# product_description="Session credits",
# )
```
An on-demand charge must be at least `100` in the smallest currency unit (\$1.00 for USD). The API rejects a lower `product_price` with `"product_price: value out of range"`. To authorize without charging, use `mandate_only: true` as shown above, then charge at least that minimum later.
For the full charge flow, webhook events, and retry policies, see [On-Demand Subscriptions](/developer-resources/ondemand-subscriptions).
## Subscription Flows from Mobile
A mobile app starts a subscription with the same checkout session flow as a one-time payment. The SDK opens hosted checkout, the customer subscribes, and your app handles the deep-link return. Your backend manages the rest of the subscription lifecycle.
### Regular Recurring Subscriptions
For billing at a fixed interval, such as monthly or yearly, create a checkout session with a subscription product and a deep-link `return_url`. Your backend receives `subscription.active` when the subscription starts.
**Apple Pay** and **Cash App Pay** support non-zero recurring subscriptions.
For the complete backend webhook flow, see the [Subscription Integration Guide](/developer-resources/subscription-integration-guide).
***
### On-Demand Subscriptions
An on-demand subscription authorizes a customer's payment method once, so you can charge variable amounts later. Use it for wallet top-ups, pay-as-you-go, and any charge whose amount you don't know in advance. For the full request body, see the **On-Demand Mandate** recipe.
On mobile, keep these points in mind:
* Set `show_on_demand_tag: false` so the checkout page doesn't show subscription or on-demand wording. Customers who save a card for top-ups don't expect subscription terms.
* After the customer authorizes the mandate, your backend receives `subscription.active`. Store the `subscription_id`, because every later charge uses it.
An on-demand charge must be at least `100` in the smallest currency unit (\$1.00 for USD). The API rejects a lower amount with `"product_price: value out of range"`. Charge at least that minimum, or use `mandate_only: true` to authorize without charging and collect the first amount later.
**Don't retry charges in quick succession.** While a previous charge on the same subscription is still processing, a new charge fails with `"Cannot create new charge as previous payment is not successful yet"`. This happens most often with Indian payment methods (UPI and Indian debit and credit cards), where the deduction happens 48 hours after the charge starts. Check that the previous charge has finished before you retry.
For the charge endpoint, webhook events, and retry policies, see [On-Demand Subscriptions](/developer-resources/ondemand-subscriptions).
***
### Subscription with Free Trial
To offer a trial before the first charge, pass `subscription_data.trial_period_days` in the checkout session. The customer authorizes a payment method at signup, and Dodo Payments charges it when the trial ends. For the full request body, see the **Subscription with Free Trial** recipe.
***
### Upgrades and Downgrades
Your backend changes plans through the API, not through a new checkout session. Dodo Payments calculates proration with the proration mode you choose. To let customers change plans themselves, link to the [Customer Portal](/features/customer-portal).
Backend setup: webhook flow, access provisioning, and cancellation.
Mandate authorization, variable charges, and retry policies.
Proration modes, plan changes, and seat adjustments.
Self-service subscription management for your customers.
## Reducing Checkout Drop-Offs
On a small screen, every form field takes more effort to fill in. The checkout session settings below shorten the form and reduce drop-offs.
### Optimize the Form
These settings shorten the checkout form on mobile:
| Setting | Recommended value | Effect |
| - | - | - |
| `show_order_details` | `false` | Collapses the order summary, so payment methods appear at the top |
| `minimal_address` | `true` | Asks for only a postcode, or a region where required, instead of street, city, and state |
| `show_saved_payment_methods` | `true` | Shows saved payment methods to returning customers |
| `allow_discount_code` | `false` | Removes the discount code field |
| `theme` | `"system"` | Follows the device's light or dark setting |
| `force_language` | Your app's language | Stops checkout from using the browser language |
### Pre-Fill Customer Data
Each field you pre-fill is one the customer doesn't have to type:
* **New customers**: set `customer.email` and `customer.name` from your auth session.
* **Returning customers**: set `customer.customer_id` to use the customer's stored details.
* **Currency**: pass `billing_currency` and `billing_address.country` together.
### Recovery Tools
Recovery tools bring back customers whose checkout or renewal didn't complete:
Email sequences for abandoned or failed checkouts.
Automatic retries for failed subscription renewals.
Emails that recover subscriptions with failed payments.
Every recovery tool and the revenue it recovers.
## Best Practices
* **Security**: Never ship an API key in your app. Create checkout sessions on your backend and pass only the `checkout_url` to the app.
* **Authority**: Treat `CheckoutResult.status` as a UI hint. Grant access only after your backend confirms the payment.
* **User Experience**: Show a loading state while your backend creates the session. Don't treat `cancelled` as a failure, because the payment may still have succeeded.
* **Testing**: Use test mode and test cards, and check the return URL round trip on a real device as well as a simulator.
* **Conversion**: Set `show_order_details: false` and `minimal_address: true`. Together they move payment methods above the fold and remove most address fields.
* **Currency**: Pass both `billing_currency` and `billing_address.country`. If you omit either one, Adaptive Currency can pick the billing currency from the customer's IP address.
* **On-demand billing**: Set `show_on_demand_tag: false` when you use on-demand subscriptions only to save a card. Customers who top up a wallet don't expect subscription wording.
* **Recovery**: Turn on Abandoned Cart Recovery in the dashboard to email customers who don't complete checkout.
## Troubleshooting
### Common Issues
* **Callback never arrives**: The scheme in `returnUrl` must match the scheme you registered. On Android, that is the `dodoCallbackScheme` manifest placeholder. On iOS, it is the `Info.plist` URL type. React Native and Flutter apps need both, and in Expo the config plugin sets both.
* **Checkout returns to the browser instead of your app (iOS)**: Your app doesn't forward the incoming URL. Call `DodoCheckout.handleOpenURL(url)` from `.onOpenURL`, `scene(_:openURLContexts:)`, or a React Native `Linking` listener.
* **`PLATFORM_ERROR` on Android**: The most common cause is a scheme mismatch. It also appears when your `MainActivity` sets `android:taskAffinity=""` (the `flutter create` default), which lets some Android OEM builds lose the in-progress checkout.
* **`ALREADY_IN_PROGRESS`**: A checkout is still open. Wait for the previous one to finish, or dismiss it, before you start another.
* **Build fails with an unresolved placeholder**: You added the Android SDK but didn't set `manifestPlaceholders["dodoCallbackScheme"]`.
* **Payment succeeded but access wasn't granted**: Your app grants access from the mobile result. Grant access from the `payment.succeeded` or `subscription.active` webhook instead.
* **Apple Pay or Google Pay doesn't appear on mobile**: Check whether checkout is loading inside an embedded WebView (`WKWebView` or Android `WebView`). Open it with the SDK, or in the system browser surface: a Custom Tab on Android, or `SFSafariViewController` or `ASWebAuthenticationSession` on iOS.
## Additional Resources
* [Payment Integration Guide](/developer-resources/integration-guide)
* [Webhook Documentation](/developer-resources/webhooks/intents/webhook-events-guide)
* [Testing Process](/miscellaneous/testing-process)
* [Technical FAQs](/miscellaneous/faq)
* [Checkout Session Customization](/developer-resources/checkout-session)
* [On-Demand Subscriptions](/developer-resources/ondemand-subscriptions)
* [Subscription Upgrade/Downgrade](/developer-resources/subscription-upgrade-downgrade)
* [Abandoned Cart Recovery](/features/recovery/abandoned-cart-recovery)
* [Customer Portal](/features/customer-portal)
For questions or support, email [support@dodopayments.com](mailto:support@dodopayments.com).
This documentation is built and hosted on [Mintlify](https://mintlify.com), a developer documentation platform.
```javascript expandable theme={null}
const session = await client.checkoutSessions.create({
product_cart: [{ product_id: 'pdt_your_product_id', quantity: 1 }],
customer: { email: 'user@example.com', name: 'Jane Smith' },
billing_address: { country: 'US' },
billing_currency: 'USD',
return_url: 'myapp://checkout/success',
minimal_address: true,
customization: {
show_order_details: false,
theme: 'dark',
theme_config: {
dark: {
button_primary: '#7C3AED',
button_primary_hover: '#6D28D9',
button_text_primary: '#FFFFFF',
bg_primary: '#1A1A2E',
bg_secondary: '#16213E',
text_primary: '#E2E8F0',
},
pay_button_text: 'Complete Purchase',
radius: '8px',
},
},
});
```
```python expandable theme={null}
session = client.checkout_sessions.create(
product_cart=[{"product_id": "pdt_your_product_id", "quantity": 1}],
customer={"email": "user@example.com", "name": "Jane Smith"},
billing_address={"country": "US"},
billing_currency="USD",
return_url="myapp://checkout/success",
minimal_address=True,
customization={
"show_order_details": False,
"theme": "dark",
"theme_config": {
"dark": {
"button_primary": "#7C3AED",
"button_primary_hover": "#6D28D9",
"button_text_primary": "#FFFFFF",
"bg_primary": "#1A1A2E",
"bg_secondary": "#16213E",
"text_primary": "#E2E8F0",
},
"pay_button_text": "Complete Purchase",
"radius": "8px",
},
},
)
```
`theme_config` accepts separate `dark` and `light` objects, so the palette follows the device's appearance. For every color key and the font option, see [Checkout Sessions](/developer-resources/checkout-session).
Use this recipe for signed-in customers who have paid before. Pass the customer's `customer_id`, their saved `payment_method_id`, and `confirm: true` to skip the checkout form. With a `payment_method_id`, the session charges the saved method directly and returns no `checkout_url`, so your app has nothing to open. Learn the outcome from webhooks.
```javascript expandable theme={null}
const session = await client.checkoutSessions.create({
product_cart: [{ product_id: 'pdt_your_product_id', quantity: 1 }],
customer: { customer_id: 'cus_returning_customer_id' },
// confirm: true requires a complete billing address
billing_address: {
country: 'US',
state: 'CA',
city: 'San Francisco',
street: '123 Main St',
zipcode: '94102',
},
billing_currency: 'USD',
return_url: 'myapp://checkout/success',
payment_method_id: 'pm_saved_payment_method_id',
confirm: true,
show_saved_payment_methods: true, // top-level parameter
feature_flags: { redirect_immediately: true },
});
```
```python expandable theme={null}
session = client.checkout_sessions.create(
product_cart=[{"product_id": "pdt_your_product_id", "quantity": 1}],
customer={"customer_id": "cus_returning_customer_id"},
# confirm=True requires a complete billing address
billing_address={
"country": "US",
"state": "CA",
"city": "San Francisco",
"street": "123 Main St",
"zipcode": "94102",
},
billing_currency="USD",
return_url="myapp://checkout/success",
payment_method_id="pm_saved_payment_method_id",
confirm=True,
show_saved_payment_methods=True, # top-level parameter
feature_flags={"redirect_immediately": True},
)
```
Grant access when your backend receives the `payment.succeeded` webhook. Any `status` your app shows is a UI hint only.
Use this recipe for a subscription product with a free trial before the first charge. `trial_period_days` sets the trial length for this session.
```javascript expandable theme={null}
const session = await client.checkoutSessions.create({
product_cart: [{ product_id: 'pdt_your_subscription_product_id', quantity: 1 }],
customer: { email: 'user@example.com', name: 'Jane Smith' },
billing_address: { country: 'US' },
billing_currency: 'USD',
return_url: 'myapp://subscription/activated',
cancel_url: 'myapp://subscription/cancelled',
minimal_address: true,
customization: {
show_order_details: false,
theme: 'system',
},
subscription_data: { trial_period_days: 14 },
});
```
```python expandable theme={null}
session = client.checkout_sessions.create(
product_cart=[{"product_id": "pdt_your_subscription_product_id", "quantity": 1}],
customer={"email": "user@example.com", "name": "Jane Smith"},
billing_address={"country": "US"},
billing_currency="USD",
return_url="myapp://subscription/activated",
cancel_url="myapp://subscription/cancelled",
minimal_address=True,
customization={"show_order_details": False, "theme": "system"},
subscription_data={"trial_period_days": 14},
)
```
Grant access when your backend receives the `subscription.active` webhook, not when the mobile SDK returns. For the full webhook flow, see the [Subscription Integration Guide](/developer-resources/subscription-integration-guide).
Use this recipe to save a customer's payment method for later charges, such as wallet top-ups, pay-as-you-go, or BNPL, without showing a subscription label. The customer authorizes the payment method once, and you charge variable amounts later.
Apps that charge by usage follow this pattern. For example, an astrology app charges a pre-authorized card for each session instead of on a fixed schedule.
```javascript expandable theme={null}
// Step 1: Authorize the mandate (no charge yet)
const session = await client.checkoutSessions.create({
product_cart: [{ product_id: 'pdt_your_subscription_product_id', quantity: 1 }],
customer: { email: 'user@example.com', name: 'Jane Smith' },
billing_address: { country: 'US' },
billing_currency: 'USD',
return_url: 'myapp://mandate/authorized',
cancel_url: 'myapp://mandate/cancelled',
minimal_address: true,
customization: {
show_order_details: false,
show_on_demand_tag: false, // hides the "on-demand" / "subscription" label
theme: 'system',
},
subscription_data: {
on_demand: { mandate_only: true },
},
});
// Step 2: Later, charge any amount using the subscription ID
// (received via the subscription.active webhook after mandate authorization)
// await client.subscriptions.charge(subscriptionId, {
// product_price: 2000, // $20.00 in cents
// product_currency: 'USD',
// product_description: 'Session credits',
// });
```
```python expandable theme={null}
# Step 1: Authorize the mandate (no charge yet)
session = client.checkout_sessions.create(
product_cart=[{"product_id": "pdt_your_subscription_product_id", "quantity": 1}],
customer={"email": "user@example.com", "name": "Jane Smith"},
billing_address={"country": "US"},
billing_currency="USD",
return_url="myapp://mandate/authorized",
cancel_url="myapp://mandate/cancelled",
minimal_address=True,
customization={
"show_order_details": False,
"show_on_demand_tag": False, # hides the "on-demand" / "subscription" label
"theme": "system",
},
subscription_data={"on_demand": {"mandate_only": True}},
)
# Step 2: Later, charge any amount using the subscription ID
# client.subscriptions.charge(
# subscription_id,
# product_price=2000, # $20.00 in cents
# product_currency="USD",
# product_description="Session credits",
# )
```
An on-demand charge must be at least `100` in the smallest currency unit (\$1.00 for USD). The API rejects a lower `product_price` with `"product_price: value out of range"`. To authorize without charging, use `mandate_only: true` as shown above, then charge at least that minimum later.
For the full charge flow, webhook events, and retry policies, see [On-Demand Subscriptions](/developer-resources/ondemand-subscriptions).
## Subscription Flows from Mobile
A mobile app starts a subscription with the same checkout session flow as a one-time payment. The SDK opens hosted checkout, the customer subscribes, and your app handles the deep-link return. Your backend manages the rest of the subscription lifecycle.
### Regular Recurring Subscriptions
For billing at a fixed interval, such as monthly or yearly, create a checkout session with a subscription product and a deep-link `return_url`. Your backend receives `subscription.active` when the subscription starts.
**Apple Pay** and **Cash App Pay** support non-zero recurring subscriptions.
For the complete backend webhook flow, see the [Subscription Integration Guide](/developer-resources/subscription-integration-guide).
***
### On-Demand Subscriptions
An on-demand subscription authorizes a customer's payment method once, so you can charge variable amounts later. Use it for wallet top-ups, pay-as-you-go, and any charge whose amount you don't know in advance. For the full request body, see the **On-Demand Mandate** recipe.
On mobile, keep these points in mind:
* Set `show_on_demand_tag: false` so the checkout page doesn't show subscription or on-demand wording. Customers who save a card for top-ups don't expect subscription terms.
* After the customer authorizes the mandate, your backend receives `subscription.active`. Store the `subscription_id`, because every later charge uses it.
An on-demand charge must be at least `100` in the smallest currency unit (\$1.00 for USD). The API rejects a lower amount with `"product_price: value out of range"`. Charge at least that minimum, or use `mandate_only: true` to authorize without charging and collect the first amount later.
**Don't retry charges in quick succession.** While a previous charge on the same subscription is still processing, a new charge fails with `"Cannot create new charge as previous payment is not successful yet"`. This happens most often with Indian payment methods (UPI and Indian debit and credit cards), where the deduction happens 48 hours after the charge starts. Check that the previous charge has finished before you retry.
For the charge endpoint, webhook events, and retry policies, see [On-Demand Subscriptions](/developer-resources/ondemand-subscriptions).
***
### Subscription with Free Trial
To offer a trial before the first charge, pass `subscription_data.trial_period_days` in the checkout session. The customer authorizes a payment method at signup, and Dodo Payments charges it when the trial ends. For the full request body, see the **Subscription with Free Trial** recipe.
***
### Upgrades and Downgrades
Your backend changes plans through the API, not through a new checkout session. Dodo Payments calculates proration with the proration mode you choose. To let customers change plans themselves, link to the [Customer Portal](/features/customer-portal).
Backend setup: webhook flow, access provisioning, and cancellation.
Mandate authorization, variable charges, and retry policies.
Proration modes, plan changes, and seat adjustments.
Self-service subscription management for your customers.
## Reducing Checkout Drop-Offs
On a small screen, every form field takes more effort to fill in. The checkout session settings below shorten the form and reduce drop-offs.
### Optimize the Form
These settings shorten the checkout form on mobile:
| Setting | Recommended value | Effect |
| - | - | - |
| `show_order_details` | `false` | Collapses the order summary, so payment methods appear at the top |
| `minimal_address` | `true` | Asks for only a postcode, or a region where required, instead of street, city, and state |
| `show_saved_payment_methods` | `true` | Shows saved payment methods to returning customers |
| `allow_discount_code` | `false` | Removes the discount code field |
| `theme` | `"system"` | Follows the device's light or dark setting |
| `force_language` | Your app's language | Stops checkout from using the browser language |
### Pre-Fill Customer Data
Each field you pre-fill is one the customer doesn't have to type:
* **New customers**: set `customer.email` and `customer.name` from your auth session.
* **Returning customers**: set `customer.customer_id` to use the customer's stored details.
* **Currency**: pass `billing_currency` and `billing_address.country` together.
### Recovery Tools
Recovery tools bring back customers whose checkout or renewal didn't complete:
Email sequences for abandoned or failed checkouts.
Automatic retries for failed subscription renewals.
Emails that recover subscriptions with failed payments.
Every recovery tool and the revenue it recovers.
## Best Practices
* **Security**: Never ship an API key in your app. Create checkout sessions on your backend and pass only the `checkout_url` to the app.
* **Authority**: Treat `CheckoutResult.status` as a UI hint. Grant access only after your backend confirms the payment.
* **User Experience**: Show a loading state while your backend creates the session. Don't treat `cancelled` as a failure, because the payment may still have succeeded.
* **Testing**: Use test mode and test cards, and check the return URL round trip on a real device as well as a simulator.
* **Conversion**: Set `show_order_details: false` and `minimal_address: true`. Together they move payment methods above the fold and remove most address fields.
* **Currency**: Pass both `billing_currency` and `billing_address.country`. If you omit either one, Adaptive Currency can pick the billing currency from the customer's IP address.
* **On-demand billing**: Set `show_on_demand_tag: false` when you use on-demand subscriptions only to save a card. Customers who top up a wallet don't expect subscription wording.
* **Recovery**: Turn on Abandoned Cart Recovery in the dashboard to email customers who don't complete checkout.
## Troubleshooting
### Common Issues
* **Callback never arrives**: The scheme in `returnUrl` must match the scheme you registered. On Android, that is the `dodoCallbackScheme` manifest placeholder. On iOS, it is the `Info.plist` URL type. React Native and Flutter apps need both, and in Expo the config plugin sets both.
* **Checkout returns to the browser instead of your app (iOS)**: Your app doesn't forward the incoming URL. Call `DodoCheckout.handleOpenURL(url)` from `.onOpenURL`, `scene(_:openURLContexts:)`, or a React Native `Linking` listener.
* **`PLATFORM_ERROR` on Android**: The most common cause is a scheme mismatch. It also appears when your `MainActivity` sets `android:taskAffinity=""` (the `flutter create` default), which lets some Android OEM builds lose the in-progress checkout.
* **`ALREADY_IN_PROGRESS`**: A checkout is still open. Wait for the previous one to finish, or dismiss it, before you start another.
* **Build fails with an unresolved placeholder**: You added the Android SDK but didn't set `manifestPlaceholders["dodoCallbackScheme"]`.
* **Payment succeeded but access wasn't granted**: Your app grants access from the mobile result. Grant access from the `payment.succeeded` or `subscription.active` webhook instead.
* **Apple Pay or Google Pay doesn't appear on mobile**: Check whether checkout is loading inside an embedded WebView (`WKWebView` or Android `WebView`). Open it with the SDK, or in the system browser surface: a Custom Tab on Android, or `SFSafariViewController` or `ASWebAuthenticationSession` on iOS.
## Additional Resources
* [Payment Integration Guide](/developer-resources/integration-guide)
* [Webhook Documentation](/developer-resources/webhooks/intents/webhook-events-guide)
* [Testing Process](/miscellaneous/testing-process)
* [Technical FAQs](/miscellaneous/faq)
* [Checkout Session Customization](/developer-resources/checkout-session)
* [On-Demand Subscriptions](/developer-resources/ondemand-subscriptions)
* [Subscription Upgrade/Downgrade](/developer-resources/subscription-upgrade-downgrade)
* [Abandoned Cart Recovery](/features/recovery/abandoned-cart-recovery)
* [Customer Portal](/features/customer-portal)
For questions or support, email [support@dodopayments.com](mailto:support@dodopayments.com).
This documentation is built and hosted on [Mintlify](https://mintlify.com), a developer documentation platform.