> ## Documentation Index
> Fetch the complete documentation index at: https://docs.dodopayments.com/llms.txt
> Use this file to discover all available pages before exploring further.
# Third-Party Analytics
> Track page views and e-commerce events on your Dodo Payments storefront, checkout, and Customer Portal with Google Analytics 4, Google Tag Manager, and Meta Pixel.
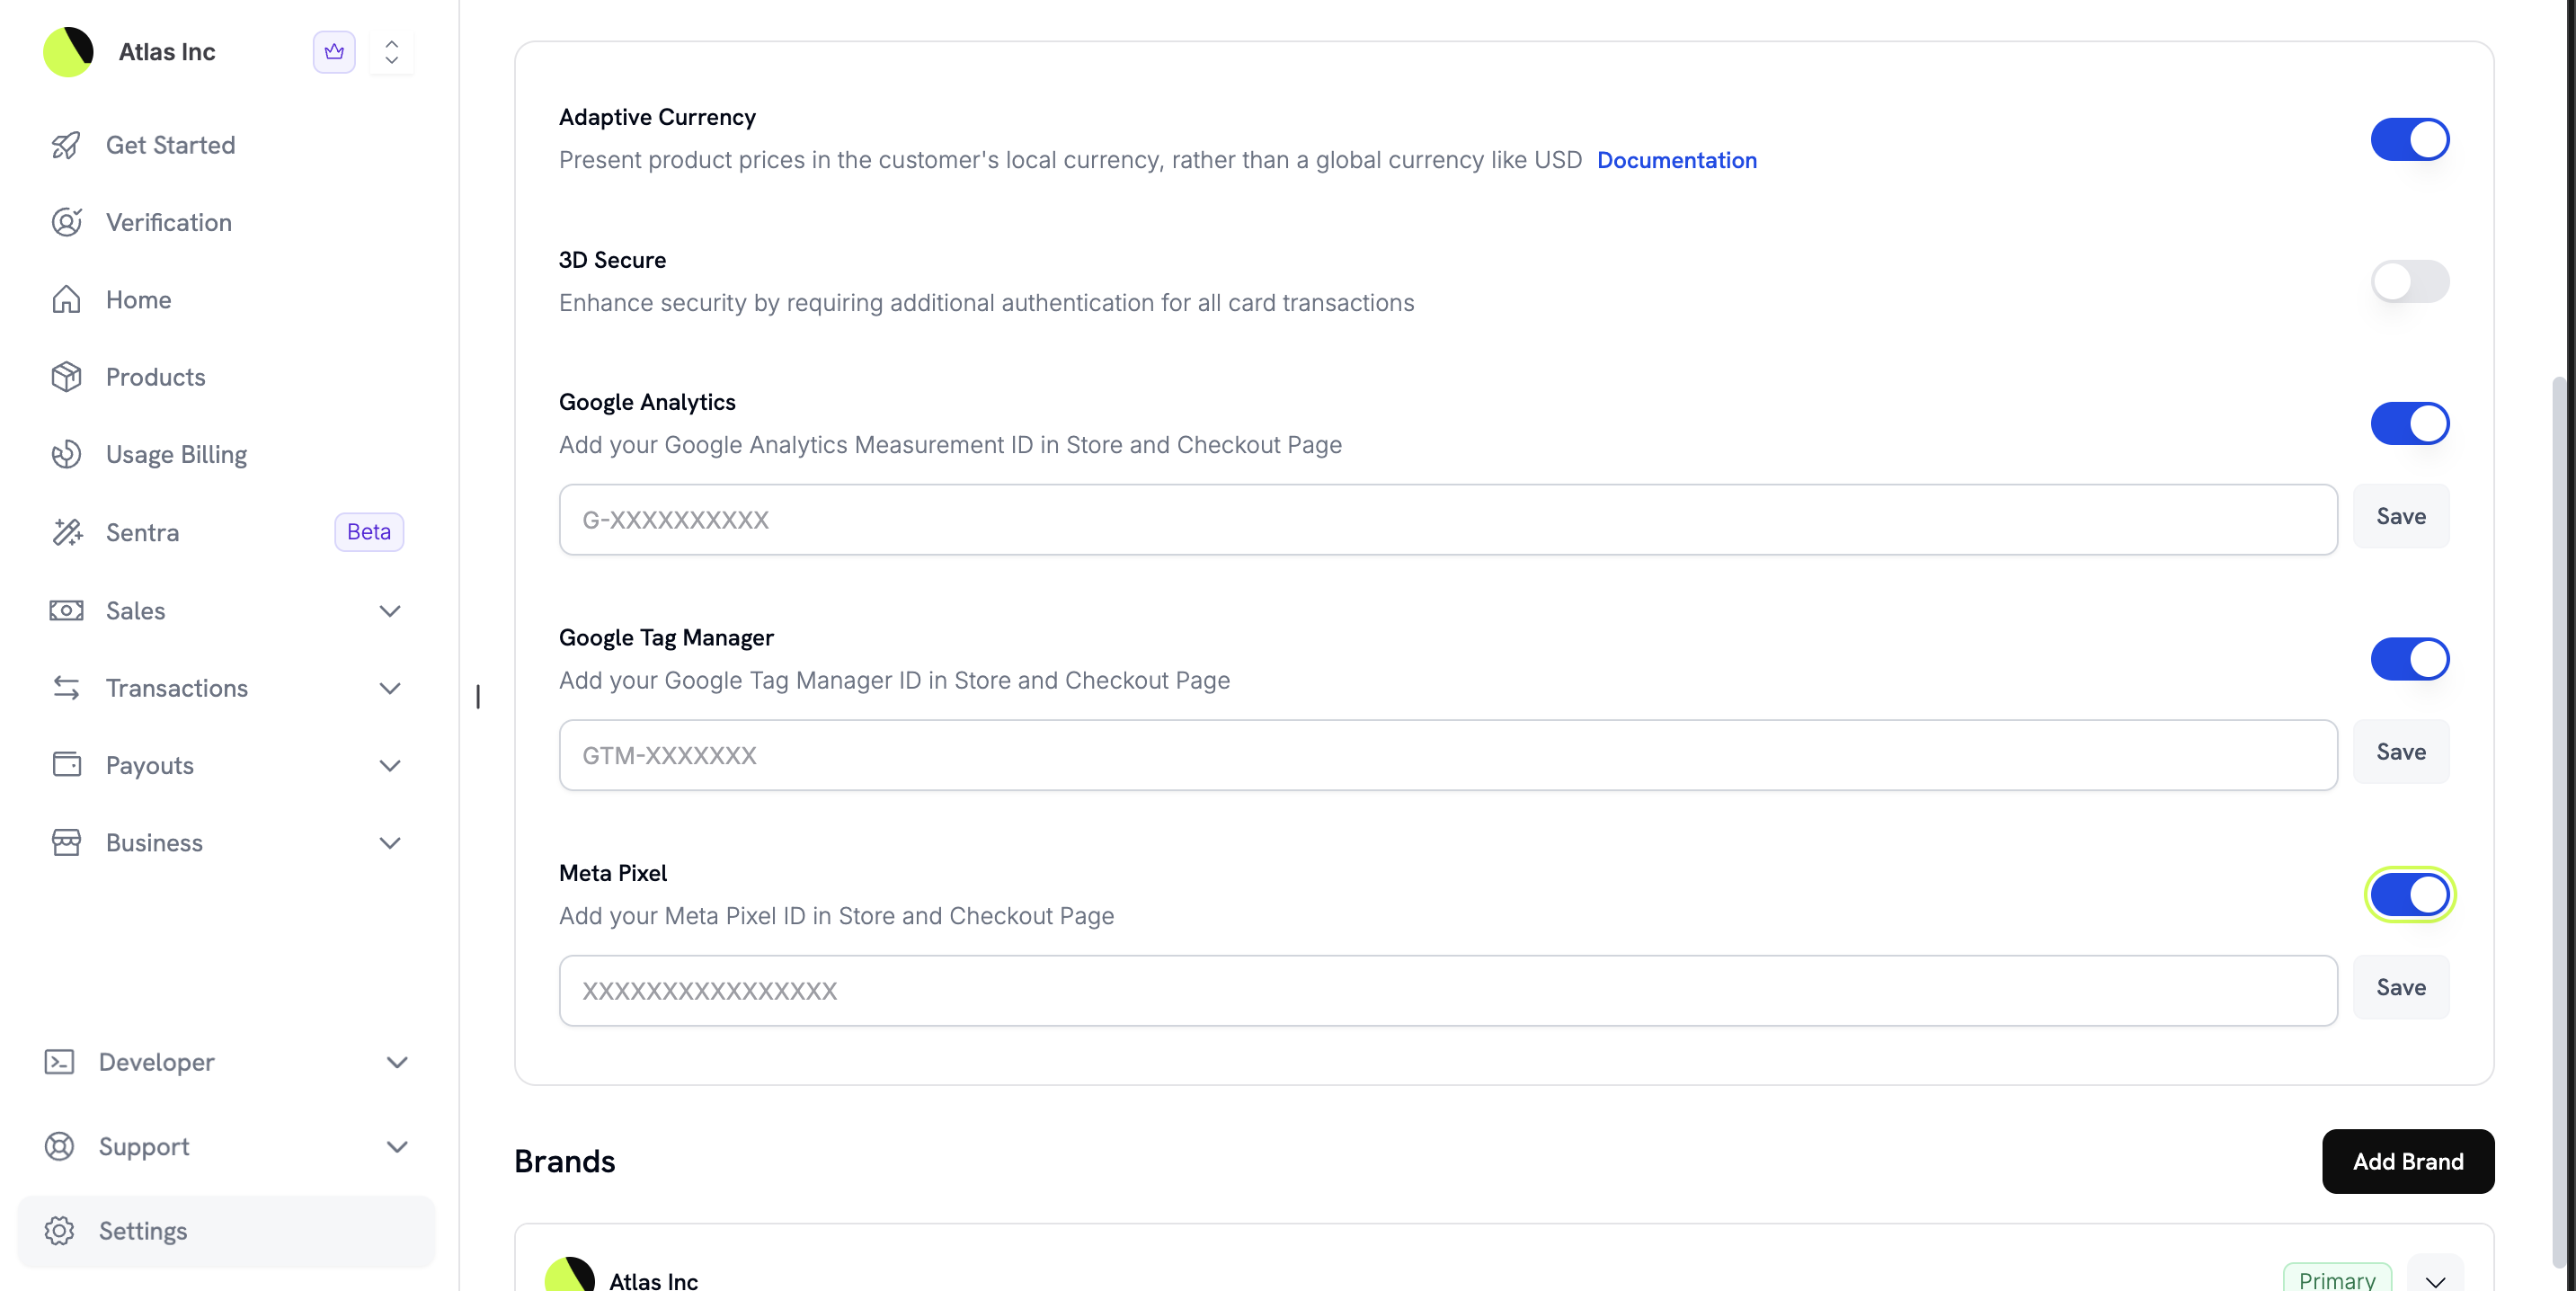 Follow each customer from your storefront through checkout to a completed purchase. Dodo Payments sends events from your hosted pages to Google Analytics 4, Google Tag Manager, and Meta Pixel.
Tracking turns on for your Storefront, checkout pages, and Customer Portal as soon as you add a tracking ID in the dashboard.
Ad blockers in customer browsers can stop tracking for some visitors to your store.
## Supported Platforms
Page views and e-commerce tracking with GA4.
Add and manage marketing tags.
Track Facebook and Instagram ad conversions.
## Getting Started
You need an ID from at least one platform: a Google Analytics 4 Measurement ID, a Google Tag Manager Container ID, or a Meta Pixel ID.
In the Dodo Payments dashboard, go to **Settings → Tracking Integrations**.
Turn on the toggle for the platform you want to use, then enter its tracking ID:
* **Google Analytics**: your Measurement ID, which starts with `G-` (format: `G-XXXXXXXXXX`).
* **Google Tag Manager**: your Container ID, which starts with `GTM-` (format: `GTM-XXXXXXX`).
* **Meta Pixel**: your Pixel ID, a number of 10 to 20 digits.
Click **Save** next to the ID. To change a saved ID, click **Edit**. To stop tracking, turn the toggle off, which removes the ID.
Open your storefront or a test checkout, then confirm that the events arrive in your analytics dashboard.
## Google Analytics 4
[Google Analytics 4](https://marketingplatform.google.com/about/analytics/) reports web traffic and e-commerce activity. With your Measurement ID added, it records the customer journey from browsing your store to completing a purchase.
### Add Your Google Analytics Measurement ID
1. In Google Analytics, go to **Admin** → **Data Streams** and select your web stream.
2. Copy the **Measurement ID**, which starts with `G-`.
3. In the Dodo Payments dashboard, go to **Settings → Tracking Integrations**.
4. Turn on **Google Analytics** and paste your Measurement ID.
5. Click **Save**.
If you don't have a Google Analytics property yet, follow [Google's setup guide](https://support.google.com/analytics/answer/9304153) to create one.
### Events Tracked in Google Analytics
Dodo Payments sends these events from your hosted storefront and checkout pages. Events carry product details, amounts, and currency where they apply.
#### Storefront Events
| Event | Description |
| - | - |
| `view_item_list` | Fires when the storefront page loads with products. |
| `select_item` | Fires when a customer clicks a product to start checkout. |
#### Checkout Events
| Event | Description |
| - | - |
| `view_item` | Fires when the checkout page loads. |
| `apply_discount`\* | Fires when a valid discount code is applied. |
| `remove_discount`\* | Fires when a discount code is removed. |
| `add_payment_info` | Fires when the customer submits the payment form. |
| `purchase` | Fires when the payment succeeds. |
`apply_discount` and `remove_discount` are custom events. They aren't part of the [standard Google Analytics e-commerce events](https://support.google.com/analytics/answer/9267735).
### Using GA4 with Overlay/Inline Checkout
To track Google Analytics events in overlay or inline checkout on your own website, install the Google Analytics tracking code on the page where you embed checkout.
The embedded checkout then sends the checkout events listed above to your Google Analytics property. No other configuration is needed.
## Google Tag Manager
[Google Tag Manager](https://marketingplatform.google.com/about/tag-manager/) manages marketing and analytics tags without code changes. Dodo Payments loads your GTM container on your storefront, checkout, and Customer Portal pages, so the tags you publish in the container fire there.
The payment status page, which reports the `purchase` event, doesn't load your GTM container.
### Add Your GTM Container ID
1. In Google Tag Manager, copy your **Container ID**, which starts with `GTM-`.
2. In the Dodo Payments dashboard, go to **Settings → Tracking Integrations**.
3. Turn on **Google Tag Manager** and paste your Container ID.
4. Click **Save**.
You can add more tracking in your GTM container, such as Google Ads conversions. Dodo Payments injects both the GTM script and its `noscript` fallback.
### Using GTM with Overlay/Inline Checkout
For overlay or inline checkout embedded on your website, install GTM on your own site. The embedded checkout loads the Container ID saved in your dashboard and fires its events inside the checkout frame.
## Meta Pixel
[Meta Pixel](https://www.facebook.com/business/tools/meta-pixel/) tracks customer actions on your store, so you can measure your Facebook and Instagram ad campaigns from ad click to completed purchase.
### Add Your Meta Pixel ID
1. In [Meta Events Manager](https://www.facebook.com/events_manager2/), create or select your Pixel.
2. Copy the **Pixel ID**, a number that is typically 15 or 16 digits long.
3. In the Dodo Payments dashboard, go to **Settings → Tracking Integrations**.
4. Turn on **Meta Pixel** and paste your Pixel ID.
5. Click **Save**.
If you haven't created a Pixel yet, follow Meta's [Pixel setup guide](https://www.facebook.com/business/help/952192354843755).
### Events Tracked with Meta Pixel
These events appear in your [Meta Events Manager](https://www.facebook.com/events_manager2/). Events carry content IDs, values, and currency where they apply.
Events can take several minutes to appear in Meta Events Manager.
#### Storefront Events
| Event | Description |
| - | - |
| `PageView` | Fires when the storefront page loads. |
| `ViewContent` | Fires when the storefront loads with products. |
| `InitiateCheckout` | Fires when a customer clicks a product to start checkout. |
#### Checkout Events
| Event | Description |
| - | - |
| `PageView` | Fires when the checkout page loads. |
| `AddToCart` | Fires when the checkout loads. |
| `ApplyDiscount`\* | Fires when a valid discount code is applied. |
| `RemoveDiscount`\* | Fires when a discount code is removed. |
| `AddPaymentInfo` | Fires when the customer submits the payment form. |
| `Purchase` | Fires when the payment succeeds. |
`ApplyDiscount` and `RemoveDiscount` are custom events. They aren't part of [Meta's standard events](https://developers.facebook.com/docs/meta-pixel/reference#standard-events).
## Complete Events Reference
This table maps each trigger to its Google Analytics 4 and Meta Pixel events:
| Trigger | GA4 Event | Meta Pixel Event | Location |
| - | - | - | - |
| Page loads | - | `PageView` | Storefront and Checkout |
| Storefront page loads | `view_item_list` | `ViewContent` | Storefront |
| Customer clicks product | `select_item` | `InitiateCheckout` | Storefront |
| Checkout page loads | `view_item` | `AddToCart` | Checkout |
| Discount code applied | `apply_discount` | `ApplyDiscount` | Checkout |
| Discount code removed | `remove_discount` | `RemoveDiscount` | Checkout |
| Payment form submitted | `add_payment_info` | `AddPaymentInfo` | Checkout |
| Payment successful | `purchase` | `Purchase` | Checkout |
## Platform Coverage
Tracking support differs by Dodo Payments surface:
| Surface | Google Analytics 4 | Google Tag Manager | Meta Pixel |
| - | - | - | - |
| Storefront | Yes | Yes | Yes |
| Checkout (Hosted) | Yes | Yes | Yes |
| Checkout (Overlay/Inline)\* | Yes | Yes | Yes |
| Customer Portal | Yes | Yes | No |
\*For overlay and inline checkout, install the tracking code on your own website for full attribution. The embedded checkout tracks its own events automatically.
## Event Data Included
Each event carries the e-commerce data you need to analyze customer behavior. Amounts are in major currency units, for example `10.5` for \$10.50.
### Product Data
* Product ID
* Product name
* Price
* Currency
* Quantity
### Transaction Data (Purchase Events)
* Payment ID, sent as the transaction ID
* Total amount
* Tax amount
* Currency
Purchase events don't include the discount code. The code is sent only with the `ApplyDiscount` and `RemoveDiscount` events.
### Customer Data
Events don't include customer data. Dodo Payments sends no customer ID and no email address to Google Analytics, Google Tag Manager, or Meta Pixel.
## Best Practices
After you add your tracking IDs, open your storefront and complete a test checkout, then confirm that the events appear in your analytics dashboards. Use the Google Analytics Realtime report or the Test Events tool in Meta Events Manager.
Add UTM parameters to your marketing links to see which campaigns drive conversions.
In Google Analytics, create a conversion event for `purchase` to track your conversion rate. In Meta Ads Manager, use the `Purchase` event as the optimization goal for your campaigns.
If you use Google Tag Manager, consider setting up Enhanced E-commerce reports for funnel analysis and product performance metrics.
## Troubleshooting
* Check that your Measurement ID is correct (format: `G-XXXXXXXXXX`).
* Check the Google Analytics Realtime report, where events appear first.
* Confirm that the **Google Analytics** toggle is on in **Settings → Tracking Integrations**.
* Wait a few minutes, because Google Analytics can take time to process events.
* Test in a private browser window to rule out ad blockers.
* Check that your Pixel ID is correct: a number of 10 to 20 digits.
* Debug with the Meta Pixel Helper browser extension.
* Check the **Test Events** tab in Events Manager.
* Wait several minutes, because events can take that long to appear.
* Turn off ad blockers while you test.
* Check that your Container ID is correct (format: `GTM-XXXXXXX`).
* Debug tag firing with GTM Preview mode.
* Check that the triggers in your GTM container are configured correctly.
* Confirm that the container is published, not only saved as a draft.
* Install the tracking code on your own website first.
* Make sure the tracking code loads before the checkout overlay opens.
* Check the browser console for JavaScript errors.
* If you use GA4, check that cross-domain tracking is configured.
* Amounts are sent in major currency units, for example `10.5` for \$10.50, not in the smallest currency unit.
* Check that your analytics tool displays the correct currency.
* Check whether tax is included or excluded as you expect. The `purchase` event reports tax in its own `tax` field.
## Related Resources
Send payment events to Segment for analytics and customer data platform workflows.
Track sale conversions and affiliate attribution with Dub.
Trigger automated email campaigns from payment events.
Build custom analytics integrations with webhook events.
This documentation is built and hosted on [Mintlify](https://mintlify.com), a developer documentation platform.
Follow each customer from your storefront through checkout to a completed purchase. Dodo Payments sends events from your hosted pages to Google Analytics 4, Google Tag Manager, and Meta Pixel.
Tracking turns on for your Storefront, checkout pages, and Customer Portal as soon as you add a tracking ID in the dashboard.
Ad blockers in customer browsers can stop tracking for some visitors to your store.
## Supported Platforms
Page views and e-commerce tracking with GA4.
Add and manage marketing tags.
Track Facebook and Instagram ad conversions.
## Getting Started
You need an ID from at least one platform: a Google Analytics 4 Measurement ID, a Google Tag Manager Container ID, or a Meta Pixel ID.
In the Dodo Payments dashboard, go to **Settings → Tracking Integrations**.
Turn on the toggle for the platform you want to use, then enter its tracking ID:
* **Google Analytics**: your Measurement ID, which starts with `G-` (format: `G-XXXXXXXXXX`).
* **Google Tag Manager**: your Container ID, which starts with `GTM-` (format: `GTM-XXXXXXX`).
* **Meta Pixel**: your Pixel ID, a number of 10 to 20 digits.
Click **Save** next to the ID. To change a saved ID, click **Edit**. To stop tracking, turn the toggle off, which removes the ID.
Open your storefront or a test checkout, then confirm that the events arrive in your analytics dashboard.
## Google Analytics 4
[Google Analytics 4](https://marketingplatform.google.com/about/analytics/) reports web traffic and e-commerce activity. With your Measurement ID added, it records the customer journey from browsing your store to completing a purchase.
### Add Your Google Analytics Measurement ID
1. In Google Analytics, go to **Admin** → **Data Streams** and select your web stream.
2. Copy the **Measurement ID**, which starts with `G-`.
3. In the Dodo Payments dashboard, go to **Settings → Tracking Integrations**.
4. Turn on **Google Analytics** and paste your Measurement ID.
5. Click **Save**.
If you don't have a Google Analytics property yet, follow [Google's setup guide](https://support.google.com/analytics/answer/9304153) to create one.
### Events Tracked in Google Analytics
Dodo Payments sends these events from your hosted storefront and checkout pages. Events carry product details, amounts, and currency where they apply.
#### Storefront Events
| Event | Description |
| - | - |
| `view_item_list` | Fires when the storefront page loads with products. |
| `select_item` | Fires when a customer clicks a product to start checkout. |
#### Checkout Events
| Event | Description |
| - | - |
| `view_item` | Fires when the checkout page loads. |
| `apply_discount`\* | Fires when a valid discount code is applied. |
| `remove_discount`\* | Fires when a discount code is removed. |
| `add_payment_info` | Fires when the customer submits the payment form. |
| `purchase` | Fires when the payment succeeds. |
`apply_discount` and `remove_discount` are custom events. They aren't part of the [standard Google Analytics e-commerce events](https://support.google.com/analytics/answer/9267735).
### Using GA4 with Overlay/Inline Checkout
To track Google Analytics events in overlay or inline checkout on your own website, install the Google Analytics tracking code on the page where you embed checkout.
The embedded checkout then sends the checkout events listed above to your Google Analytics property. No other configuration is needed.
## Google Tag Manager
[Google Tag Manager](https://marketingplatform.google.com/about/tag-manager/) manages marketing and analytics tags without code changes. Dodo Payments loads your GTM container on your storefront, checkout, and Customer Portal pages, so the tags you publish in the container fire there.
The payment status page, which reports the `purchase` event, doesn't load your GTM container.
### Add Your GTM Container ID
1. In Google Tag Manager, copy your **Container ID**, which starts with `GTM-`.
2. In the Dodo Payments dashboard, go to **Settings → Tracking Integrations**.
3. Turn on **Google Tag Manager** and paste your Container ID.
4. Click **Save**.
You can add more tracking in your GTM container, such as Google Ads conversions. Dodo Payments injects both the GTM script and its `noscript` fallback.
### Using GTM with Overlay/Inline Checkout
For overlay or inline checkout embedded on your website, install GTM on your own site. The embedded checkout loads the Container ID saved in your dashboard and fires its events inside the checkout frame.
## Meta Pixel
[Meta Pixel](https://www.facebook.com/business/tools/meta-pixel/) tracks customer actions on your store, so you can measure your Facebook and Instagram ad campaigns from ad click to completed purchase.
### Add Your Meta Pixel ID
1. In [Meta Events Manager](https://www.facebook.com/events_manager2/), create or select your Pixel.
2. Copy the **Pixel ID**, a number that is typically 15 or 16 digits long.
3. In the Dodo Payments dashboard, go to **Settings → Tracking Integrations**.
4. Turn on **Meta Pixel** and paste your Pixel ID.
5. Click **Save**.
If you haven't created a Pixel yet, follow Meta's [Pixel setup guide](https://www.facebook.com/business/help/952192354843755).
### Events Tracked with Meta Pixel
These events appear in your [Meta Events Manager](https://www.facebook.com/events_manager2/). Events carry content IDs, values, and currency where they apply.
Events can take several minutes to appear in Meta Events Manager.
#### Storefront Events
| Event | Description |
| - | - |
| `PageView` | Fires when the storefront page loads. |
| `ViewContent` | Fires when the storefront loads with products. |
| `InitiateCheckout` | Fires when a customer clicks a product to start checkout. |
#### Checkout Events
| Event | Description |
| - | - |
| `PageView` | Fires when the checkout page loads. |
| `AddToCart` | Fires when the checkout loads. |
| `ApplyDiscount`\* | Fires when a valid discount code is applied. |
| `RemoveDiscount`\* | Fires when a discount code is removed. |
| `AddPaymentInfo` | Fires when the customer submits the payment form. |
| `Purchase` | Fires when the payment succeeds. |
`ApplyDiscount` and `RemoveDiscount` are custom events. They aren't part of [Meta's standard events](https://developers.facebook.com/docs/meta-pixel/reference#standard-events).
## Complete Events Reference
This table maps each trigger to its Google Analytics 4 and Meta Pixel events:
| Trigger | GA4 Event | Meta Pixel Event | Location |
| - | - | - | - |
| Page loads | - | `PageView` | Storefront and Checkout |
| Storefront page loads | `view_item_list` | `ViewContent` | Storefront |
| Customer clicks product | `select_item` | `InitiateCheckout` | Storefront |
| Checkout page loads | `view_item` | `AddToCart` | Checkout |
| Discount code applied | `apply_discount` | `ApplyDiscount` | Checkout |
| Discount code removed | `remove_discount` | `RemoveDiscount` | Checkout |
| Payment form submitted | `add_payment_info` | `AddPaymentInfo` | Checkout |
| Payment successful | `purchase` | `Purchase` | Checkout |
## Platform Coverage
Tracking support differs by Dodo Payments surface:
| Surface | Google Analytics 4 | Google Tag Manager | Meta Pixel |
| - | - | - | - |
| Storefront | Yes | Yes | Yes |
| Checkout (Hosted) | Yes | Yes | Yes |
| Checkout (Overlay/Inline)\* | Yes | Yes | Yes |
| Customer Portal | Yes | Yes | No |
\*For overlay and inline checkout, install the tracking code on your own website for full attribution. The embedded checkout tracks its own events automatically.
## Event Data Included
Each event carries the e-commerce data you need to analyze customer behavior. Amounts are in major currency units, for example `10.5` for \$10.50.
### Product Data
* Product ID
* Product name
* Price
* Currency
* Quantity
### Transaction Data (Purchase Events)
* Payment ID, sent as the transaction ID
* Total amount
* Tax amount
* Currency
Purchase events don't include the discount code. The code is sent only with the `ApplyDiscount` and `RemoveDiscount` events.
### Customer Data
Events don't include customer data. Dodo Payments sends no customer ID and no email address to Google Analytics, Google Tag Manager, or Meta Pixel.
## Best Practices
After you add your tracking IDs, open your storefront and complete a test checkout, then confirm that the events appear in your analytics dashboards. Use the Google Analytics Realtime report or the Test Events tool in Meta Events Manager.
Add UTM parameters to your marketing links to see which campaigns drive conversions.
In Google Analytics, create a conversion event for `purchase` to track your conversion rate. In Meta Ads Manager, use the `Purchase` event as the optimization goal for your campaigns.
If you use Google Tag Manager, consider setting up Enhanced E-commerce reports for funnel analysis and product performance metrics.
## Troubleshooting
* Check that your Measurement ID is correct (format: `G-XXXXXXXXXX`).
* Check the Google Analytics Realtime report, where events appear first.
* Confirm that the **Google Analytics** toggle is on in **Settings → Tracking Integrations**.
* Wait a few minutes, because Google Analytics can take time to process events.
* Test in a private browser window to rule out ad blockers.
* Check that your Pixel ID is correct: a number of 10 to 20 digits.
* Debug with the Meta Pixel Helper browser extension.
* Check the **Test Events** tab in Events Manager.
* Wait several minutes, because events can take that long to appear.
* Turn off ad blockers while you test.
* Check that your Container ID is correct (format: `GTM-XXXXXXX`).
* Debug tag firing with GTM Preview mode.
* Check that the triggers in your GTM container are configured correctly.
* Confirm that the container is published, not only saved as a draft.
* Install the tracking code on your own website first.
* Make sure the tracking code loads before the checkout overlay opens.
* Check the browser console for JavaScript errors.
* If you use GA4, check that cross-domain tracking is configured.
* Amounts are sent in major currency units, for example `10.5` for \$10.50, not in the smallest currency unit.
* Check that your analytics tool displays the correct currency.
* Check whether tax is included or excluded as you expect. The `purchase` event reports tax in its own `tax` field.
## Related Resources
Send payment events to Segment for analytics and customer data platform workflows.
Track sale conversions and affiliate attribution with Dub.
Trigger automated email campaigns from payment events.
Build custom analytics integrations with webhook events.
This documentation is built and hosted on [Mintlify](https://mintlify.com), a developer documentation platform.