> ## Documentation Index
> Fetch the complete documentation index at: https://docs.dodopayments.com/llms.txt
> Use this file to discover all available pages before exploring further.
# Customer Management
> View every customer, their payments, subscriptions, and wallet balances in the Dodo Payments dashboard, and manage customer records through the API.
## Overview
The **Customers** page lists everyone who has bought from your business. From a customer's page you can review their payments and subscriptions, check and adjust their wallet balances, send them a Customer Portal link, and block them. The same customer records are available through the API.
View all customers in one list, filter by name or email, and open any customer's details.
Hold prepaid balances that Dodo Payments applies to subscription charges.
Let customers manage their subscriptions, invoices, and license keys themselves.
Create, update, and retrieve customers through the API.
## Accessing the Customers Page
In the dashboard, go to **Sales → Customers**.
The page lists every current and past customer of your business.
 ## Customer Information
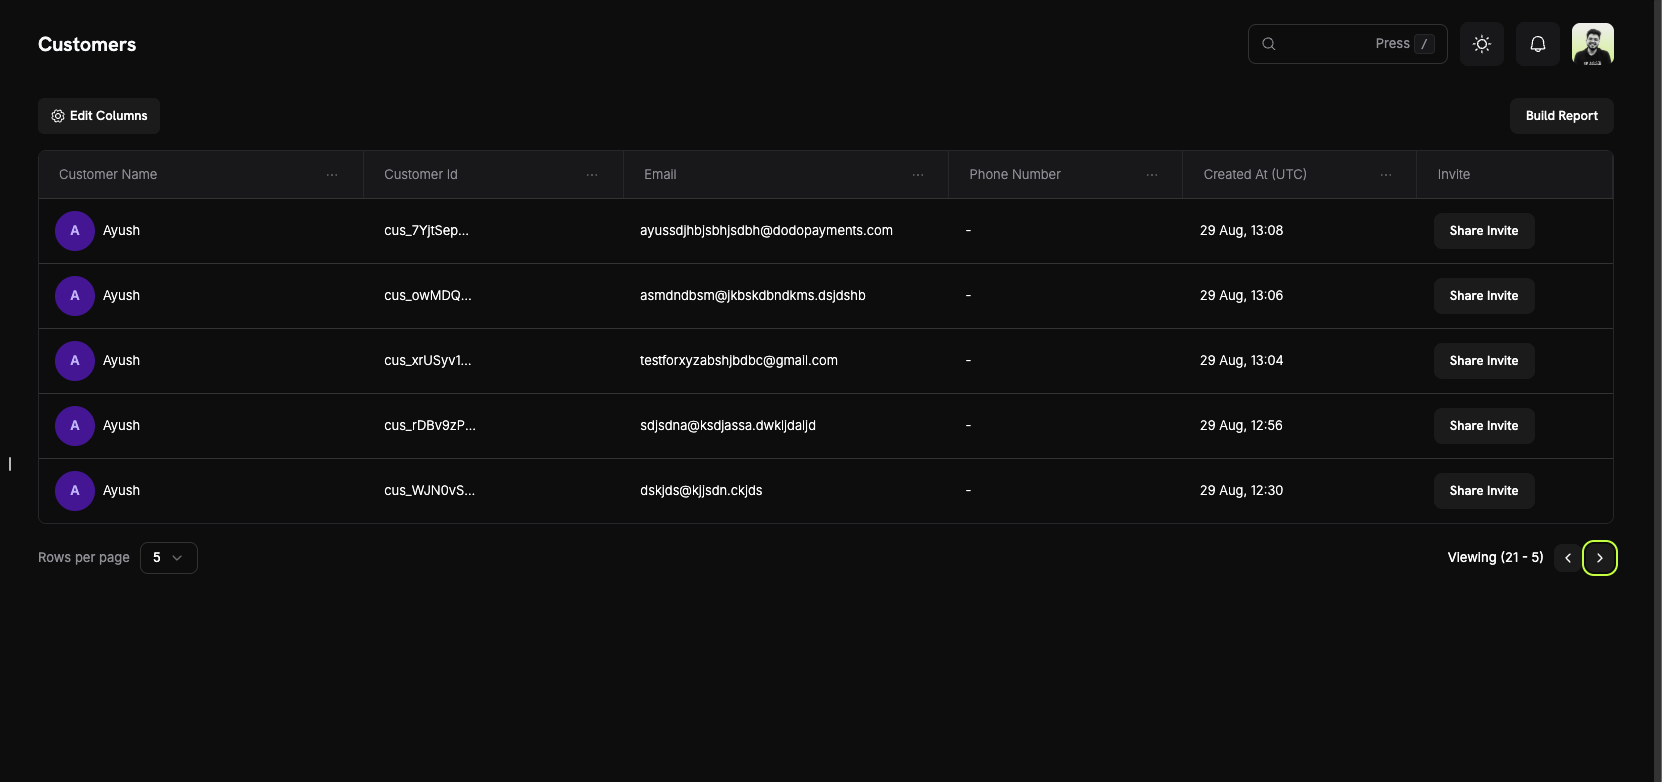
The customer table shows one row per customer, with the columns below.
### Customer List Columns
* **Customer Name**: The customer's full name, with an avatar.
* **Customer Id**: The unique identifier, starting with `cus_`. Use it in API calls.
* **Email**: The customer's email address. The customer uses it to sign in to the Customer Portal.
* **Phone Number**: The customer's phone number, if one was provided.
* **Created At**: When the customer record was created. Hover over the value to see the time in UTC.
* **Invite**: A **Share Invite** button that opens the Customer Portal links for this customer.
### Page Features
* **Column visibility**: Choose which columns the table shows.
* **Filters**: Find customers by **Name** or **Email Address**.
* **Pagination**: Move through the list and set the number of **Rows per page**.
Hide the columns you don't use so the table shows only what matters to your workflow.
## Customer Details Page
Click a customer to open their **Customer Information** page:
## Customer Information
The customer table shows one row per customer, with the columns below.
### Customer List Columns
* **Customer Name**: The customer's full name, with an avatar.
* **Customer Id**: The unique identifier, starting with `cus_`. Use it in API calls.
* **Email**: The customer's email address. The customer uses it to sign in to the Customer Portal.
* **Phone Number**: The customer's phone number, if one was provided.
* **Created At**: When the customer record was created. Hover over the value to see the time in UTC.
* **Invite**: A **Share Invite** button that opens the Customer Portal links for this customer.
### Page Features
* **Column visibility**: Choose which columns the table shows.
* **Filters**: Find customers by **Name** or **Email Address**.
* **Pagination**: Move through the list and set the number of **Rows per page**.
Hide the columns you don't use so the table shows only what matters to your workflow.
## Customer Details Page
Click a customer to open their **Customer Information** page:
 ### About Section
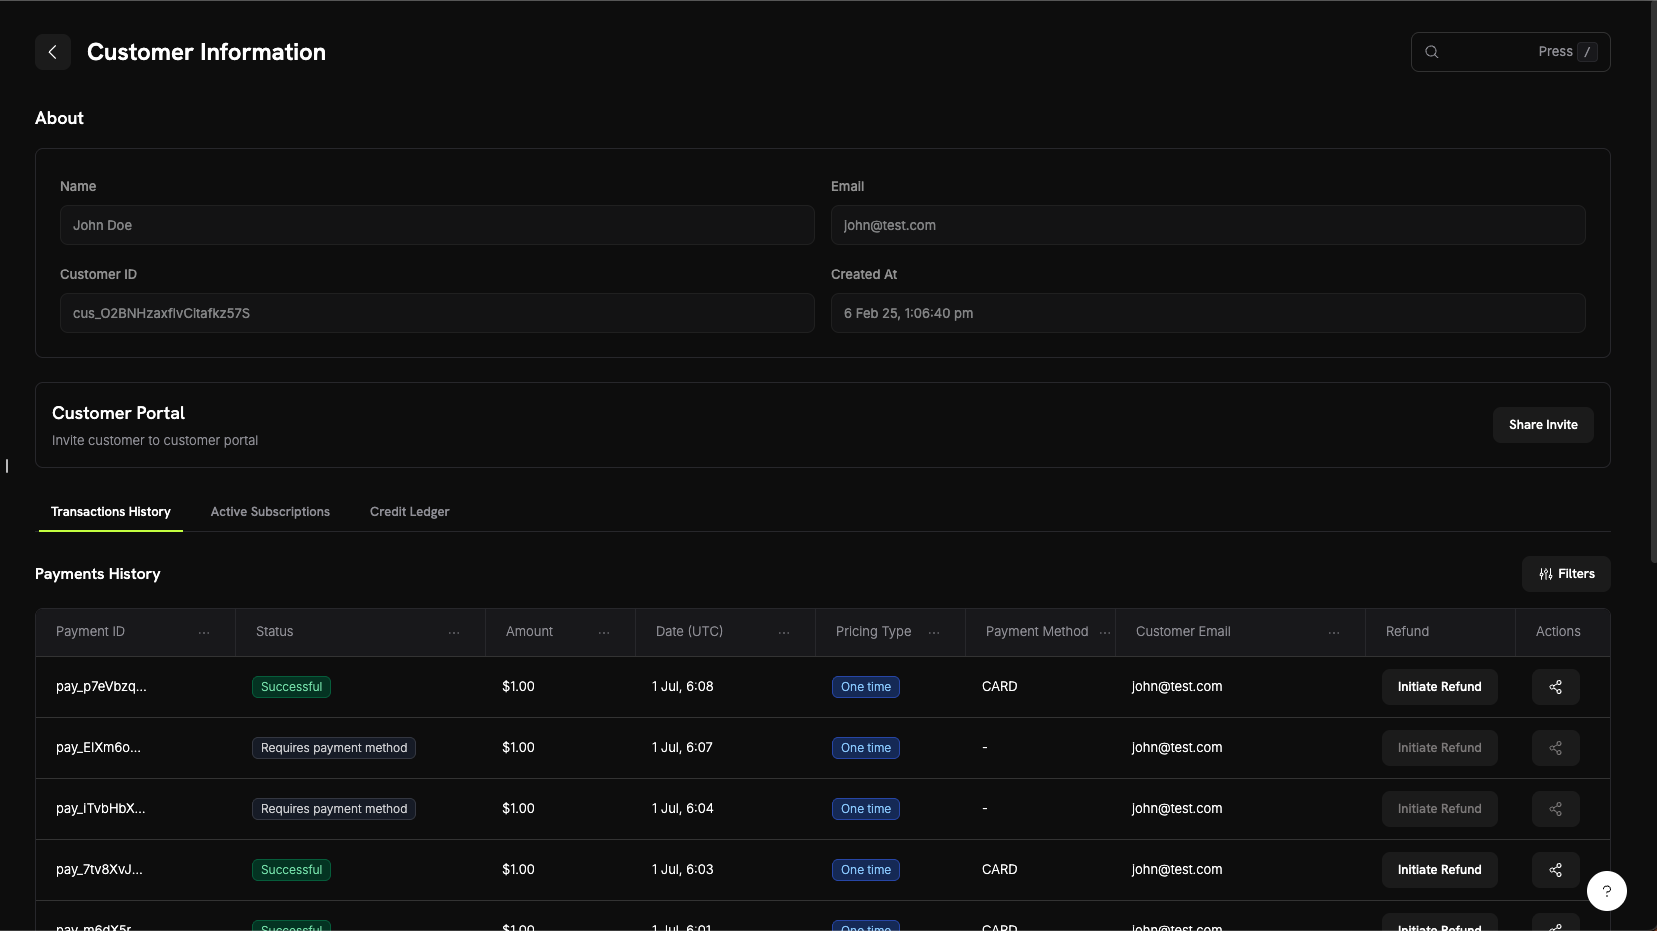
The top of the page shows the customer's core details:
* **Name**: The customer's full name.
* **Email**: The customer's email address.
* **Customer ID**: The identifier to use in the API and in support requests.
* **Created At**: When the customer record was created.
Below the details, the **Customer Portal** card has a **Share Invite** button. It shows a static link and a 24-hour dynamic link to the customer's portal. See [Access Methods](/features/customer-portal#access-methods).
### Customer Activity Tabs
Tabs below the details show the customer's activity. The main ones are described here. The page also has **Credits**, **Entitlements**, and **Sent Emails** tabs; see [Customer Email Logs](/features/email-logs) for **Sent Emails**.
The customer's payments, refunds, and disputes. The payments table shows:
* **Payment ID**: The payment's identifier, starting with `pay_`.
* **Status**: The payment status, for example **Successful**, **Failed**, or **Refunded**.
* **Amount**: The payment amount.
* **Date**: When the payment was created.
* **Pricing Type**: One-time or subscription.
* **Payment Method**: The payment method used, such as card or UPI.
* **Customer Email**: The email address on the payment.
* **Refund**: An **Initiate Refund** button.
* **Actions**: More options for the payment.
The customer's subscriptions, shown when the customer has at least one:
* Product name and subscription ID
* Next billing date and next billing amount
* Subscription status
* Click a row to open the subscription and manage or cancel it
The customer's wallet balances and wallet ledger:
* A **Total Balance**, with a per-currency breakdown under **View Breakdown**
* Every fund addition and deduction, with the balance before and after each entry
* The event type and reason for each entry
* An **Apply Credit/Debit** button to add or deduct funds from the dashboard
Use the ledger to reconcile a customer's balance.
The **Wallets** tab shows every change to a customer's wallet, so you can trace how the current balance was reached.
## Blocking a Customer
Block a customer who commits fraud or abuses refunds so they can't check out with you again. Blocking cancels the customer's live subscriptions and makes their Customer Portal read-only. A blocked customer's page shows a **Blocked** badge, an **Unblock Customer** button, and an **Activity Log** of notes explaining the block. Manage all blocks from **Settings → Blocklist**.
What a block does, how emails are matched, and how to block from the dashboard or the API.
## Customer Portal
The Customer Portal is a hosted self-service site where your customers manage their subscriptions, view billing history, and retrieve license keys without contacting support.
### Portal Capabilities
In the portal, customers can:
* **View Billing History**: See past payments and download invoices.
* **Manage Subscriptions**: View details, change plan, pause, or cancel, depending on your settings.
* **Retrieve License Keys**: See the license keys tied to their purchases.
* **Update Billing Details**: Change the name, billing address, and payment method on a subscription. Email address and phone number are shown but can't be edited in the portal.
Portal features, access methods, and integration examples.
## Customer Wallets
Customer Wallets hold prepaid money for a customer, one balance per currency. Dodo Payments applies a wallet balance to the customer's subscription charges before it charges their payment method. You add or deduct funds with a ledger entry, for example to issue a refund as wallet balance or a promotional bonus.
### Key Features
* **Multi-Currency Support**: Each currency has its own balance.
* **Prepaid Balances**: Funds are applied to future subscription renewals and plan-change charges.
* **Transaction History**: The ledger records every fund addition and deduction.
* **API-First Design**: Check balances and add or deduct funds through the API, or from the **Wallets** tab.
Supported currencies, code examples, and best practices for customer wallet balances.
## API Management
The Customers API lets you create, retrieve, and update customers, list them with filters, and manage their saved payment methods.
### Available API Endpoints
Create a customer. `name` and `email` are required. `phone_number` and `metadata` are optional.
List customers page by page. Filter by `email`, by `name` (partial match), or by creation date.
Retrieve one customer by their ID.
Update a customer's `name`, `email`, `phone_number`, or `metadata`.
Remove a saved payment method. The request fails with `409` if an active subscription uses it.
Create a Customer Portal link for one customer, valid for 24 hours.
Every endpoint requires your API key. Call the API from your server and never expose the key in client-side code.
This documentation is built and hosted on [Mintlify](https://mintlify.com), a developer documentation platform.
### About Section
The top of the page shows the customer's core details:
* **Name**: The customer's full name.
* **Email**: The customer's email address.
* **Customer ID**: The identifier to use in the API and in support requests.
* **Created At**: When the customer record was created.
Below the details, the **Customer Portal** card has a **Share Invite** button. It shows a static link and a 24-hour dynamic link to the customer's portal. See [Access Methods](/features/customer-portal#access-methods).
### Customer Activity Tabs
Tabs below the details show the customer's activity. The main ones are described here. The page also has **Credits**, **Entitlements**, and **Sent Emails** tabs; see [Customer Email Logs](/features/email-logs) for **Sent Emails**.
The customer's payments, refunds, and disputes. The payments table shows:
* **Payment ID**: The payment's identifier, starting with `pay_`.
* **Status**: The payment status, for example **Successful**, **Failed**, or **Refunded**.
* **Amount**: The payment amount.
* **Date**: When the payment was created.
* **Pricing Type**: One-time or subscription.
* **Payment Method**: The payment method used, such as card or UPI.
* **Customer Email**: The email address on the payment.
* **Refund**: An **Initiate Refund** button.
* **Actions**: More options for the payment.
The customer's subscriptions, shown when the customer has at least one:
* Product name and subscription ID
* Next billing date and next billing amount
* Subscription status
* Click a row to open the subscription and manage or cancel it
The customer's wallet balances and wallet ledger:
* A **Total Balance**, with a per-currency breakdown under **View Breakdown**
* Every fund addition and deduction, with the balance before and after each entry
* The event type and reason for each entry
* An **Apply Credit/Debit** button to add or deduct funds from the dashboard
Use the ledger to reconcile a customer's balance.
The **Wallets** tab shows every change to a customer's wallet, so you can trace how the current balance was reached.
## Blocking a Customer
Block a customer who commits fraud or abuses refunds so they can't check out with you again. Blocking cancels the customer's live subscriptions and makes their Customer Portal read-only. A blocked customer's page shows a **Blocked** badge, an **Unblock Customer** button, and an **Activity Log** of notes explaining the block. Manage all blocks from **Settings → Blocklist**.
What a block does, how emails are matched, and how to block from the dashboard or the API.
## Customer Portal
The Customer Portal is a hosted self-service site where your customers manage their subscriptions, view billing history, and retrieve license keys without contacting support.
### Portal Capabilities
In the portal, customers can:
* **View Billing History**: See past payments and download invoices.
* **Manage Subscriptions**: View details, change plan, pause, or cancel, depending on your settings.
* **Retrieve License Keys**: See the license keys tied to their purchases.
* **Update Billing Details**: Change the name, billing address, and payment method on a subscription. Email address and phone number are shown but can't be edited in the portal.
Portal features, access methods, and integration examples.
## Customer Wallets
Customer Wallets hold prepaid money for a customer, one balance per currency. Dodo Payments applies a wallet balance to the customer's subscription charges before it charges their payment method. You add or deduct funds with a ledger entry, for example to issue a refund as wallet balance or a promotional bonus.
### Key Features
* **Multi-Currency Support**: Each currency has its own balance.
* **Prepaid Balances**: Funds are applied to future subscription renewals and plan-change charges.
* **Transaction History**: The ledger records every fund addition and deduction.
* **API-First Design**: Check balances and add or deduct funds through the API, or from the **Wallets** tab.
Supported currencies, code examples, and best practices for customer wallet balances.
## API Management
The Customers API lets you create, retrieve, and update customers, list them with filters, and manage their saved payment methods.
### Available API Endpoints
Create a customer. `name` and `email` are required. `phone_number` and `metadata` are optional.
List customers page by page. Filter by `email`, by `name` (partial match), or by creation date.
Retrieve one customer by their ID.
Update a customer's `name`, `email`, `phone_number`, or `metadata`.
Remove a saved payment method. The request fails with `409` if an active subscription uses it.
Create a Customer Portal link for one customer, valid for 24 hours.
Every endpoint requires your API key. Call the API from your server and never expose the key in client-side code.
This documentation is built and hosted on [Mintlify](https://mintlify.com), a developer documentation platform.