> ## Documentation Index
> Fetch the complete documentation index at: https://docs.dodopayments.com/llms.txt
> Use this file to discover all available pages before exploring further.
# Invoice Management
> Dodo Payments generates a branded invoice for every successful payment. Set the name and logo it shows, see what it contains, and download it.
 ## Overview
Dodo Payments generates an invoice for every successful transaction, so you never create invoices by hand and every sale is documented the same way. After each payment, your customer receives a payment confirmation email with the receipt details and a link to the payment in the Customer Portal. The invoice isn't attached to the email.
Invoices are generated for both one-time purchases and recurring subscription payments.
## Key Features
Dodo Payments creates the invoice when a payment succeeds, with no manual work.
Each invoice shows your brand's name and logo, so it matches your other customer touchpoints.
Customers receive a payment confirmation email after each payment.
Download the invoice for any payment from its details page in the dashboard.
## Setting Up Invoice Branding
An invoice shows the name and logo of the brand the payment belongs to. For a business with one brand, that is your primary brand. With several brands, set the name and logo on each brand. See [Multi-Brand Setup](/features/multi-brands).
Open the Dodo Payments dashboard and go to **Settings** → **Business**.
In the **Brands Under \[Your Business]** panel, open the brand's `...` menu and select **Edit**. Upload the **Brand Logo** and enter the **Brand Name**. Invoices for the brand's payments show these details.
Use a high-resolution logo (minimum 300x300px) in PNG format for the best print quality.
**Accepted logo formats:** PNG, JPEG, GIF, WebP, ICO, and SVG. Any other format, AVIF included, is rejected at upload with a `422` error. WebP and ICO files are converted to PNG when the invoice is rendered, so they print correctly. Keep each side under 4096 pixels. If the invoice can't render the logo, it is generated without one.
Click **Save Changes** to apply your branding. Invoices generated from then on use these details.
Your invoice branding is configured and applies to all new invoices.
## What's Included in Invoices
Every generated invoice contains these transaction details:
* **Business Information**: Your brand's name and logo, with the Dodo Payments entity that sells to your customer as the Merchant of Record
* **Customer Details**: Customer name and billing address. For a business purchase with a tax ID, the customer's business name.
* **Invoice Number**: A unique invoice ID for tracking and reference
* **Transaction Date**: When the payment was processed, with the payment ID
* **Payment Details**: Amount paid and currency
* **Product/Service Description**: Itemized list of purchased products or subscriptions, with quantity, unit price, and tax for each line, plus any discount
* **Tax Information**: Applicable taxes and tax identification numbers
* **Payment Status**: **Paid** for a successful payment
Dodo Payments generates the invoice ID automatically. It is unique to each invoice.
## How Invoice Generation Works
When a customer completes a one-time purchase:
1. The payment is processed successfully.
2. Dodo Payments generates an invoice with the transaction details.
3. The customer receives a payment confirmation email.
4. The invoice is available on the payment's details page under **Transactions → Payments**.
One-time purchase invoices include product details, pricing, and payment confirmation.
For recurring subscription payments:
1. The subscription renewal payment is processed automatically.
2. Dodo Payments generates an invoice for the billing period.
3. The customer receives a payment confirmation email.
4. The invoice is stored with the renewal payment in your dashboard for your records.
Subscription invoices list the subscription plan as a line item. They don't show the billing period or the next renewal date.
## Managing Invoices
### Accessing Your Invoices
Invoices are attached to payments. To find one, go to **Transactions → Payments** in your Dodo Payments dashboard and open the payment. From there you can:
* **View Invoice Details**: See the complete transaction information on the payment's details page.
* **Download PDF**: Click **Invoice** in the top-right corner to download the invoice as a PDF. For a refund, open it under **Transactions → Refunds** and click **Download Refund Invoice**.
* **Resend to Customer**: To send the customer's payment email again, use **Resend** on the customer's **Sent Emails** tab. See [Email Logs](/features/email-logs).
* **Filter and Search**: Filter payments by date, status, or currency to find the invoices you need.
To download an invoice in code, call [Get Invoice](/api-reference/payments/get-invoice) with the payment ID. The response is the PDF.
Filter payments by date to collect the invoices for an accounting period or a customer support request.
## Invoice Template Preview
A branded invoice looks like this:
## Overview
Dodo Payments generates an invoice for every successful transaction, so you never create invoices by hand and every sale is documented the same way. After each payment, your customer receives a payment confirmation email with the receipt details and a link to the payment in the Customer Portal. The invoice isn't attached to the email.
Invoices are generated for both one-time purchases and recurring subscription payments.
## Key Features
Dodo Payments creates the invoice when a payment succeeds, with no manual work.
Each invoice shows your brand's name and logo, so it matches your other customer touchpoints.
Customers receive a payment confirmation email after each payment.
Download the invoice for any payment from its details page in the dashboard.
## Setting Up Invoice Branding
An invoice shows the name and logo of the brand the payment belongs to. For a business with one brand, that is your primary brand. With several brands, set the name and logo on each brand. See [Multi-Brand Setup](/features/multi-brands).
Open the Dodo Payments dashboard and go to **Settings** → **Business**.
In the **Brands Under \[Your Business]** panel, open the brand's `...` menu and select **Edit**. Upload the **Brand Logo** and enter the **Brand Name**. Invoices for the brand's payments show these details.
Use a high-resolution logo (minimum 300x300px) in PNG format for the best print quality.
**Accepted logo formats:** PNG, JPEG, GIF, WebP, ICO, and SVG. Any other format, AVIF included, is rejected at upload with a `422` error. WebP and ICO files are converted to PNG when the invoice is rendered, so they print correctly. Keep each side under 4096 pixels. If the invoice can't render the logo, it is generated without one.
Click **Save Changes** to apply your branding. Invoices generated from then on use these details.
Your invoice branding is configured and applies to all new invoices.
## What's Included in Invoices
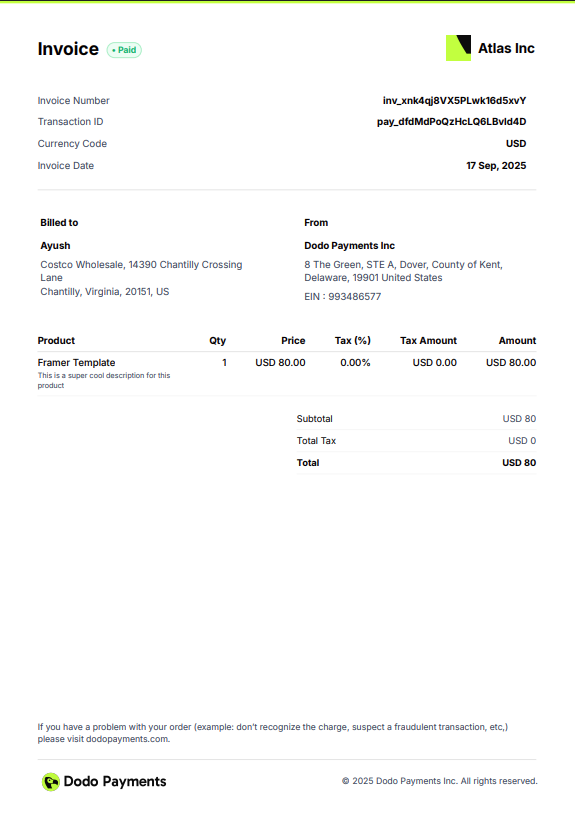
Every generated invoice contains these transaction details:
* **Business Information**: Your brand's name and logo, with the Dodo Payments entity that sells to your customer as the Merchant of Record
* **Customer Details**: Customer name and billing address. For a business purchase with a tax ID, the customer's business name.
* **Invoice Number**: A unique invoice ID for tracking and reference
* **Transaction Date**: When the payment was processed, with the payment ID
* **Payment Details**: Amount paid and currency
* **Product/Service Description**: Itemized list of purchased products or subscriptions, with quantity, unit price, and tax for each line, plus any discount
* **Tax Information**: Applicable taxes and tax identification numbers
* **Payment Status**: **Paid** for a successful payment
Dodo Payments generates the invoice ID automatically. It is unique to each invoice.
## How Invoice Generation Works
When a customer completes a one-time purchase:
1. The payment is processed successfully.
2. Dodo Payments generates an invoice with the transaction details.
3. The customer receives a payment confirmation email.
4. The invoice is available on the payment's details page under **Transactions → Payments**.
One-time purchase invoices include product details, pricing, and payment confirmation.
For recurring subscription payments:
1. The subscription renewal payment is processed automatically.
2. Dodo Payments generates an invoice for the billing period.
3. The customer receives a payment confirmation email.
4. The invoice is stored with the renewal payment in your dashboard for your records.
Subscription invoices list the subscription plan as a line item. They don't show the billing period or the next renewal date.
## Managing Invoices
### Accessing Your Invoices
Invoices are attached to payments. To find one, go to **Transactions → Payments** in your Dodo Payments dashboard and open the payment. From there you can:
* **View Invoice Details**: See the complete transaction information on the payment's details page.
* **Download PDF**: Click **Invoice** in the top-right corner to download the invoice as a PDF. For a refund, open it under **Transactions → Refunds** and click **Download Refund Invoice**.
* **Resend to Customer**: To send the customer's payment email again, use **Resend** on the customer's **Sent Emails** tab. See [Email Logs](/features/email-logs).
* **Filter and Search**: Filter payments by date, status, or currency to find the invoices you need.
To download an invoice in code, call [Get Invoice](/api-reference/payments/get-invoice) with the payment ID. The response is the PDF.
Filter payments by date to collect the invoices for an accounting period or a customer support request.
## Invoice Template Preview
A branded invoice looks like this:
 ## Related Features
Learn how subscriptions work with automatic recurring invoices.
Manage multiple brands with separate invoice branding for each.
Let customers view and download their invoices in the Customer Portal.
Configure tax settings so invoices display the correct tax information.
This documentation is built and hosted on [Mintlify](https://mintlify.com), a developer documentation platform.
## Related Features
Learn how subscriptions work with automatic recurring invoices.
Manage multiple brands with separate invoice branding for each.
Let customers view and download their invoices in the Customer Portal.
Configure tax settings so invoices display the correct tax information.
This documentation is built and hosted on [Mintlify](https://mintlify.com), a developer documentation platform.