> ## Documentation Index
> Fetch the complete documentation index at: https://docs.dodopayments.com/llms.txt
> Use this file to discover all available pages before exploring further.
# Products
> Create one-time, subscription, or usage-based products. Manage pricing, media, and automated fulfillment in one place.
Products are the foundation of Dodo Payments. Whether you sell a one-time download, a recurring subscription, or usage-based access, you start by creating a product. Each product defines how it's priced, presented at checkout, and fulfilled after purchase.
Charge once for lifetime access or a single deliverable.
Bill on a schedule with trials, proration, and add-ons.
Meter consumption and bill by actual usage.
## Create a Product
Create products from the dashboard or via API. Choose the pricing model upfront—One-Time, Subscription, or Usage-Based—then configure the details. The pricing model is immutable; create a new product if you need a different model.
Provide a clear title and a concise, value-oriented description. Markdown is supported in descriptions.
Keep the first sentence customer-facing and outcome-oriented; it appears prominently in checkout.
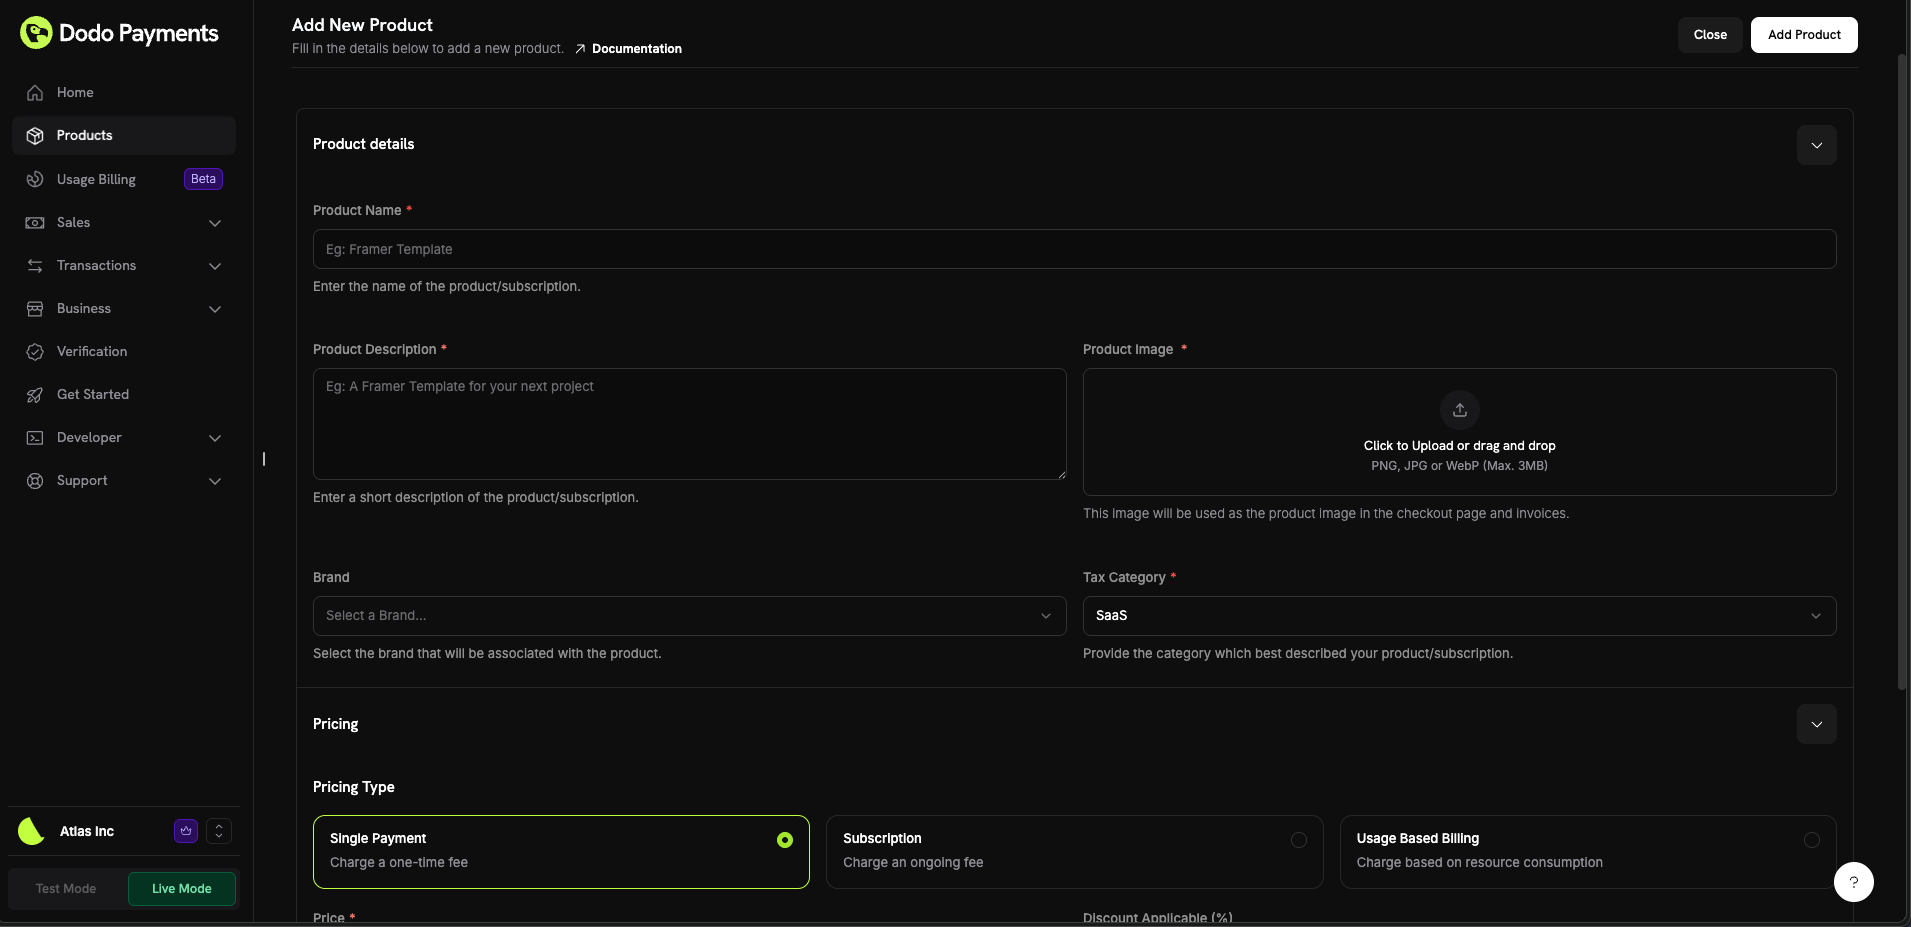 Select the pricing model:
* **One-Time**: Fixed price paid once.
* **Subscription**: Recurring price with interval and optional trial.
* **Usage-Based**: Price derived from metered events.
Then set pricing:
* **Price**: Base amount and currency. You can set the base price in any currency Dodo Payments supports, except for [Pay What You Want](/features/pay-what-you-want) products, whose base currency must be USD, GBP, or EUR. USD, GBP, EUR, and INR are pinned to the top of the currency selector for quick access.
* **Discount Applicable (%)**: Optional percentage discount shown in checkout and invoices. You can enter up to two decimal places, such as `10.5`. In the API, set the discount in basis points with `discount_bps`, so `1050` is 10.5%. The legacy `discount` field is deprecated and rounds to a whole percent.
* For subscriptions, set **Repeat every** (e.g., 1 month or 1 year), **Trial days**, and an optional **Trial amount** for a [paid trial](/features/subscription#paid-trials). A non-zero subscription price must meet the [subscription minimum](/features/adaptive-currency#minimum-amounts) for the currency the customer pays in: \$1.00 for USD. Currencies other than USD, EUR, and GBP must also be worth at least \$1.00. A price of exactly \$0 is also supported, and you can let customers start a \$0 subscription without a card; see [Card-Optional at Zero Price](/features/subscription#card-optional-at-zero-price). Negative amounts aren't supported.
With [Adaptive Currency](/features/adaptive-currency) turned on, customers outside your base currency are billed in their local currency, so you can author prices in whichever currency best fits your market. With it off, they pay in your base currency.
Want a fixed price per currency or country instead of a live FX conversion? Set a `pricing_mode` on the product and attach [Localized Pricing](/features/localized-pricing) rules, such as €9.99 in EUR or ₹999 in India.
Editing a price changes what new customers pay. Existing subscriptions are never repriced; each keeps the price it was created with. To move an existing subscriber onto a different price, change their plan explicitly with the [Change Plan API](/api-reference/subscriptions/change-plan); proration settings apply to that plan change, not to price edits.
Upload images to showcase the product on checkout and invoices. Supported formats: PNG, JPG, WebP, up to 3 MB. Reorder or replace images at any time.
In the **Entitlements** section, attach fulfillment that activates automatically after payment:
* **License Keys**: Issue and validate unique keys.
* **Digital Files**: Grant secure file access.
* **Feature Flags**: Unlock a capability that your app checks.
* **Platform Access**: Grant access on Discord, GitHub, Telegram, Figma, Framer, or Notion.
Add or remove benefits as your offer evolves. Existing subscribers gain or lose access accordingly.
## Variants and Pricing Options
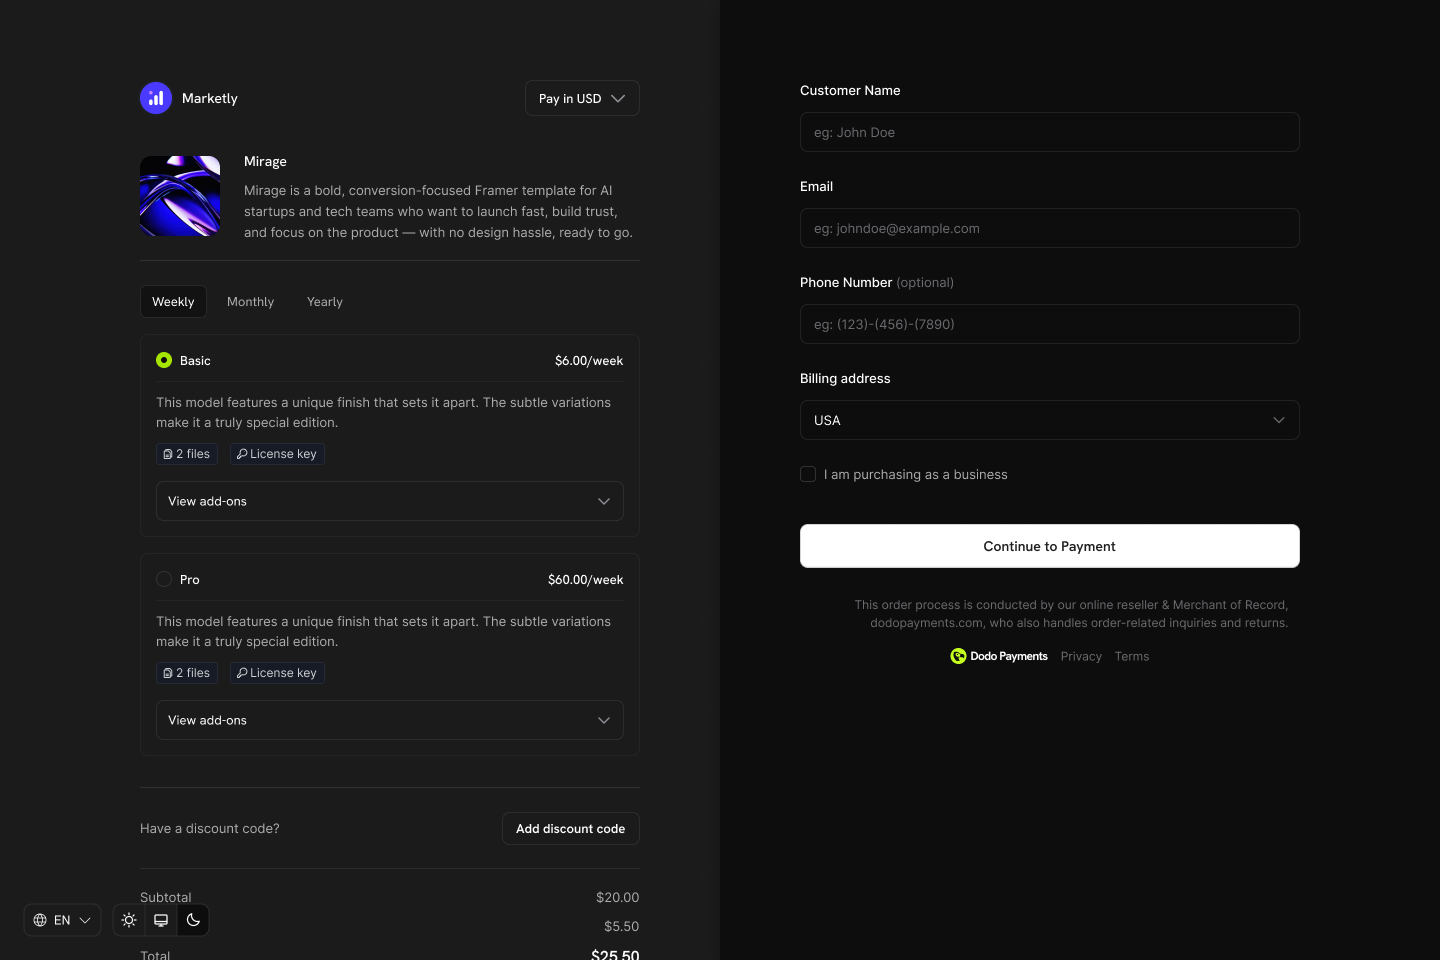
Instead of variants under one product, create separate products for each pricing option (for example, Monthly and Yearly). Then group them into a Product Collection to present all options in a single checkout and enable plan switching in the Customer Portal.
Select the pricing model:
* **One-Time**: Fixed price paid once.
* **Subscription**: Recurring price with interval and optional trial.
* **Usage-Based**: Price derived from metered events.
Then set pricing:
* **Price**: Base amount and currency. You can set the base price in any currency Dodo Payments supports, except for [Pay What You Want](/features/pay-what-you-want) products, whose base currency must be USD, GBP, or EUR. USD, GBP, EUR, and INR are pinned to the top of the currency selector for quick access.
* **Discount Applicable (%)**: Optional percentage discount shown in checkout and invoices. You can enter up to two decimal places, such as `10.5`. In the API, set the discount in basis points with `discount_bps`, so `1050` is 10.5%. The legacy `discount` field is deprecated and rounds to a whole percent.
* For subscriptions, set **Repeat every** (e.g., 1 month or 1 year), **Trial days**, and an optional **Trial amount** for a [paid trial](/features/subscription#paid-trials). A non-zero subscription price must meet the [subscription minimum](/features/adaptive-currency#minimum-amounts) for the currency the customer pays in: \$1.00 for USD. Currencies other than USD, EUR, and GBP must also be worth at least \$1.00. A price of exactly \$0 is also supported, and you can let customers start a \$0 subscription without a card; see [Card-Optional at Zero Price](/features/subscription#card-optional-at-zero-price). Negative amounts aren't supported.
With [Adaptive Currency](/features/adaptive-currency) turned on, customers outside your base currency are billed in their local currency, so you can author prices in whichever currency best fits your market. With it off, they pay in your base currency.
Want a fixed price per currency or country instead of a live FX conversion? Set a `pricing_mode` on the product and attach [Localized Pricing](/features/localized-pricing) rules, such as €9.99 in EUR or ₹999 in India.
Editing a price changes what new customers pay. Existing subscriptions are never repriced; each keeps the price it was created with. To move an existing subscriber onto a different price, change their plan explicitly with the [Change Plan API](/api-reference/subscriptions/change-plan); proration settings apply to that plan change, not to price edits.
Upload images to showcase the product on checkout and invoices. Supported formats: PNG, JPG, WebP, up to 3 MB. Reorder or replace images at any time.
In the **Entitlements** section, attach fulfillment that activates automatically after payment:
* **License Keys**: Issue and validate unique keys.
* **Digital Files**: Grant secure file access.
* **Feature Flags**: Unlock a capability that your app checks.
* **Platform Access**: Grant access on Discord, GitHub, Telegram, Figma, Framer, or Notion.
Add or remove benefits as your offer evolves. Existing subscribers gain or lose access accordingly.
## Variants and Pricing Options
Instead of variants under one product, create separate products for each pricing option (for example, Monthly and Yearly). Then group them into a Product Collection to present all options in a single checkout and enable plan switching in the Customer Portal.
 ### Why This Approach?
* **Clear pricing models**: Each product has a single, well-defined pricing model (one-time, subscription, or usage-based).
* **Predictable APIs**: Simpler integrations without nested variant logic.
* **Easier reporting**: Track revenue and metrics per product without variant aggregation.
* **Flexible checkout**: Display multiple products side-by-side, letting customers compare and choose.
### How Product Collections Work
1. **Create products**: Set up individual products for each plan (e.g., Starter Monthly, Starter Annual, Pro Monthly, Pro Annual).
2. **Group into a collection**: Add related products to a Product Collection.
3. **Unified checkout**: Customers see all options in one checkout and select their preferred plan.
4. **Plan switching**: Customers can upgrade or downgrade between products in the same collection via the Customer Portal.
Group related products together for unified checkout experiences and upgrade/downgrade paths.
## Managing Products
You can manage products through the dashboard or programmatically via API. The API provides full control over product creation, updates, retrieval, image uploads, and archiving.
### Dashboard Management
* **Update**: Edit name, description, images, price, fields, and benefits at any time (pricing model is immutable).
* **Archive**: Hide a product from new purchases without disrupting existing customers. You can unarchive later.
* **Drafts**: An in-progress product is saved as a draft so you can return to it later. Drafts are kept separately for test mode and live mode, so an unfinished product in one mode never bleeds into the other. Use **Clear Draft** to discard it and start fresh.
Product and collection form pages include header action buttons, so you can save without scrolling to the bottom of a long form.
### API Management
The following instructions allow you to create, update, manage, and retrieve products, including uploading images.
Send a `POST` request to the `/products` endpoint with details such as name, description, price, currency, and whether it is a recurring product.
For recurring products, set the `price` object to a recurring price (`type: recurring_price`) and specify `payment_frequency_interval` and `subscription_period_interval` (`Day`, `Week`, `Month`, or `Year`) along with their corresponding counts.
View detailed request and response structure in the Create Product API documentation.
Send a `PATCH` request to the `/products/{product_id}` endpoint. You can update properties such as name, price, and description while keeping other details unchanged.
Ensure that the `product_id` in the endpoint matches an existing product.
View detailed request and response structure in the Update Product API documentation.
Fetch a list of products stored in your account using a `GET` request to the `/products` endpoint. This allows you to retrieve product details, including active and archived products.
View detailed request and response structure in the Retrieve Products API documentation.
Associate an image with a product by uploading it to AWS S3 using a pre-signed URL provided by the API. First, request an image upload URL from the `/products/{product_id}/images` endpoint, then use the provided URL to upload the image within 60 seconds.
The pre-signed URL expires in 60 seconds, so the image must be uploaded within that timeframe.
Once the pre-signed URL is received from the API, upload the image using the `PUT` method. This ensures secure and temporary access to AWS S3 for uploading the image.
**Supported libraries for uploading to S3:**
* **Node.js**: `axios`, `node-fetch`
* **Python**: `requests`, `boto3`
* **Go**: `net/http`
* **PHP**: `GuzzleHttp`
* **Ruby**: `rest-client`
If the upload is successful, AWS S3 will return a `200 OK` status, indicating that the image has been stored successfully.
View detailed request and response structure in the Upload Product Image API documentation.
Hide a product from new purchases without deleting it permanently using a `DELETE` request to the `/products/{id}` endpoint.
View detailed request and response structure in the Archive Product API documentation.
Restore an archived product by sending a `POST` request to the `/products/{product_id}/unarchive` endpoint. This reactivates the product and makes it available for use again.
View detailed request and response structure in the Unarchive Product API documentation.
Create payment or subscription flows from products, and fulfill automatically via benefits and webhooks.
Create checkout sessions for one-time or subscription purchases.
React to payment lifecycle events.
Handle subscription created, renewed, and canceled events.
## Best Practices
* **Start with clarity**: Separate products for each pricing option (Monthly vs Yearly).
* **Use trials thoughtfully**: Pair trials with onboarding to drive activation.
* **Automate fulfillment**: Use benefits and webhooks to deliver instantly.
* **Tag with metadata**: Store your system IDs for reconciliation.
## Related
Track revenue, customers, retention, subscribers, and MRR for each individual product.
Set fixed per-currency or per-country prices on a product instead of relying on live exchange rates.
This documentation is built and hosted on [Mintlify](https://mintlify.com), a developer documentation platform.
### Why This Approach?
* **Clear pricing models**: Each product has a single, well-defined pricing model (one-time, subscription, or usage-based).
* **Predictable APIs**: Simpler integrations without nested variant logic.
* **Easier reporting**: Track revenue and metrics per product without variant aggregation.
* **Flexible checkout**: Display multiple products side-by-side, letting customers compare and choose.
### How Product Collections Work
1. **Create products**: Set up individual products for each plan (e.g., Starter Monthly, Starter Annual, Pro Monthly, Pro Annual).
2. **Group into a collection**: Add related products to a Product Collection.
3. **Unified checkout**: Customers see all options in one checkout and select their preferred plan.
4. **Plan switching**: Customers can upgrade or downgrade between products in the same collection via the Customer Portal.
Group related products together for unified checkout experiences and upgrade/downgrade paths.
## Managing Products
You can manage products through the dashboard or programmatically via API. The API provides full control over product creation, updates, retrieval, image uploads, and archiving.
### Dashboard Management
* **Update**: Edit name, description, images, price, fields, and benefits at any time (pricing model is immutable).
* **Archive**: Hide a product from new purchases without disrupting existing customers. You can unarchive later.
* **Drafts**: An in-progress product is saved as a draft so you can return to it later. Drafts are kept separately for test mode and live mode, so an unfinished product in one mode never bleeds into the other. Use **Clear Draft** to discard it and start fresh.
Product and collection form pages include header action buttons, so you can save without scrolling to the bottom of a long form.
### API Management
The following instructions allow you to create, update, manage, and retrieve products, including uploading images.
Send a `POST` request to the `/products` endpoint with details such as name, description, price, currency, and whether it is a recurring product.
For recurring products, set the `price` object to a recurring price (`type: recurring_price`) and specify `payment_frequency_interval` and `subscription_period_interval` (`Day`, `Week`, `Month`, or `Year`) along with their corresponding counts.
View detailed request and response structure in the Create Product API documentation.
Send a `PATCH` request to the `/products/{product_id}` endpoint. You can update properties such as name, price, and description while keeping other details unchanged.
Ensure that the `product_id` in the endpoint matches an existing product.
View detailed request and response structure in the Update Product API documentation.
Fetch a list of products stored in your account using a `GET` request to the `/products` endpoint. This allows you to retrieve product details, including active and archived products.
View detailed request and response structure in the Retrieve Products API documentation.
Associate an image with a product by uploading it to AWS S3 using a pre-signed URL provided by the API. First, request an image upload URL from the `/products/{product_id}/images` endpoint, then use the provided URL to upload the image within 60 seconds.
The pre-signed URL expires in 60 seconds, so the image must be uploaded within that timeframe.
Once the pre-signed URL is received from the API, upload the image using the `PUT` method. This ensures secure and temporary access to AWS S3 for uploading the image.
**Supported libraries for uploading to S3:**
* **Node.js**: `axios`, `node-fetch`
* **Python**: `requests`, `boto3`
* **Go**: `net/http`
* **PHP**: `GuzzleHttp`
* **Ruby**: `rest-client`
If the upload is successful, AWS S3 will return a `200 OK` status, indicating that the image has been stored successfully.
View detailed request and response structure in the Upload Product Image API documentation.
Hide a product from new purchases without deleting it permanently using a `DELETE` request to the `/products/{id}` endpoint.
View detailed request and response structure in the Archive Product API documentation.
Restore an archived product by sending a `POST` request to the `/products/{product_id}/unarchive` endpoint. This reactivates the product and makes it available for use again.
View detailed request and response structure in the Unarchive Product API documentation.
Create payment or subscription flows from products, and fulfill automatically via benefits and webhooks.
Create checkout sessions for one-time or subscription purchases.
React to payment lifecycle events.
Handle subscription created, renewed, and canceled events.
## Best Practices
* **Start with clarity**: Separate products for each pricing option (Monthly vs Yearly).
* **Use trials thoughtfully**: Pair trials with onboarding to drive activation.
* **Automate fulfillment**: Use benefits and webhooks to deliver instantly.
* **Tag with metadata**: Store your system IDs for reconciliation.
## Related
Track revenue, customers, retention, subscribers, and MRR for each individual product.
Set fixed per-currency or per-country prices on a product instead of relying on live exchange rates.
This documentation is built and hosted on [Mintlify](https://mintlify.com), a developer documentation platform.