> ## Documentation Index
> Fetch the complete documentation index at: https://docs.dodopayments.com/llms.txt
> Use this file to discover all available pages before exploring further.
# Meters
> Transform raw usage events into billable quantities with aggregation and filtering.
Meters convert raw events into billable quantities. They filter events and apply aggregation functions (Count, Sum, Max, Last) to calculate usage per customer.
 ## API Resources
Create meters programmatically via API.
Retrieve all meters in your account.
Fetch details for a specific meter by ID.
Archive a meter to stop tracking usage.
Restore an archived meter to resume tracking.
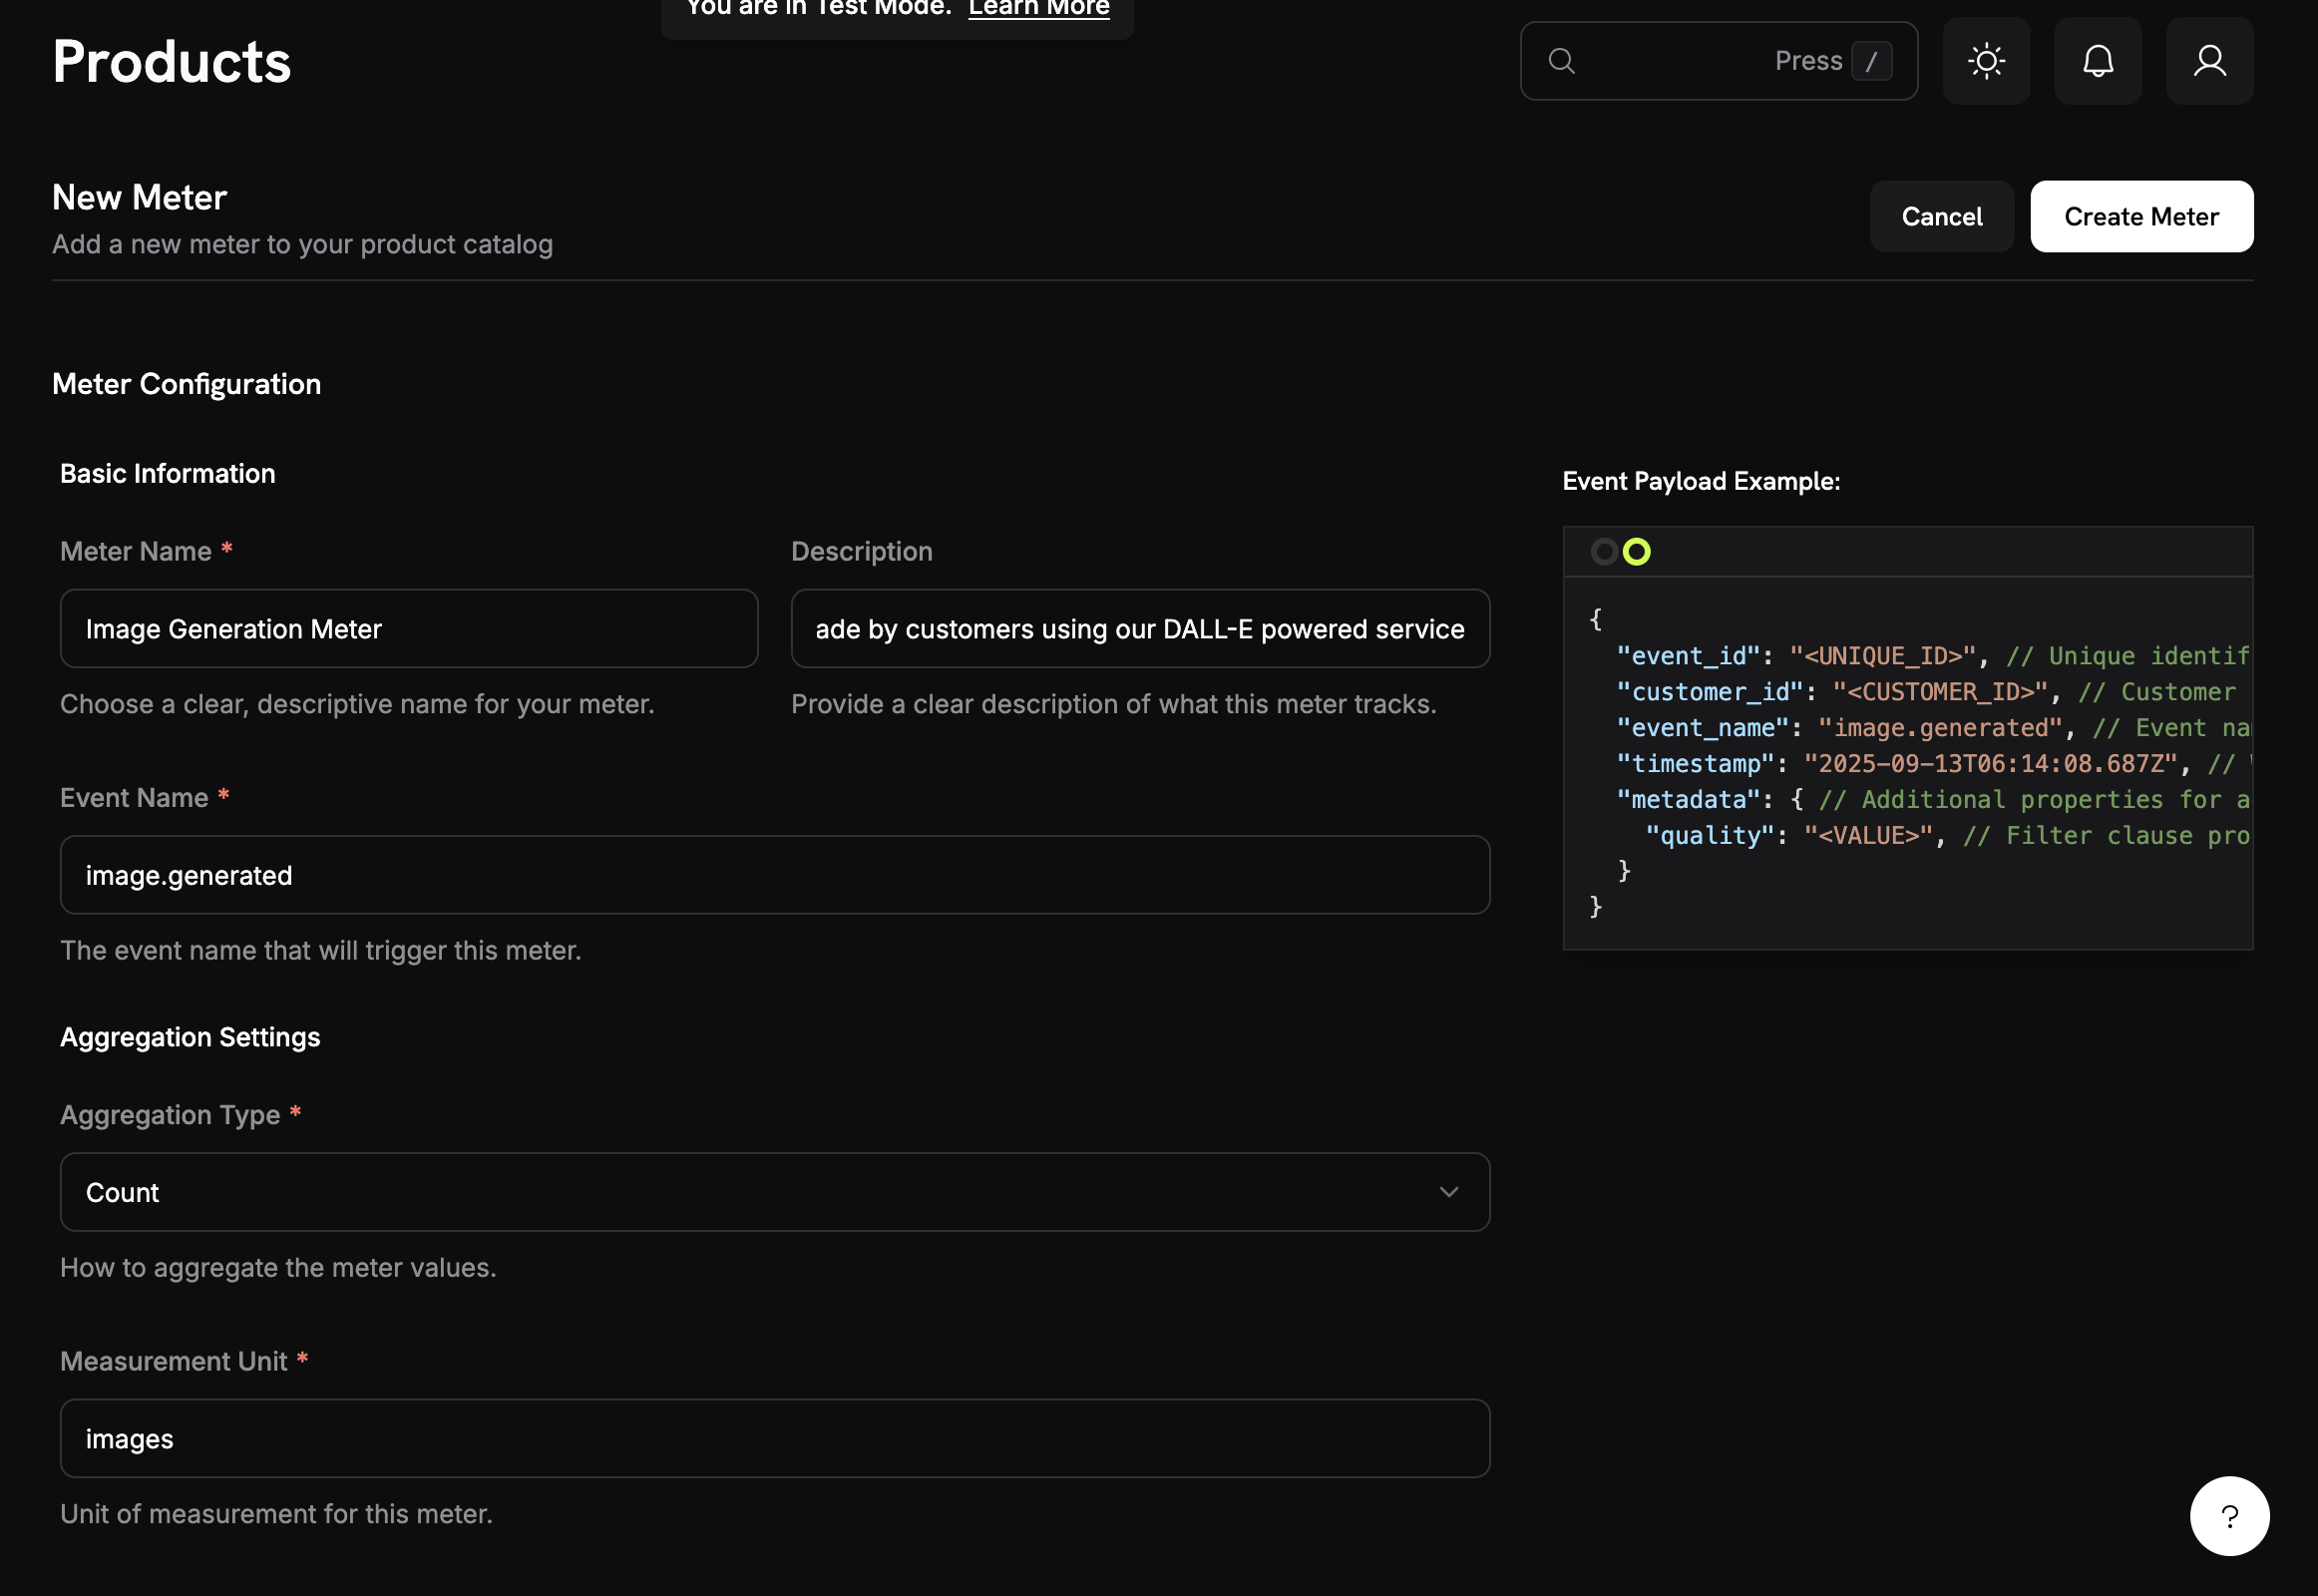
## Creating a Meter
A descriptive name for the meter (e.g., "API Requests", "Token Usage").
The exact event name to match (case-sensitive). Examples: `api.call`, `image.generated`.
Choose how events are aggregated:
* **Count**: Total number of events (API calls, uploads)
* **Sum**: Sum of numeric values (tokens, bytes)
* **Max**: Highest value in the period (peak users)
* **Last**: Most recent value
The metadata key to aggregate (required for Sum, Max, and Last). Examples: `tokens`, `bytes`, `duration_ms`.
The unit label for invoices and reports. Examples: `calls`, `tokens`, `GB`, `hours`.
## API Resources
Create meters programmatically via API.
Retrieve all meters in your account.
Fetch details for a specific meter by ID.
Archive a meter to stop tracking usage.
Restore an archived meter to resume tracking.
## Creating a Meter
A descriptive name for the meter (e.g., "API Requests", "Token Usage").
The exact event name to match (case-sensitive). Examples: `api.call`, `image.generated`.
Choose how events are aggregated:
* **Count**: Total number of events (API calls, uploads)
* **Sum**: Sum of numeric values (tokens, bytes)
* **Max**: Highest value in the period (peak users)
* **Last**: Most recent value
The metadata key to aggregate (required for Sum, Max, and Last). Examples: `tokens`, `bytes`, `duration_ms`.
The unit label for invoices and reports. Examples: `calls`, `tokens`, `GB`, `hours`.
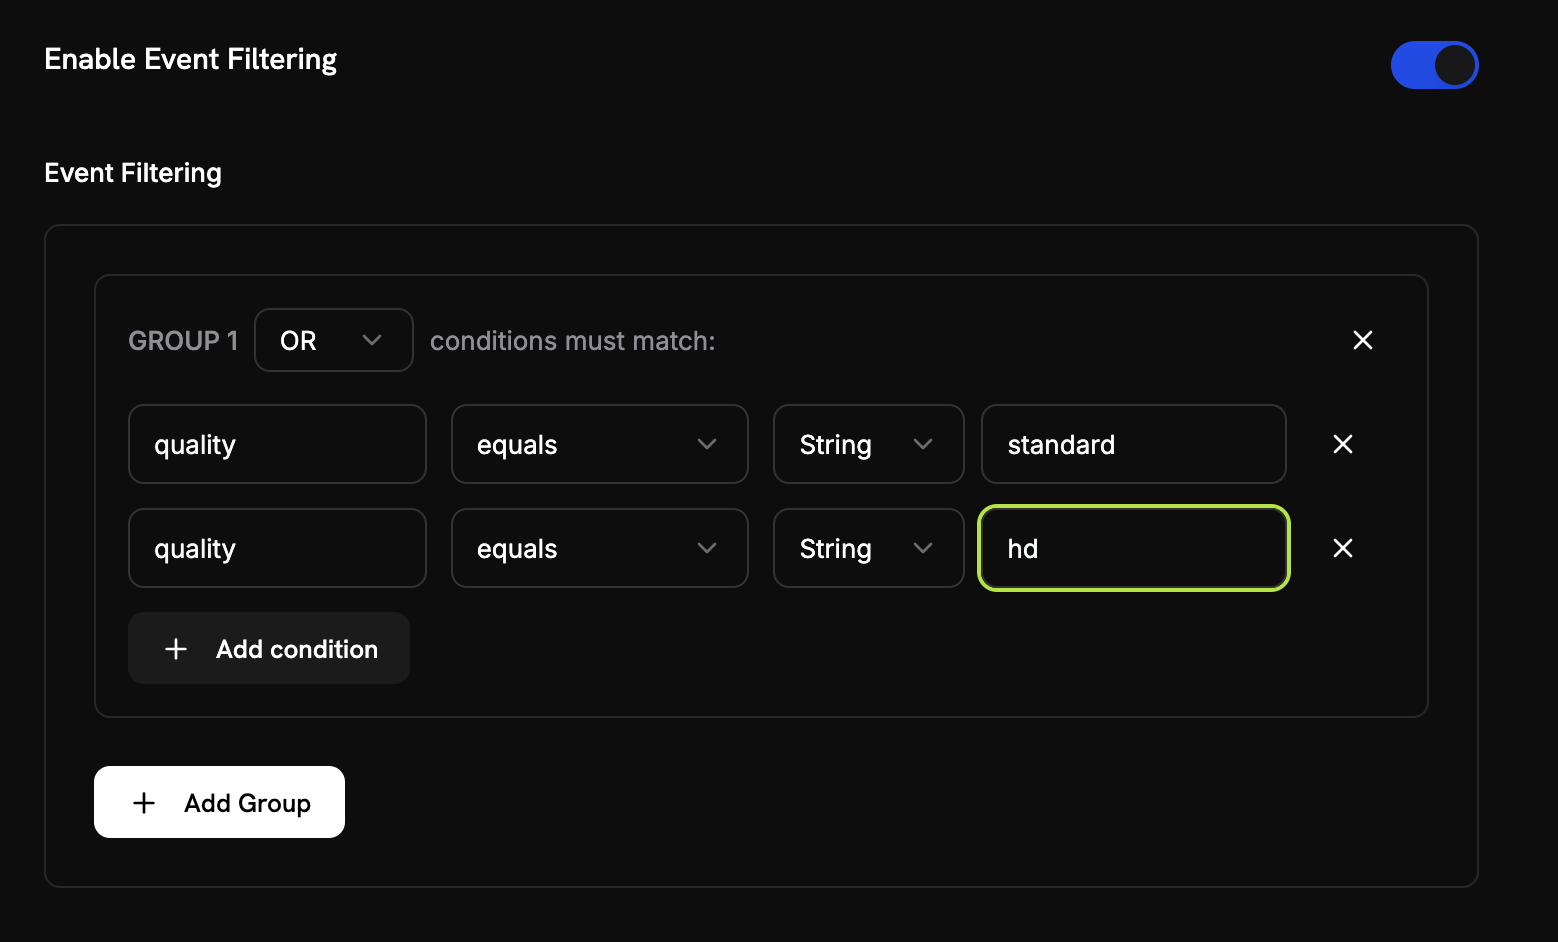 Add conditions to filter which events are counted:
* **AND logic**: All conditions must match
* **OR logic**: Any condition can match
Available comparators: equals, not equals, greater than, greater than or equals, less than, less than or equals, contains, does not contain.
Enable filtering, choose your logic, then add conditions with a property key, comparator, and value.
Review your configuration and click **Create Meter**.
## Viewing Analytics
Add conditions to filter which events are counted:
* **AND logic**: All conditions must match
* **OR logic**: Any condition can match
Available comparators: equals, not equals, greater than, greater than or equals, less than, less than or equals, contains, does not contain.
Enable filtering, choose your logic, then add conditions with a property key, comparator, and value.
Review your configuration and click **Create Meter**.
## Viewing Analytics
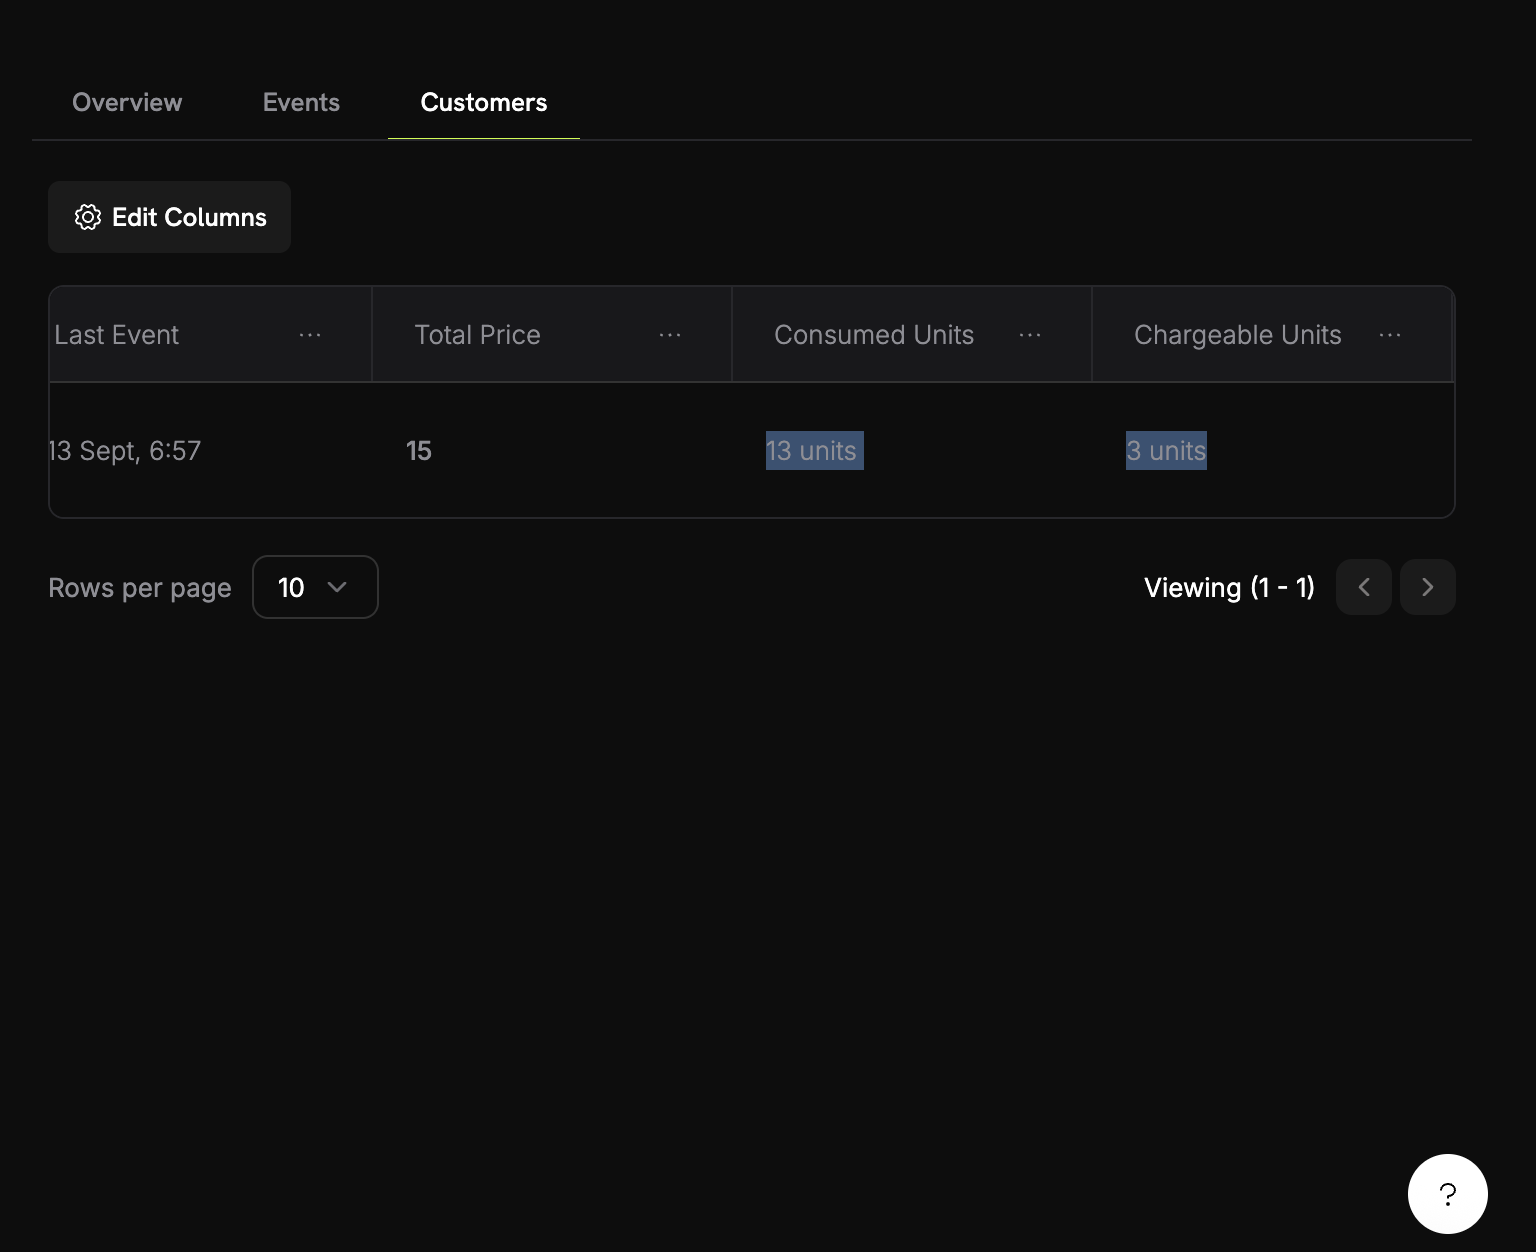 Your meter dashboard displays:
* **Overview**: Total usage and usage trends over time
* **Events**: Individual events received and their metadata
* **Customers**: Per-customer usage totals and charges
## Billing in Credits Instead of Currency
By default, meters charge customers per-unit in dollars (or your configured currency). You can instead configure a meter to deduct from a customer's credit balance, so usage consumes credits rather than generating a monetary charge.
Credit-based deduction requires a [Credit Entitlement](/features/credit-based-billing) attached to the same product. Create the credit entitlement first, then link it to the meter.
### When to Use Credit-Based Deduction
| Scenario | Standard (currency) | Credit-based |
| - | - | - |
| Simple per-unit pricing (\$0.01/call) | ✅ Best fit | Unnecessary overhead |
| Prepaid credit packs (buy 10K tokens, use over time) | ❌ Can't express | ✅ Best fit |
| Bundled usage with subscriptions (Pro plan includes 100K calls) | Possible via free threshold | ✅ Better: credits roll over, expire, and show in portal |
| Multi-meter products sharing a credit pool | ❌ Each meter bills separately | ✅ All meters deduct from one balance |
### Configuring a Meter to Deduct Credits
First, create a credit entitlement in **Products → Credits**. Define the unit (e.g., "API Calls", "Tokens"), precision, and lifecycle settings (expiry, rollover, overage).
See the [Credit-Based Billing guide](/features/credit-based-billing) for detailed instructions.
Go to your usage-based product and open the **Meter** configuration section.
Click the **+** button to attach a meter. Configure the event name, aggregation type, and measurement unit as usual.
Toggle **Bill usage in Credits** on the meter configuration to reveal credit settings:
Your meter dashboard displays:
* **Overview**: Total usage and usage trends over time
* **Events**: Individual events received and their metadata
* **Customers**: Per-customer usage totals and charges
## Billing in Credits Instead of Currency
By default, meters charge customers per-unit in dollars (or your configured currency). You can instead configure a meter to deduct from a customer's credit balance, so usage consumes credits rather than generating a monetary charge.
Credit-based deduction requires a [Credit Entitlement](/features/credit-based-billing) attached to the same product. Create the credit entitlement first, then link it to the meter.
### When to Use Credit-Based Deduction
| Scenario | Standard (currency) | Credit-based |
| - | - | - |
| Simple per-unit pricing (\$0.01/call) | ✅ Best fit | Unnecessary overhead |
| Prepaid credit packs (buy 10K tokens, use over time) | ❌ Can't express | ✅ Best fit |
| Bundled usage with subscriptions (Pro plan includes 100K calls) | Possible via free threshold | ✅ Better: credits roll over, expire, and show in portal |
| Multi-meter products sharing a credit pool | ❌ Each meter bills separately | ✅ All meters deduct from one balance |
### Configuring a Meter to Deduct Credits
First, create a credit entitlement in **Products → Credits**. Define the unit (e.g., "API Calls", "Tokens"), precision, and lifecycle settings (expiry, rollover, overage).
See the [Credit-Based Billing guide](/features/credit-based-billing) for detailed instructions.
Go to your usage-based product and open the **Meter** configuration section.
Click the **+** button to attach a meter. Configure the event name, aggregation type, and measurement unit as usual.
Toggle **Bill usage in Credits** on the meter configuration to reveal credit settings:
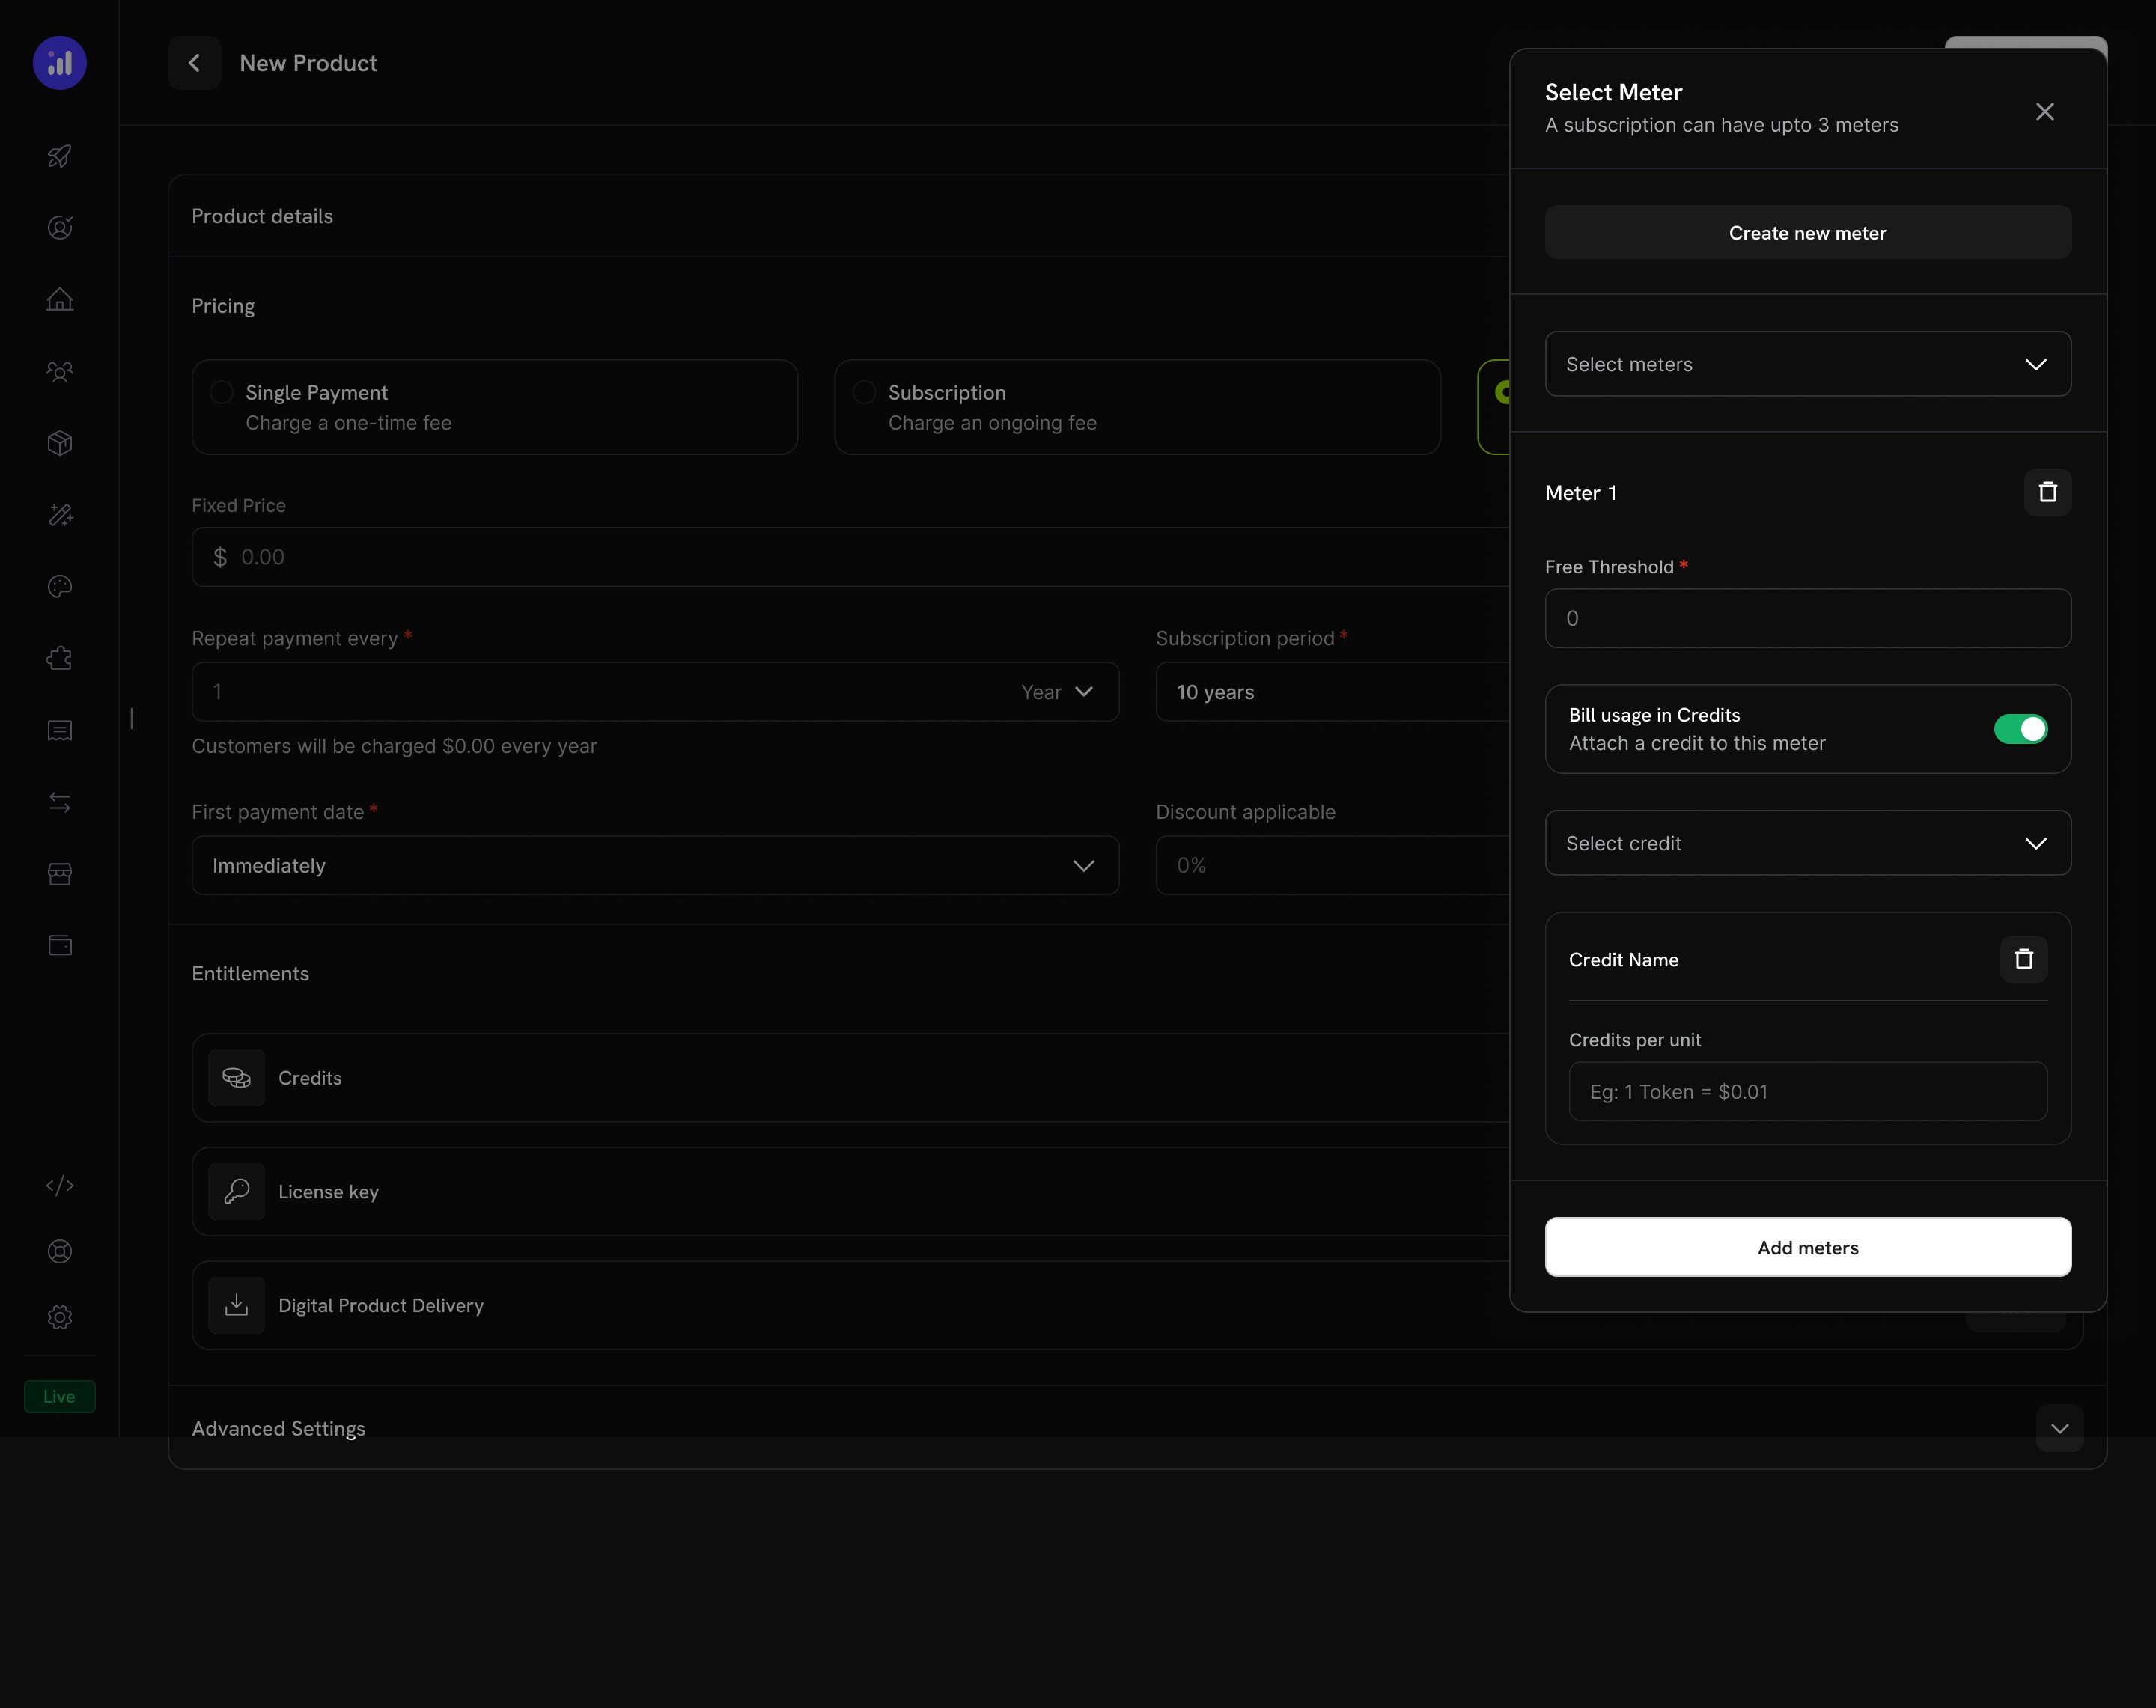 Select which credit entitlement this meter deducts from.
The number of usage units required to deduct 1 credit. For example:
* `1` = each meter event deducts 1 credit
* `100` = 100 meter events deduct 1 credit
* `1000` = 1,000 API calls consume 1 credit
The **Free Threshold** applies to meters billed in money, not to meters billed in credits. When a meter bills in credits, every unit counts toward credit deduction.
**Example**: With meter-units-per-credit of 1, a customer who makes 2,500 API calls has 2,500 credits deducted.
### How Credit Deduction Works
Once configured, the deduction pipeline runs automatically:
1. **Events arrive** — Your application sends usage events via the [Event Ingestion API](/features/usage-based-billing/event-ingestion).
2. **Meter aggregates** — Events are aggregated per your meter configuration (Count, Sum, Max, Last).
3. **Background worker processes** — Every minute, a worker fetches new events since the last checkpoint.
4. **Credits are deducted** — Aggregated usage is converted to credits using the `meter_units_per_credit` rate and deducted using FIFO ordering (earliest-expiring grants consumed first).
5. **Overage tracked** — If the balance hits zero, further usage is recorded as overage and handled according to the configured behavior (forgiven at reset, billed at next invoice, or carried forward as deficit). Dodo Payments doesn't block usage when the balance runs out. To stop access at zero, check the balance in your application.
```mermaid theme={null}
flowchart LR
A[Usage Event] --> B[Meter Aggregation]
B --> C{Credits Available?}
C -->|Yes| D[Deduct from Balance]
C -->|No| E{Overage Enabled?}
E -->|Yes| F[Track Overage]
E -->|No| G[Your App Enforces Limits]
D --> H[Update Ledger]
F --> H
```
Credit deduction runs asynchronously (every \~1 minute). There may be a brief delay between event ingestion and balance deduction. Design your application to handle this delay and don't rely on real-time balance checks for access control on individual requests.
### Multiple Meters, One Credit Pool
You can link multiple meters on the same product to the same credit entitlement. All meters deduct from one shared balance.
**Example**: An AI platform with two meters:
* `text.generation` — 1 credit per 1,000 tokens
* `image.generation` — 10 credits per image
Both deduct from the same "AI Credits" pool. The customer sees a single unified balance in their portal.
Use different `meter_units_per_credit` rates across meters to express relative costs. Expensive operations (image generation) cost fewer meter units per credit than cheap ones (text completion).
View the full credit deduction history for a customer.
Check a customer's current credit balance via API.
## Troubleshooting
* Event name must match exactly (case-sensitive)
* Check that meter filters aren't excluding events
* Verify customer IDs exist in your account
* Temporarily disable filters to test
* Verify the Over Property matches the metadata key exactly
* Use numbers, not strings: `tokens: 150` not `tokens: "150"`
* Include required properties in all events
* Match case exactly
* Use correct operators for the data type
* Ensure events include the filtered properties
* Check the Events tab to count actual events received
* Verify the aggregation type (Count vs Sum)
* Ensure values are numeric for Sum and Max
## Next Steps
Start sending usage events from your application to your meters.
Use ready-made meter configurations for common use cases.
This documentation is built and hosted on [Mintlify](https://mintlify.com), a developer documentation platform.
Select which credit entitlement this meter deducts from.
The number of usage units required to deduct 1 credit. For example:
* `1` = each meter event deducts 1 credit
* `100` = 100 meter events deduct 1 credit
* `1000` = 1,000 API calls consume 1 credit
The **Free Threshold** applies to meters billed in money, not to meters billed in credits. When a meter bills in credits, every unit counts toward credit deduction.
**Example**: With meter-units-per-credit of 1, a customer who makes 2,500 API calls has 2,500 credits deducted.
### How Credit Deduction Works
Once configured, the deduction pipeline runs automatically:
1. **Events arrive** — Your application sends usage events via the [Event Ingestion API](/features/usage-based-billing/event-ingestion).
2. **Meter aggregates** — Events are aggregated per your meter configuration (Count, Sum, Max, Last).
3. **Background worker processes** — Every minute, a worker fetches new events since the last checkpoint.
4. **Credits are deducted** — Aggregated usage is converted to credits using the `meter_units_per_credit` rate and deducted using FIFO ordering (earliest-expiring grants consumed first).
5. **Overage tracked** — If the balance hits zero, further usage is recorded as overage and handled according to the configured behavior (forgiven at reset, billed at next invoice, or carried forward as deficit). Dodo Payments doesn't block usage when the balance runs out. To stop access at zero, check the balance in your application.
```mermaid theme={null}
flowchart LR
A[Usage Event] --> B[Meter Aggregation]
B --> C{Credits Available?}
C -->|Yes| D[Deduct from Balance]
C -->|No| E{Overage Enabled?}
E -->|Yes| F[Track Overage]
E -->|No| G[Your App Enforces Limits]
D --> H[Update Ledger]
F --> H
```
Credit deduction runs asynchronously (every \~1 minute). There may be a brief delay between event ingestion and balance deduction. Design your application to handle this delay and don't rely on real-time balance checks for access control on individual requests.
### Multiple Meters, One Credit Pool
You can link multiple meters on the same product to the same credit entitlement. All meters deduct from one shared balance.
**Example**: An AI platform with two meters:
* `text.generation` — 1 credit per 1,000 tokens
* `image.generation` — 10 credits per image
Both deduct from the same "AI Credits" pool. The customer sees a single unified balance in their portal.
Use different `meter_units_per_credit` rates across meters to express relative costs. Expensive operations (image generation) cost fewer meter units per credit than cheap ones (text completion).
View the full credit deduction history for a customer.
Check a customer's current credit balance via API.
## Troubleshooting
* Event name must match exactly (case-sensitive)
* Check that meter filters aren't excluding events
* Verify customer IDs exist in your account
* Temporarily disable filters to test
* Verify the Over Property matches the metadata key exactly
* Use numbers, not strings: `tokens: 150` not `tokens: "150"`
* Include required properties in all events
* Match case exactly
* Use correct operators for the data type
* Ensure events include the filtered properties
* Check the Events tab to count actual events received
* Verify the aggregation type (Count vs Sum)
* Ensure values are numeric for Sum and Max
## Next Steps
Start sending usage events from your application to your meters.
Use ready-made meter configurations for common use cases.
This documentation is built and hosted on [Mintlify](https://mintlify.com), a developer documentation platform.