> ## Documentation Index
> Fetch the complete documentation index at: https://docs.dodopayments.com/llms.txt
> Use this file to discover all available pages before exploring further.
# AutoSend
> Send transactional emails through AutoSend's email API when Dodo Payments events occur, such as successful payments, new subscriptions, and failed payments.
## Introduction
The AutoSend integration sends an email through AutoSend's email API each time a Dodo Payments event occurs, from successful payments to failed payment attempts and refund confirmations. A transformation on the webhook endpoint turns each event into an AutoSend send request.
To set it up, you need an AutoSend API key and a sender domain verified in AutoSend. You can find your API key in the AutoSend dashboard under **Settings → API Keys**.
## Getting Started
Follow these steps to connect AutoSend to Dodo Payments:
In the Dodo Payments dashboard, go to **Developer → Webhooks** and click **Add endpoint**.
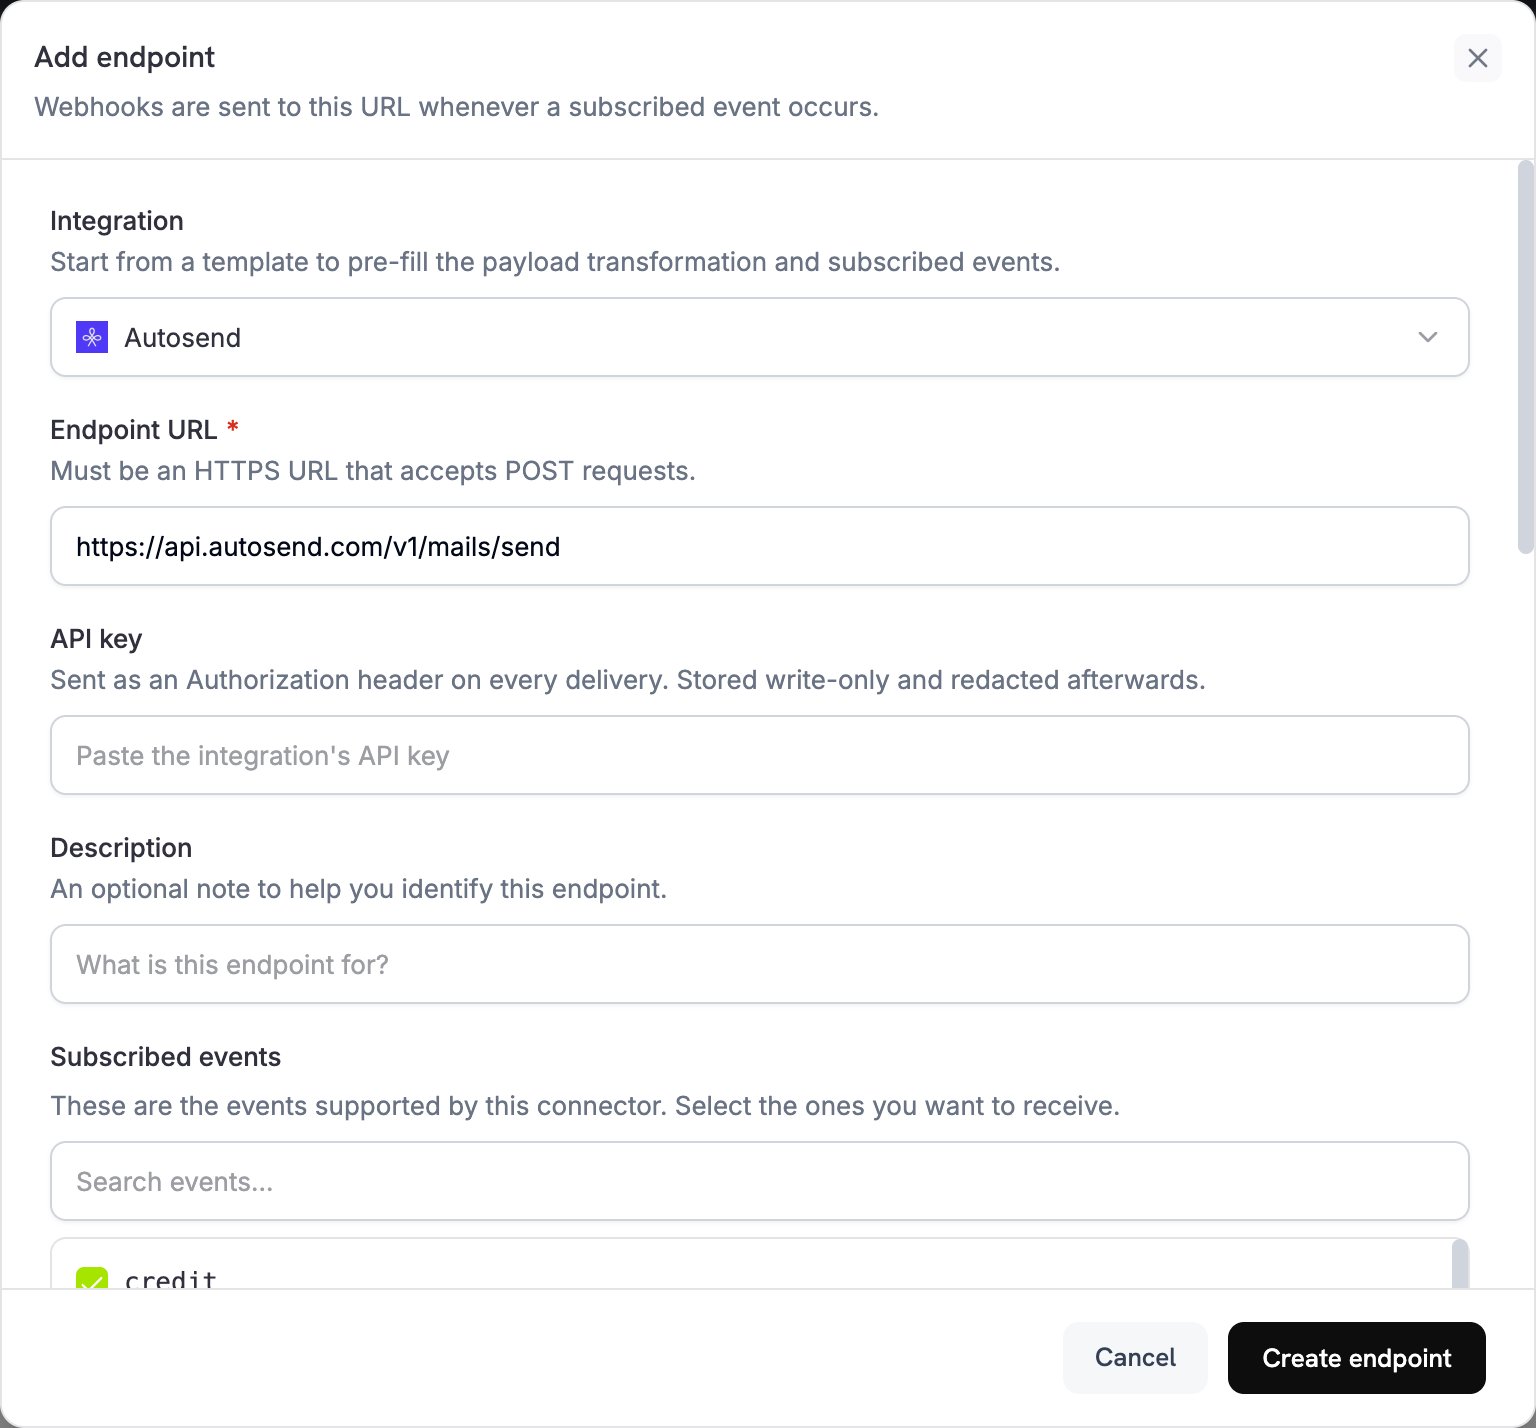 In **Integration**, select **Autosend**.
In **API key**, paste your AutoSend API key. Dodo Payments sends it in the `Authorization` header of every delivery.
See the AutoSend documentation for how to create and manage API keys.
In **Subscribed events**, select the events your transformation handles, such as `payment.succeeded`, `subscription.active`, and `payment.failed`. An endpoint with no events selected receives every event type.
Under **Transformation code**, write the JavaScript handler that builds the email for each event. Start from the [code examples](#code-examples).
Under **Test this code**, click **Simulate** to run the handler against a sample payload and check the result. Then click **Create endpoint**.
The endpoint sends an email through AutoSend each time a subscribed event occurs.
## Code Examples
Each handler checks the event type in `webhook.eventType` and reads the event data from `webhook.payload.data`. It sets `webhook.url` to AutoSend's send endpoint and replaces `webhook.payload` with the email request. Dodo Payments amounts, such as `total_amount`, are in the smallest currency unit, for example cents for USD.
### Payment Confirmation Email
Send a confirmation email when a payment succeeds (`payment.succeeded`):
```javascript payment_confirmation.js icon="js" expandable theme={null}
function handler(webhook) {
if (webhook.eventType === "payment.succeeded") {
const p = webhook.payload.data;
webhook.url = "https://api.autosend.com/v1/mails/send";
webhook.payload = {
to: {
email: p.customer.email,
name: p.customer.name,
},
from: {
email: "payments@mail.yourdomain.com",
name: "Your Company",
},
subject: "Payment Successful - Thank you for your purchase!",
templateId: "A-61522f2xxxxxxxxx",
dynamicData: {
customerName: p.customer.name,
amount: p.total_amount,
currency: p.currency,
paymentId: p.payment_id,
paymentDate: new Date(p.created_at).toLocaleDateString(),
},
replyTo: {
email: "support@yourdomain.com",
name: "Support Team",
},
};
}
return webhook;
}
```
### Subscription Welcome Email
Send a welcome email when a subscription becomes active (`subscription.active`). The example passes `product_id` as `planName`. If your template shows the plan name, map the ID to a display name first.
```javascript subscription_welcome.js icon="js" expandable theme={null}
function handler(webhook) {
if (webhook.eventType === "subscription.active") {
const s = webhook.payload.data;
webhook.url = "https://api.autosend.com/v1/mails/send";
webhook.payload = {
to: {
email: s.customer.email,
name: s.customer.name,
},
from: {
email: "subscriptions@mail.yourdomain.com",
name: "Your Company",
},
subject: "Welcome to your subscription!",
templateId: "A-61522f2xxxxxxxxx",
dynamicData: {
customerName: s.customer.name,
planName: s.product_id,
billingInterval: s.payment_frequency_interval,
nextBillingDate: new Date(s.next_billing_date).toLocaleDateString(),
subscriptionId: s.subscription_id,
},
replyTo: {
email: "support@yourdomain.com",
name: "Support Team",
},
};
}
return webhook;
}
```
### Payment Failure Notification
Send a notification email when a payment fails (`payment.failed`). The payment's `error_message` field holds the reason for the failure.
```javascript payment_failure.js icon="js" expandable theme={null}
function handler(webhook) {
if (webhook.eventType === "payment.failed") {
const p = webhook.payload.data;
webhook.url = "https://api.autosend.com/v1/mails/send";
webhook.payload = {
to: {
email: p.customer.email,
name: p.customer.name,
},
from: {
email: "billing@mail.yourdomain.com",
name: "Your Company Billing",
},
subject: "Payment Failed - Action Required",
templateId: "A-61522f2xxxxxxxxx",
dynamicData: {
customerName: p.customer.name,
amount: p.total_amount,
currency: p.currency,
failureReason: p.error_message,
paymentId: p.payment_id,
retryUrl: `https://yourdomain.com/billing/retry/${p.payment_id}`,
},
replyTo: {
email: "billing@yourdomain.com",
name: "Billing Support",
},
};
}
return webhook;
}
```
## Best Practices
* **Verify your sender domain**: AutoSend sends only from a verified domain, so verify the domain of your `from` address in AutoSend before you create the endpoint. A verified domain also improves deliverability and helps keep your emails out of spam folders.
* **Use dynamic data for personalization**: Pass customer-specific values, such as names, payment amounts, and subscription details, in the `dynamicData` field, and reference them as variables in your AutoSend template.
* **Write clear subject lines**: Write subject lines that state the email's purpose. Avoid words that trigger spam filters, and keep subjects under 50 characters.
* **Test before production**: Run each handler with **Test this code**, then send a test email before you go live. Check that the content renders correctly and that every `dynamicData` value is mapped.
## API Reference
For every parameter and error code of the send endpoint, see the [AutoSend API documentation](https://docs.autosend.com/api-reference/mails/send).
## Troubleshooting
* Verify that the API key is correct and active.
* Check that the sender domain is verified in AutoSend.
* Check that the recipient email addresses are valid.
* Review your AutoSend sending limits and quotas.
* Verify that the transformation sets the send endpoint URL: `https://api.autosend.com/v1/mails/send`.
* Check that the payload includes every required parameter.
* Open the endpoint's delivery attempts in the **Logs** tab of **Developer → Webhooks** to see AutoSend's response code.
* Check that the payload matches the AutoSend API format.
* Check that all required fields are present: `to`, `from`, and either `templateId` or `html`/`text`. Without `templateId`, `subject` is also required.
* Check that email addresses are formatted correctly.
* If you use a template, verify that `templateId` is valid.
* Check that the `dynamicData` keys match your template variables.
* Verify that your template ID is correct and the template is active in AutoSend.
* Check that the `dynamicData` keys match the variables in your template.
* Check that every required template variable has a value.
* Test the template on its own in the AutoSend dashboard.
This documentation is built and hosted on [Mintlify](https://mintlify.com), a developer documentation platform.
In **Integration**, select **Autosend**.
In **API key**, paste your AutoSend API key. Dodo Payments sends it in the `Authorization` header of every delivery.
See the AutoSend documentation for how to create and manage API keys.
In **Subscribed events**, select the events your transformation handles, such as `payment.succeeded`, `subscription.active`, and `payment.failed`. An endpoint with no events selected receives every event type.
Under **Transformation code**, write the JavaScript handler that builds the email for each event. Start from the [code examples](#code-examples).
Under **Test this code**, click **Simulate** to run the handler against a sample payload and check the result. Then click **Create endpoint**.
The endpoint sends an email through AutoSend each time a subscribed event occurs.
## Code Examples
Each handler checks the event type in `webhook.eventType` and reads the event data from `webhook.payload.data`. It sets `webhook.url` to AutoSend's send endpoint and replaces `webhook.payload` with the email request. Dodo Payments amounts, such as `total_amount`, are in the smallest currency unit, for example cents for USD.
### Payment Confirmation Email
Send a confirmation email when a payment succeeds (`payment.succeeded`):
```javascript payment_confirmation.js icon="js" expandable theme={null}
function handler(webhook) {
if (webhook.eventType === "payment.succeeded") {
const p = webhook.payload.data;
webhook.url = "https://api.autosend.com/v1/mails/send";
webhook.payload = {
to: {
email: p.customer.email,
name: p.customer.name,
},
from: {
email: "payments@mail.yourdomain.com",
name: "Your Company",
},
subject: "Payment Successful - Thank you for your purchase!",
templateId: "A-61522f2xxxxxxxxx",
dynamicData: {
customerName: p.customer.name,
amount: p.total_amount,
currency: p.currency,
paymentId: p.payment_id,
paymentDate: new Date(p.created_at).toLocaleDateString(),
},
replyTo: {
email: "support@yourdomain.com",
name: "Support Team",
},
};
}
return webhook;
}
```
### Subscription Welcome Email
Send a welcome email when a subscription becomes active (`subscription.active`). The example passes `product_id` as `planName`. If your template shows the plan name, map the ID to a display name first.
```javascript subscription_welcome.js icon="js" expandable theme={null}
function handler(webhook) {
if (webhook.eventType === "subscription.active") {
const s = webhook.payload.data;
webhook.url = "https://api.autosend.com/v1/mails/send";
webhook.payload = {
to: {
email: s.customer.email,
name: s.customer.name,
},
from: {
email: "subscriptions@mail.yourdomain.com",
name: "Your Company",
},
subject: "Welcome to your subscription!",
templateId: "A-61522f2xxxxxxxxx",
dynamicData: {
customerName: s.customer.name,
planName: s.product_id,
billingInterval: s.payment_frequency_interval,
nextBillingDate: new Date(s.next_billing_date).toLocaleDateString(),
subscriptionId: s.subscription_id,
},
replyTo: {
email: "support@yourdomain.com",
name: "Support Team",
},
};
}
return webhook;
}
```
### Payment Failure Notification
Send a notification email when a payment fails (`payment.failed`). The payment's `error_message` field holds the reason for the failure.
```javascript payment_failure.js icon="js" expandable theme={null}
function handler(webhook) {
if (webhook.eventType === "payment.failed") {
const p = webhook.payload.data;
webhook.url = "https://api.autosend.com/v1/mails/send";
webhook.payload = {
to: {
email: p.customer.email,
name: p.customer.name,
},
from: {
email: "billing@mail.yourdomain.com",
name: "Your Company Billing",
},
subject: "Payment Failed - Action Required",
templateId: "A-61522f2xxxxxxxxx",
dynamicData: {
customerName: p.customer.name,
amount: p.total_amount,
currency: p.currency,
failureReason: p.error_message,
paymentId: p.payment_id,
retryUrl: `https://yourdomain.com/billing/retry/${p.payment_id}`,
},
replyTo: {
email: "billing@yourdomain.com",
name: "Billing Support",
},
};
}
return webhook;
}
```
## Best Practices
* **Verify your sender domain**: AutoSend sends only from a verified domain, so verify the domain of your `from` address in AutoSend before you create the endpoint. A verified domain also improves deliverability and helps keep your emails out of spam folders.
* **Use dynamic data for personalization**: Pass customer-specific values, such as names, payment amounts, and subscription details, in the `dynamicData` field, and reference them as variables in your AutoSend template.
* **Write clear subject lines**: Write subject lines that state the email's purpose. Avoid words that trigger spam filters, and keep subjects under 50 characters.
* **Test before production**: Run each handler with **Test this code**, then send a test email before you go live. Check that the content renders correctly and that every `dynamicData` value is mapped.
## API Reference
For every parameter and error code of the send endpoint, see the [AutoSend API documentation](https://docs.autosend.com/api-reference/mails/send).
## Troubleshooting
* Verify that the API key is correct and active.
* Check that the sender domain is verified in AutoSend.
* Check that the recipient email addresses are valid.
* Review your AutoSend sending limits and quotas.
* Verify that the transformation sets the send endpoint URL: `https://api.autosend.com/v1/mails/send`.
* Check that the payload includes every required parameter.
* Open the endpoint's delivery attempts in the **Logs** tab of **Developer → Webhooks** to see AutoSend's response code.
* Check that the payload matches the AutoSend API format.
* Check that all required fields are present: `to`, `from`, and either `templateId` or `html`/`text`. Without `templateId`, `subject` is also required.
* Check that email addresses are formatted correctly.
* If you use a template, verify that `templateId` is valid.
* Check that the `dynamicData` keys match your template variables.
* Verify that your template ID is correct and the template is active in AutoSend.
* Check that the `dynamicData` keys match the variables in your template.
* Check that every required template variable has a value.
* Test the template on its own in the AutoSend dashboard.
This documentation is built and hosted on [Mintlify](https://mintlify.com), a developer documentation platform.