> ## Documentation Index
> Fetch the complete documentation index at: https://docs.dodopayments.com/llms.txt
> Use this file to discover all available pages before exploring further.
# Windmill
> Run Windmill scripts and flows when Dodo Payments events occur, to update databases, sync data, or automate business logic in code.
## Introduction
Run a Windmill script or flow each time a Dodo Payments event occurs. Use it to update a database, sync records to another system, send notifications, or run your own business logic in code.
The Windmill connector sends each event to the webhook URL of a Windmill script or flow. You need a deployed script or flow, a Windmill token that can run it, and access to **Developer → Webhooks** in the Dodo Payments dashboard.
## Getting Started
In the Dodo Payments dashboard, go to **Developer → Webhooks** and click **Add endpoint**.
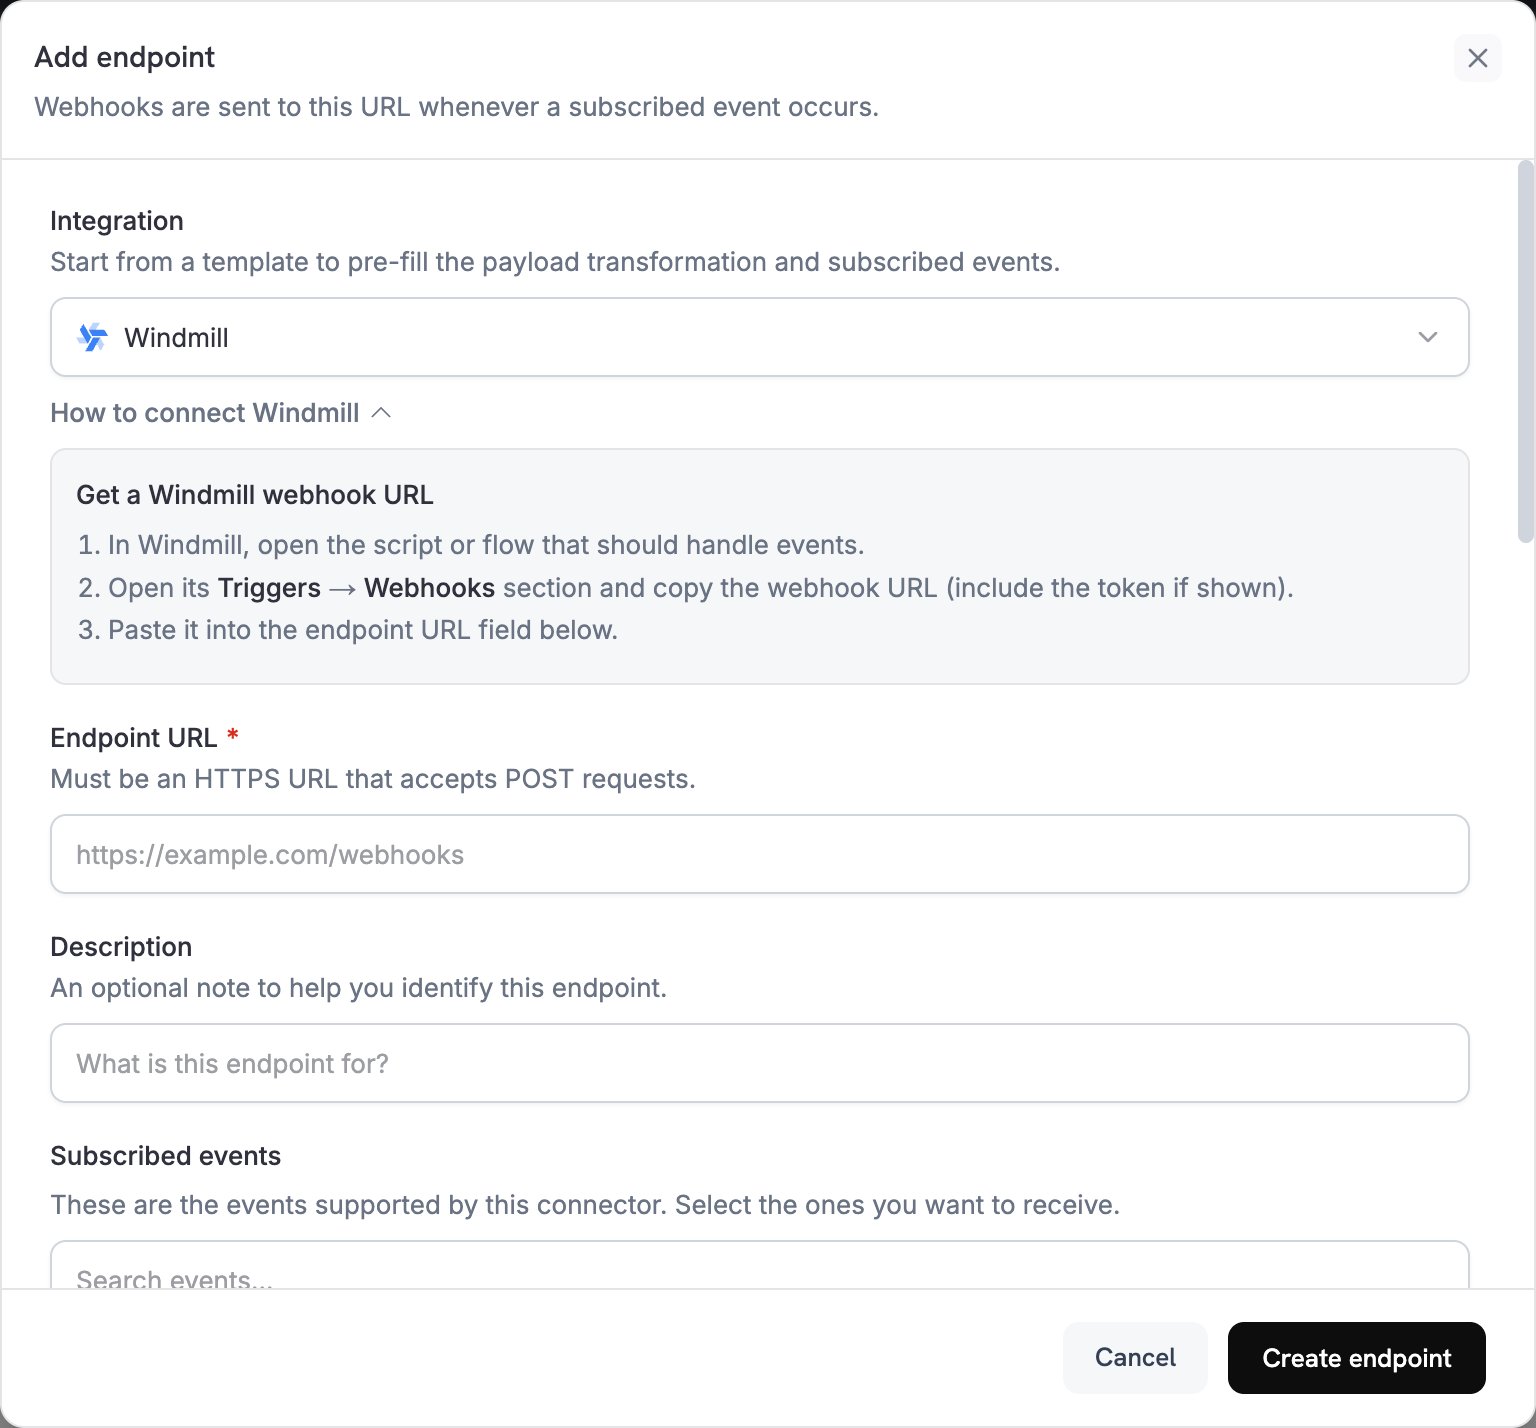 In **Integration**, select **Windmill**. The dashboard loads the Windmill transformation code and shows setup steps in the **How to connect Windmill** panel.
In Windmill, open the script or flow that should handle events. On its **Triggers** tab, open **Webhooks** and copy the asynchronous (**UUID/Async**) webhook URL. Then create a webhook-specific token for the script or flow and copy it. This token can run only that script or flow.
Paste the Windmill webhook URL into **Endpoint URL**. The URL must use HTTPS, so a self-hosted Windmill instance needs a public HTTPS address. The Windmill connector has no API key field, so you add the token after you create the endpoint.
**Subscribed events** lists the events the Windmill connector supports. Keep only the events your script or flow handles.
Under **Transformation code**, edit the handler so that the payload's top-level keys match the inputs of your script or flow. Start from the [examples](#transformation-code-examples).
Under **Test this code**, select an event type and click **Simulate** to preview the payload. Then click **Create endpoint**.
Right after you create the endpoint, open its **Advanced** tab. Under **Custom headers**, click **Add header**. Enter `Authorization` as the name and `Bearer`, a space, and your token as the value. Then click **Save**. Until you save the header, Windmill rejects deliveries, and Dodo Payments retries them on the [retry schedule](/developer-resources/webhooks#automatic-retries).
Windmill also accepts the token in a `token` query parameter at the end of the URL. Windmill recommends the header, because anyone who can see a URL with a token can use the token.
Subscribed events now start runs of your script or flow. To send a test event, open the endpoint's **Testing** tab, select an event type, and click **Send example**. In Windmill, the run appears on the **Runs** page with the `Webhook` trigger.
## Transformation Code Examples
Each handler replaces `webhook.payload` with a flat object and keeps `webhook.url`, your Windmill webhook URL. Windmill passes each top-level key to the script or flow input with the same name, so a script for the first example declares inputs such as `event_type`, `payment_id`, and `amount`. Dodo Payments amounts are in the smallest currency unit, so the examples divide by 100 and send the result as a string, such as `"25.00"`. For zero-decimal currencies such as JPY and KRW, use the amount as is.
### Basic Workflow Payload
Send the details of a successful payment:
```javascript basic_workflow.js icon="js" expandable theme={null}
function handler(webhook) {
if (webhook.eventType === "payment.succeeded") {
const p = webhook.payload.data;
webhook.payload = {
event_type: webhook.eventType,
payment_id: p.payment_id,
amount: (p.total_amount / 100).toFixed(2),
currency: p.currency,
customer_email: p.customer.email,
customer_name: p.customer.name,
payment_method: p.payment_method || "unknown",
timestamp: webhook.payload.timestamp,
metadata: {
business_id: p.business_id,
product_id: p.product_cart ? p.product_cart.map(i => i.product_id).join(', ') : undefined
}
};
}
return webhook;
}
```
### Subscription Workflow Handler
Send a `subscription_started` or `subscription_cancelled` event when a subscription becomes active or is cancelled:
```javascript subscription_workflow.js icon="js" expandable theme={null}
function handler(webhook) {
const s = webhook.payload.data;
switch (webhook.eventType) {
case "subscription.active":
webhook.payload = {
event_type: "subscription_started",
subscription_id: s.subscription_id,
customer_email: s.customer.email,
customer_name: s.customer.name,
product_id: s.product_id,
amount: (s.recurring_pre_tax_amount / 100).toFixed(2),
currency: s.currency,
frequency: s.payment_frequency_interval,
next_billing: s.next_billing_date,
customer_id: s.customer.customer_id,
timestamp: webhook.payload.timestamp
};
break;
case "subscription.cancelled":
webhook.payload = {
event_type: "subscription_cancelled",
subscription_id: s.subscription_id,
customer_email: s.customer.email,
cancelled_at: s.cancelled_at,
cancel_at_next_billing: s.cancel_at_next_billing_date,
customer_id: s.customer.customer_id,
timestamp: webhook.payload.timestamp
};
break;
}
return webhook;
}
```
### Dispute Workflow Handler
Send every dispute event, with `urgent` set to `true` when a dispute opens:
```javascript dispute_workflow.js icon="js" expandable theme={null}
function handler(webhook) {
if (webhook.eventType.startsWith("dispute.")) {
const d = webhook.payload.data;
webhook.payload = {
event_type: webhook.eventType,
dispute_id: d.dispute_id,
payment_id: d.payment_id,
amount: (d.amount / 100).toFixed(2),
currency: d.currency,
status: d.dispute_status,
stage: d.dispute_stage,
remarks: d.remarks || "",
urgent: webhook.eventType === "dispute.opened",
business_id: d.business_id,
timestamp: webhook.payload.timestamp
};
}
return webhook;
}
```
## Common Windmill Use Cases
* Update customer records in PostgreSQL or MySQL
* Log payment events to a data warehouse
* Sync data to external systems
* Update inventory levels
* Track analytics metrics
* Calculate revenue metrics
* Process refunds and adjustments
* Handle subscription lifecycle changes
* Generate reports and exports
* Validate payment data
* Send data to analytics platforms
* Update CRM systems
* Start email campaigns
* Create calendar events
* Send SMS notifications
## Tips
* Name the payload keys after your script or flow inputs, because Windmill maps each top-level key to the input with the same name.
* Use the same field names across events, so one script can handle several event types.
* Include the event type and `timestamp`. Events can arrive out of order, and `timestamp` lets your script order them.
* Use the asynchronous webhook URL. The synchronous URL waits for the run to finish, and a run that outlasts the delivery [timeout](/developer-resources/webhooks#timeouts) counts as a failed delivery, which Dodo Payments retries.
* Make your script safe to run twice for the same event, because retries can deliver an event more than once.
* To skip an event in code, set `webhook.cancel = true` before you return the webhook. The logs record a skipped delivery as successful.
* Use Windmill's [error handlers](https://www.windmill.dev/docs/core_concepts/error_handling) to get notified when a run fails.
## Troubleshooting
* Check that **Endpoint URL** is the webhook URL of your script or flow, and that the endpoint is enabled.
* Check that the `Authorization` header holds `Bearer` and a valid token. A webhook-specific token runs only its own script or flow.
* Check that the script or flow is deployed. The webhook runs the latest deployed version, not a draft.
* Open the **Logs** tab in **Developer → Webhooks** to see Windmill's response to each delivery.
* Check that the payload's top-level keys match the script or flow inputs by name.
* Check that each value matches its input type. The examples send amounts as strings.
* Check the run on the Windmill **Runs** page, filtered by the `Webhook` trigger. The asynchronous URL responds as soon as Windmill queues the run, so the Dodo Payments logs show a successful delivery even when the run fails.
* Run the script or flow in Windmill with a payload from **Simulate**.
This documentation is built and hosted on [Mintlify](https://mintlify.com), a developer documentation platform.
In **Integration**, select **Windmill**. The dashboard loads the Windmill transformation code and shows setup steps in the **How to connect Windmill** panel.
In Windmill, open the script or flow that should handle events. On its **Triggers** tab, open **Webhooks** and copy the asynchronous (**UUID/Async**) webhook URL. Then create a webhook-specific token for the script or flow and copy it. This token can run only that script or flow.
Paste the Windmill webhook URL into **Endpoint URL**. The URL must use HTTPS, so a self-hosted Windmill instance needs a public HTTPS address. The Windmill connector has no API key field, so you add the token after you create the endpoint.
**Subscribed events** lists the events the Windmill connector supports. Keep only the events your script or flow handles.
Under **Transformation code**, edit the handler so that the payload's top-level keys match the inputs of your script or flow. Start from the [examples](#transformation-code-examples).
Under **Test this code**, select an event type and click **Simulate** to preview the payload. Then click **Create endpoint**.
Right after you create the endpoint, open its **Advanced** tab. Under **Custom headers**, click **Add header**. Enter `Authorization` as the name and `Bearer`, a space, and your token as the value. Then click **Save**. Until you save the header, Windmill rejects deliveries, and Dodo Payments retries them on the [retry schedule](/developer-resources/webhooks#automatic-retries).
Windmill also accepts the token in a `token` query parameter at the end of the URL. Windmill recommends the header, because anyone who can see a URL with a token can use the token.
Subscribed events now start runs of your script or flow. To send a test event, open the endpoint's **Testing** tab, select an event type, and click **Send example**. In Windmill, the run appears on the **Runs** page with the `Webhook` trigger.
## Transformation Code Examples
Each handler replaces `webhook.payload` with a flat object and keeps `webhook.url`, your Windmill webhook URL. Windmill passes each top-level key to the script or flow input with the same name, so a script for the first example declares inputs such as `event_type`, `payment_id`, and `amount`. Dodo Payments amounts are in the smallest currency unit, so the examples divide by 100 and send the result as a string, such as `"25.00"`. For zero-decimal currencies such as JPY and KRW, use the amount as is.
### Basic Workflow Payload
Send the details of a successful payment:
```javascript basic_workflow.js icon="js" expandable theme={null}
function handler(webhook) {
if (webhook.eventType === "payment.succeeded") {
const p = webhook.payload.data;
webhook.payload = {
event_type: webhook.eventType,
payment_id: p.payment_id,
amount: (p.total_amount / 100).toFixed(2),
currency: p.currency,
customer_email: p.customer.email,
customer_name: p.customer.name,
payment_method: p.payment_method || "unknown",
timestamp: webhook.payload.timestamp,
metadata: {
business_id: p.business_id,
product_id: p.product_cart ? p.product_cart.map(i => i.product_id).join(', ') : undefined
}
};
}
return webhook;
}
```
### Subscription Workflow Handler
Send a `subscription_started` or `subscription_cancelled` event when a subscription becomes active or is cancelled:
```javascript subscription_workflow.js icon="js" expandable theme={null}
function handler(webhook) {
const s = webhook.payload.data;
switch (webhook.eventType) {
case "subscription.active":
webhook.payload = {
event_type: "subscription_started",
subscription_id: s.subscription_id,
customer_email: s.customer.email,
customer_name: s.customer.name,
product_id: s.product_id,
amount: (s.recurring_pre_tax_amount / 100).toFixed(2),
currency: s.currency,
frequency: s.payment_frequency_interval,
next_billing: s.next_billing_date,
customer_id: s.customer.customer_id,
timestamp: webhook.payload.timestamp
};
break;
case "subscription.cancelled":
webhook.payload = {
event_type: "subscription_cancelled",
subscription_id: s.subscription_id,
customer_email: s.customer.email,
cancelled_at: s.cancelled_at,
cancel_at_next_billing: s.cancel_at_next_billing_date,
customer_id: s.customer.customer_id,
timestamp: webhook.payload.timestamp
};
break;
}
return webhook;
}
```
### Dispute Workflow Handler
Send every dispute event, with `urgent` set to `true` when a dispute opens:
```javascript dispute_workflow.js icon="js" expandable theme={null}
function handler(webhook) {
if (webhook.eventType.startsWith("dispute.")) {
const d = webhook.payload.data;
webhook.payload = {
event_type: webhook.eventType,
dispute_id: d.dispute_id,
payment_id: d.payment_id,
amount: (d.amount / 100).toFixed(2),
currency: d.currency,
status: d.dispute_status,
stage: d.dispute_stage,
remarks: d.remarks || "",
urgent: webhook.eventType === "dispute.opened",
business_id: d.business_id,
timestamp: webhook.payload.timestamp
};
}
return webhook;
}
```
## Common Windmill Use Cases
* Update customer records in PostgreSQL or MySQL
* Log payment events to a data warehouse
* Sync data to external systems
* Update inventory levels
* Track analytics metrics
* Calculate revenue metrics
* Process refunds and adjustments
* Handle subscription lifecycle changes
* Generate reports and exports
* Validate payment data
* Send data to analytics platforms
* Update CRM systems
* Start email campaigns
* Create calendar events
* Send SMS notifications
## Tips
* Name the payload keys after your script or flow inputs, because Windmill maps each top-level key to the input with the same name.
* Use the same field names across events, so one script can handle several event types.
* Include the event type and `timestamp`. Events can arrive out of order, and `timestamp` lets your script order them.
* Use the asynchronous webhook URL. The synchronous URL waits for the run to finish, and a run that outlasts the delivery [timeout](/developer-resources/webhooks#timeouts) counts as a failed delivery, which Dodo Payments retries.
* Make your script safe to run twice for the same event, because retries can deliver an event more than once.
* To skip an event in code, set `webhook.cancel = true` before you return the webhook. The logs record a skipped delivery as successful.
* Use Windmill's [error handlers](https://www.windmill.dev/docs/core_concepts/error_handling) to get notified when a run fails.
## Troubleshooting
* Check that **Endpoint URL** is the webhook URL of your script or flow, and that the endpoint is enabled.
* Check that the `Authorization` header holds `Bearer` and a valid token. A webhook-specific token runs only its own script or flow.
* Check that the script or flow is deployed. The webhook runs the latest deployed version, not a draft.
* Open the **Logs** tab in **Developer → Webhooks** to see Windmill's response to each delivery.
* Check that the payload's top-level keys match the script or flow inputs by name.
* Check that each value matches its input type. The examples send amounts as strings.
* Check the run on the Windmill **Runs** page, filtered by the `Webhook` trigger. The asynchronous URL responds as soon as Windmill queues the run, so the Dodo Payments logs show a successful delivery even when the run fails.
* Run the script or flow in Windmill with a payload from **Simulate**.
This documentation is built and hosted on [Mintlify](https://mintlify.com), a developer documentation platform.