> ## Documentation Index
> Fetch the complete documentation index at: https://docs.dodopayments.com/llms.txt
> Use this file to discover all available pages before exploring further.
# WooCommerce Plugin
> Accept payments in your WooCommerce store with the Dodo Payments plugin, which sends customers to a hosted checkout and syncs order status by webhook.
## Introduction
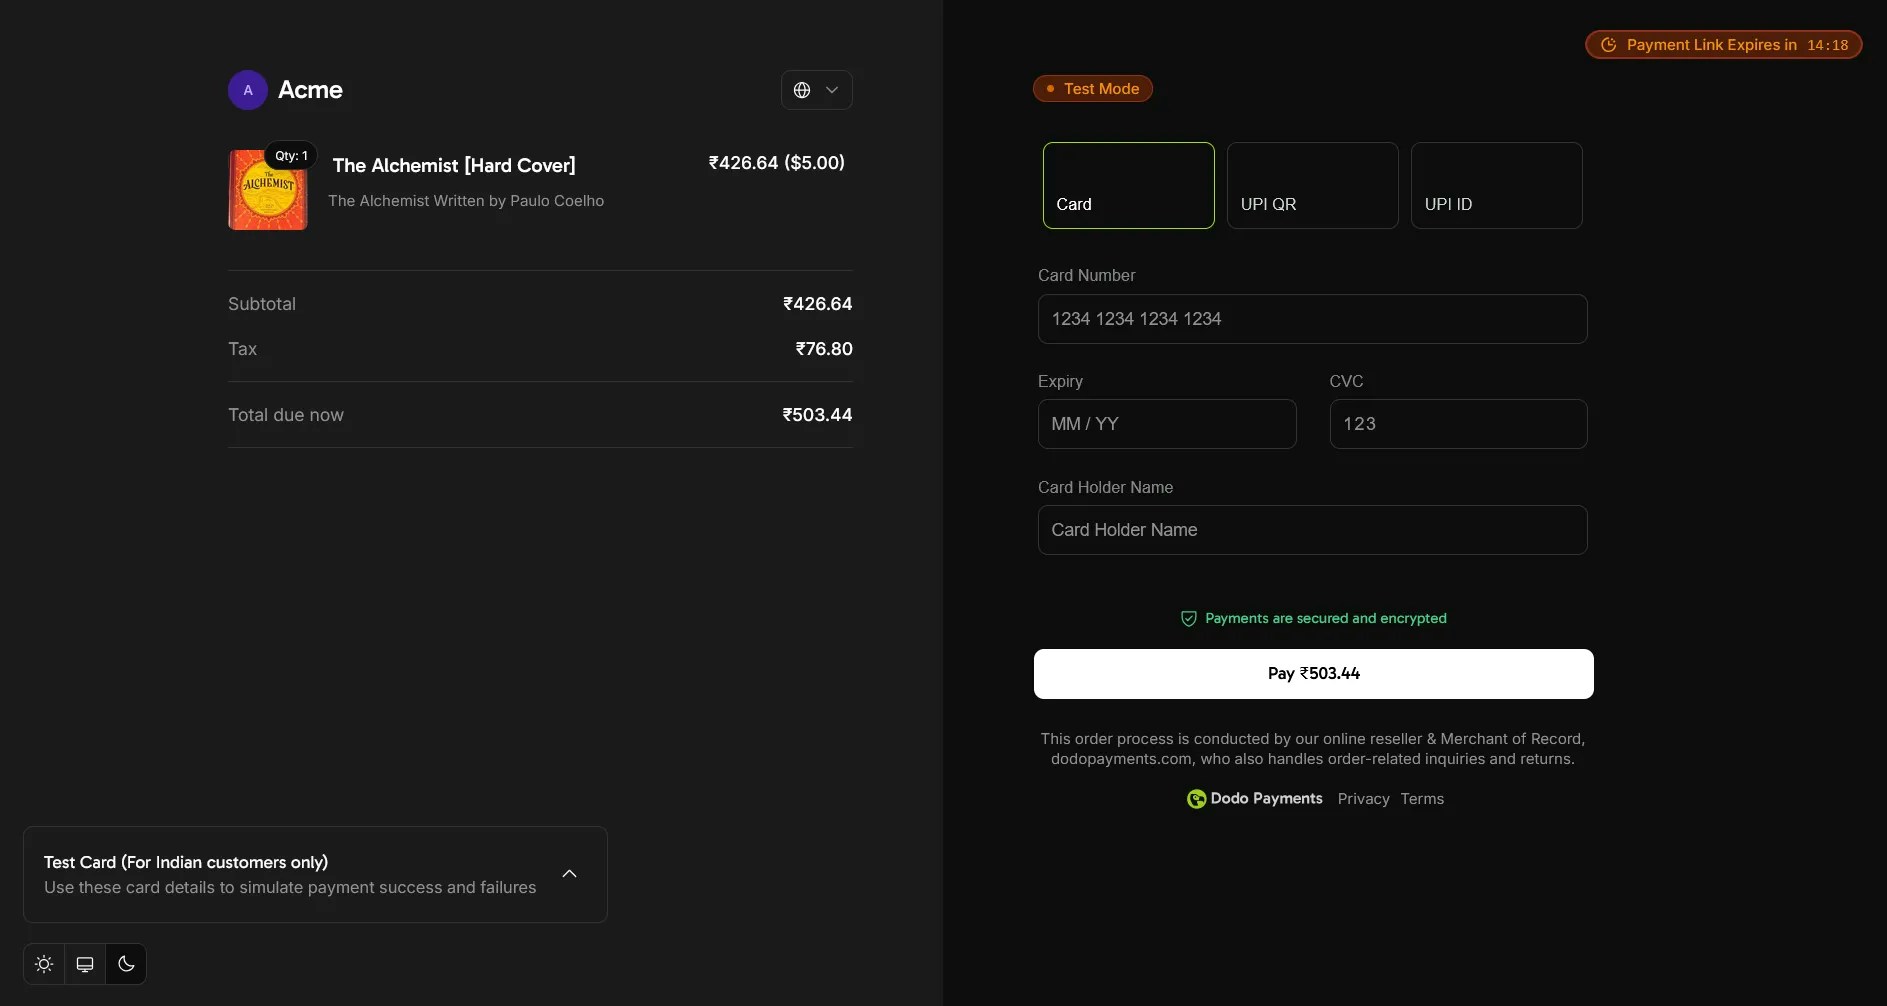
The Dodo Payments for WooCommerce plugin adds Dodo Payments as a payment method to your store's checkout. Customers pay on the Dodo Payments checkout page, which shows the payment methods available for their location, currency, and device, such as cards, digital wallets, and UPI. Webhooks from Dodo Payments then update the order status in WooCommerce.
The plugin requires WordPress 6.1 or later, PHP 7.4 or later, and WooCommerce 7.9 or later. To sell subscriptions, you also need the WooCommerce Subscriptions extension.
The plugin works with the classic WooCommerce checkout. It doesn't support the block-based checkout or physical product shipping, and it accepts only one percentage discount code per order.
## Step-by-Step Installation Guide
1. Download `dodo-payments-for-woocommerce.zip` from the latest release on GitHub.
Get the latest version of the Dodo Payments plugin for WooCommerce
You can also install the plugin from the WordPress plugin directory. On the **Add Plugins** page, search for **Dodo Payments for WooCommerce**, click **Install Now**, then click **Activate**, and continue with the [configuration guide](#configuration-guide).
Install Dodo Payments for WooCommerce from WordPress.org
2. Log in to your WordPress site as an administrator. WooCommerce must be installed and active.
3. Go to **Plugins → Add New Plugin**.
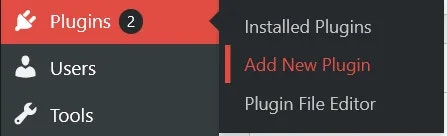 4. Click **Upload Plugin**. An upload form appears.

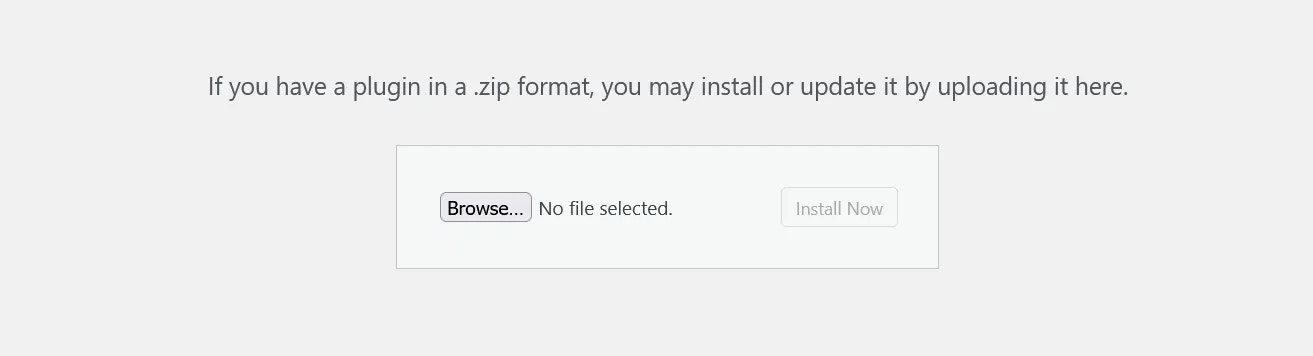 5. Click **Browse…** and select the zip file you downloaded.
6. Click **Install Now**.
5. Click **Browse…** and select the zip file you downloaded.
6. Click **Install Now**.
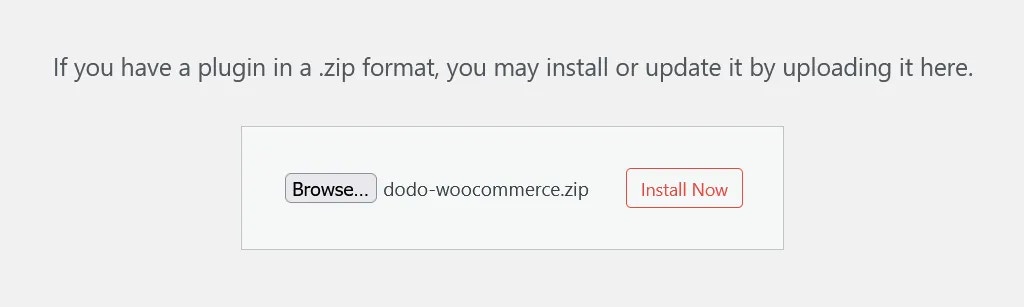 7. When the installation finishes, click **Activate Plugin**. You can also activate the plugin later from **Plugins → Installed Plugins**.
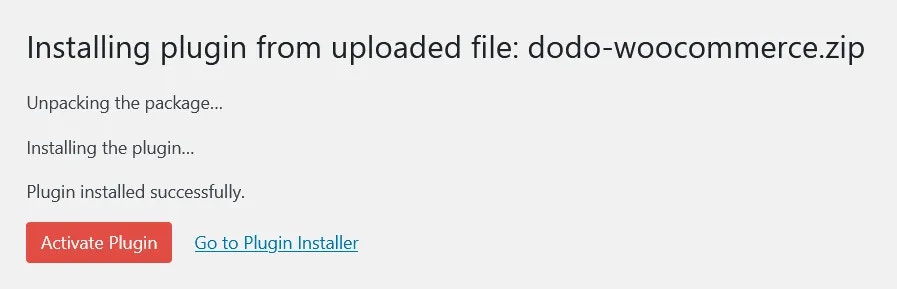 8. The plugin is installed but not configured yet. Continue with the configuration guide below.
## Configuration Guide
### Setting Up API Keys and Webhooks
The plugin needs two values from each Dodo Payments mode: an API key to create checkouts, and a webhook signing key to verify the webhooks that update your orders. These steps set up live mode.
1. Go to **WooCommerce → Settings → Payments**, or click **Payments** under **WooCommerce** in the sidebar.
8. The plugin is installed but not configured yet. Continue with the configuration guide below.
## Configuration Guide
### Setting Up API Keys and Webhooks
The plugin needs two values from each Dodo Payments mode: an API key to create checkouts, and a webhook signing key to verify the webhooks that update your orders. These steps set up live mode.
1. Go to **WooCommerce → Settings → Payments**, or click **Payments** under **WooCommerce** in the sidebar.
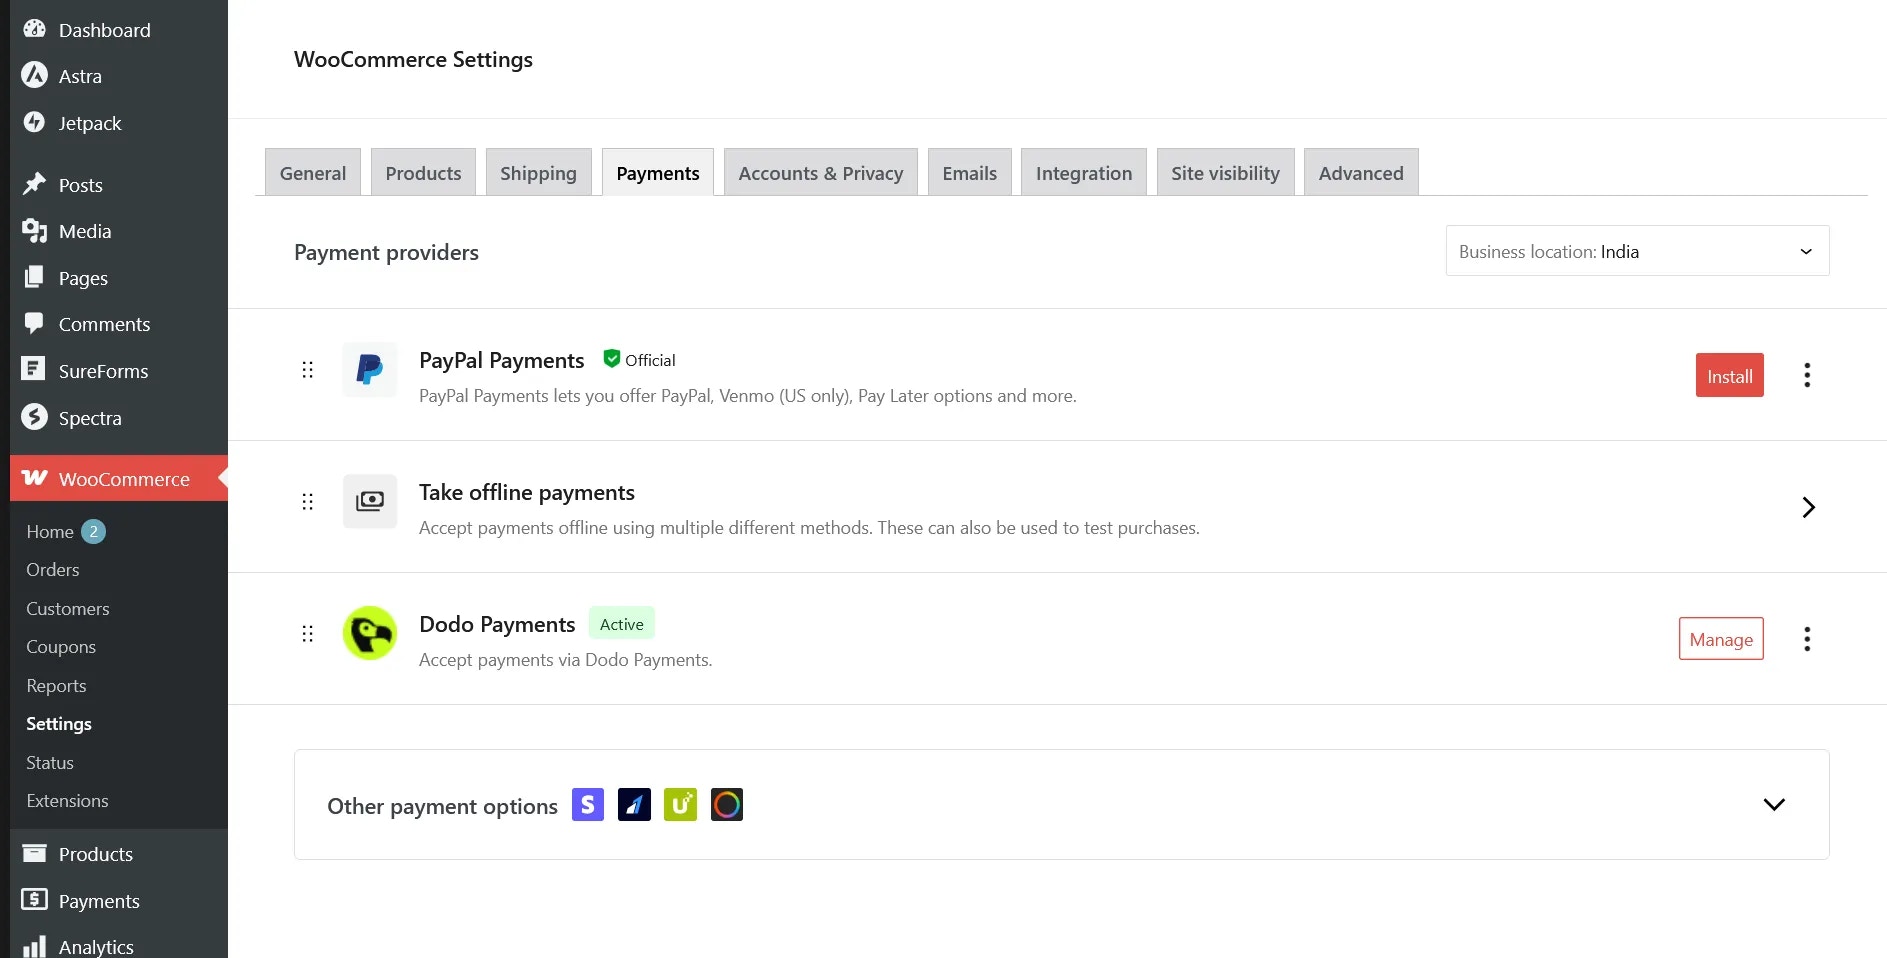
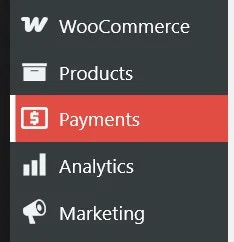 2. Turn on **Dodo Payments** if it isn't active, then click **Manage**.
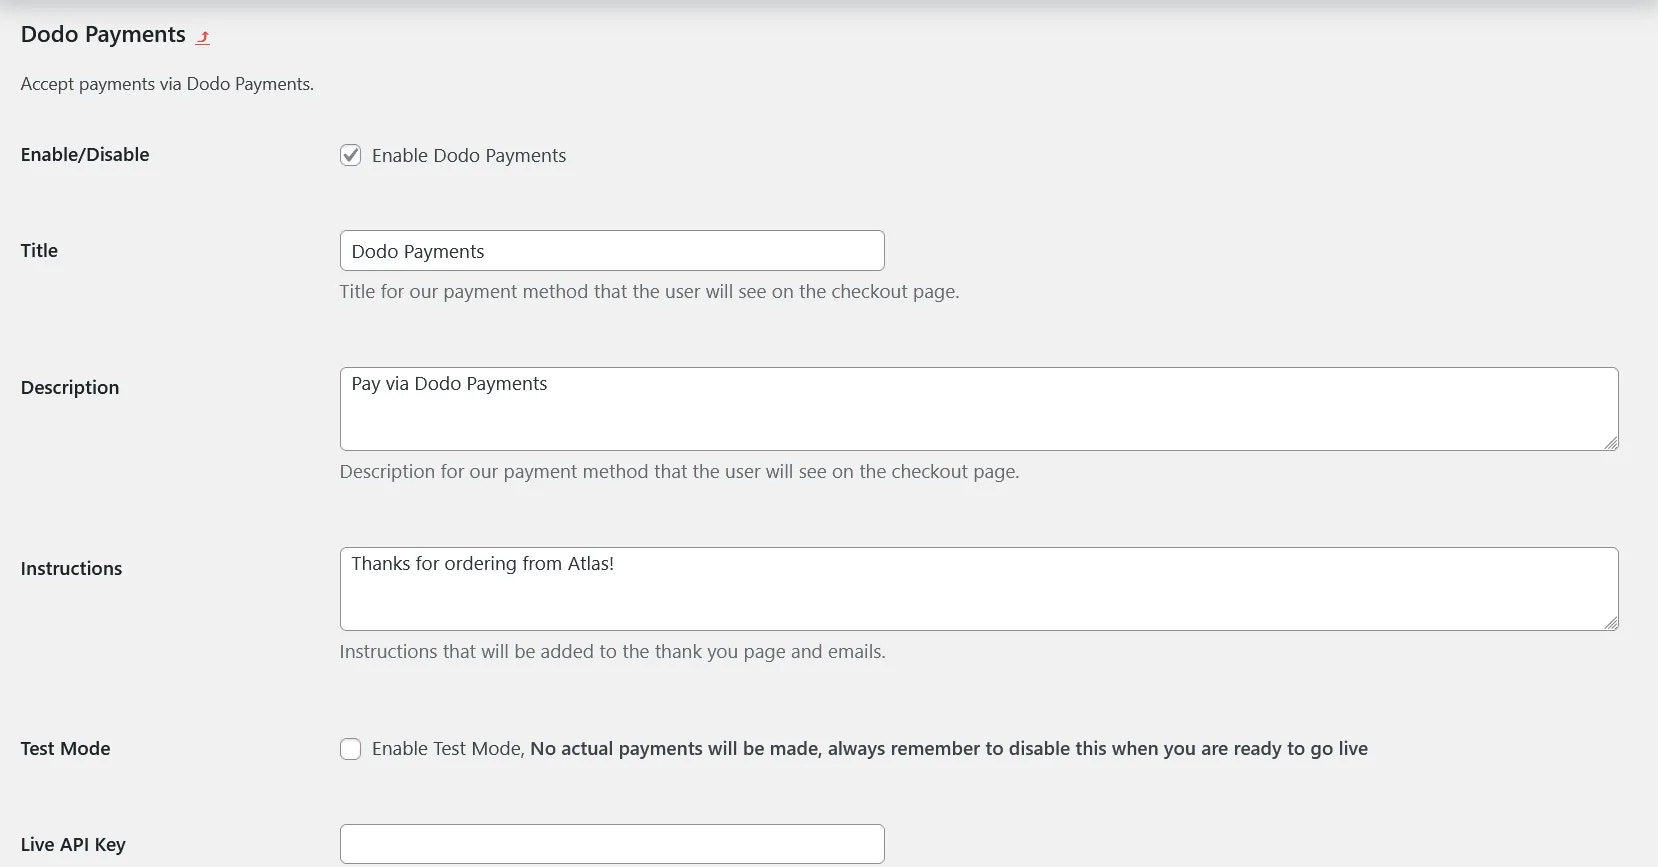
3. The plugin settings open, with a description under each option. Check that **Enable Dodo Payments** is selected, then start with **Live API Key**.
2. Turn on **Dodo Payments** if it isn't active, then click **Manage**.
3. The plugin settings open, with a description under each option. Check that **Enable Dodo Payments** is selected, then start with **Live API Key**.
 4. In the Dodo Payments dashboard, turn on the **Live Mode** switch in the sidebar. Go to **Developer → API Keys**, or use [this direct link](https://app.dodopayments.com/developer/api-keys), and click **Add API key**.
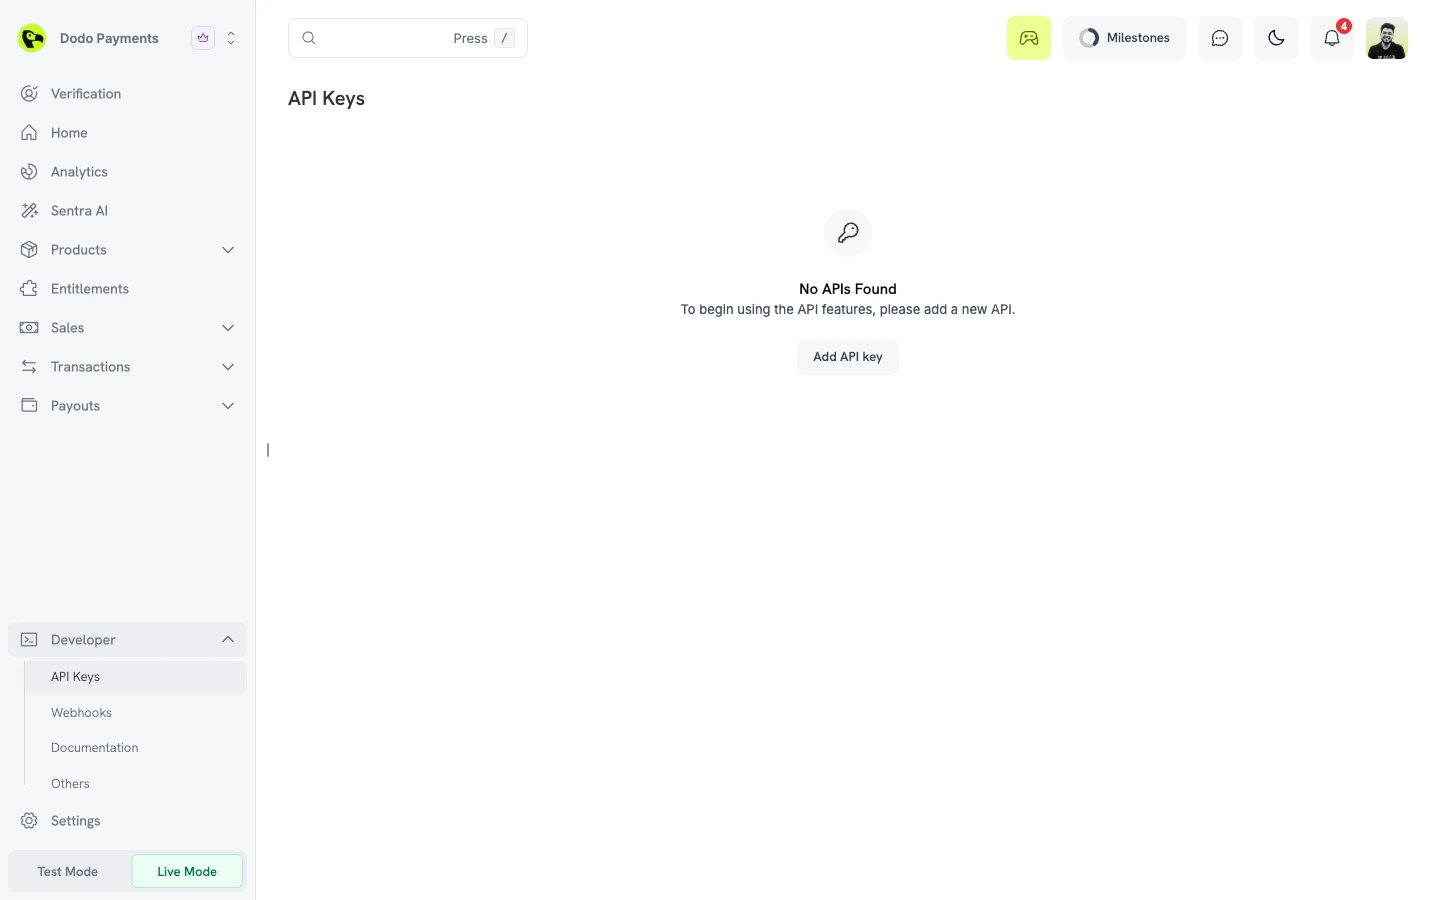 5. Enter a name for the key, such as `WooCommerce Plugin`, and click **Create**.
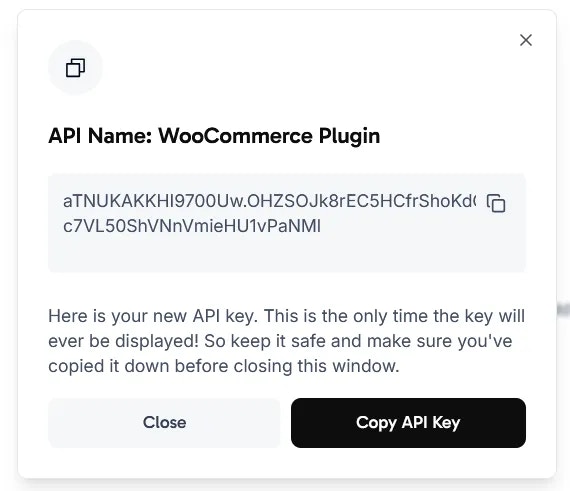
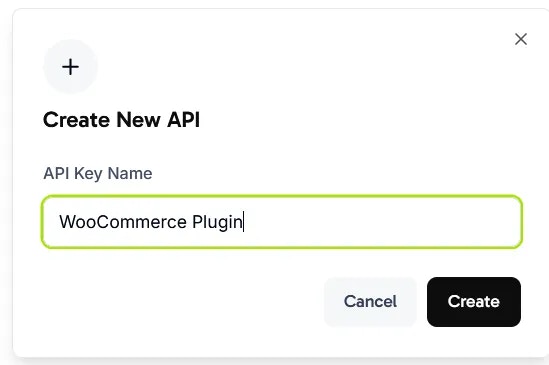 6. Click **Copy API Key**. The dashboard shows the key only once. Paste it into **Live API Key** in the plugin settings.
 7. Next, set up the webhook signing key. Dodo Payments sends payment updates to your store by webhook, and the plugin uses the key to verify that each webhook comes from Dodo Payments.
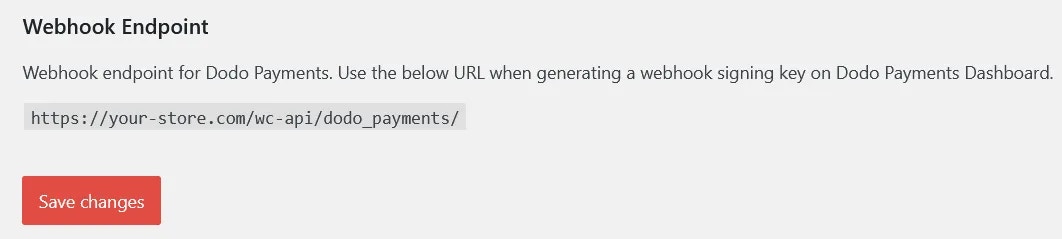
8. At the bottom of the plugin settings, under **Webhook Endpoint**, copy the URL. It has the form `https://your-store.com/?wc-api=dodo_payments`.
7. Next, set up the webhook signing key. Dodo Payments sends payment updates to your store by webhook, and the plugin uses the key to verify that each webhook comes from Dodo Payments.
8. At the bottom of the plugin settings, under **Webhook Endpoint**, copy the URL. It has the form `https://your-store.com/?wc-api=dodo_payments`.
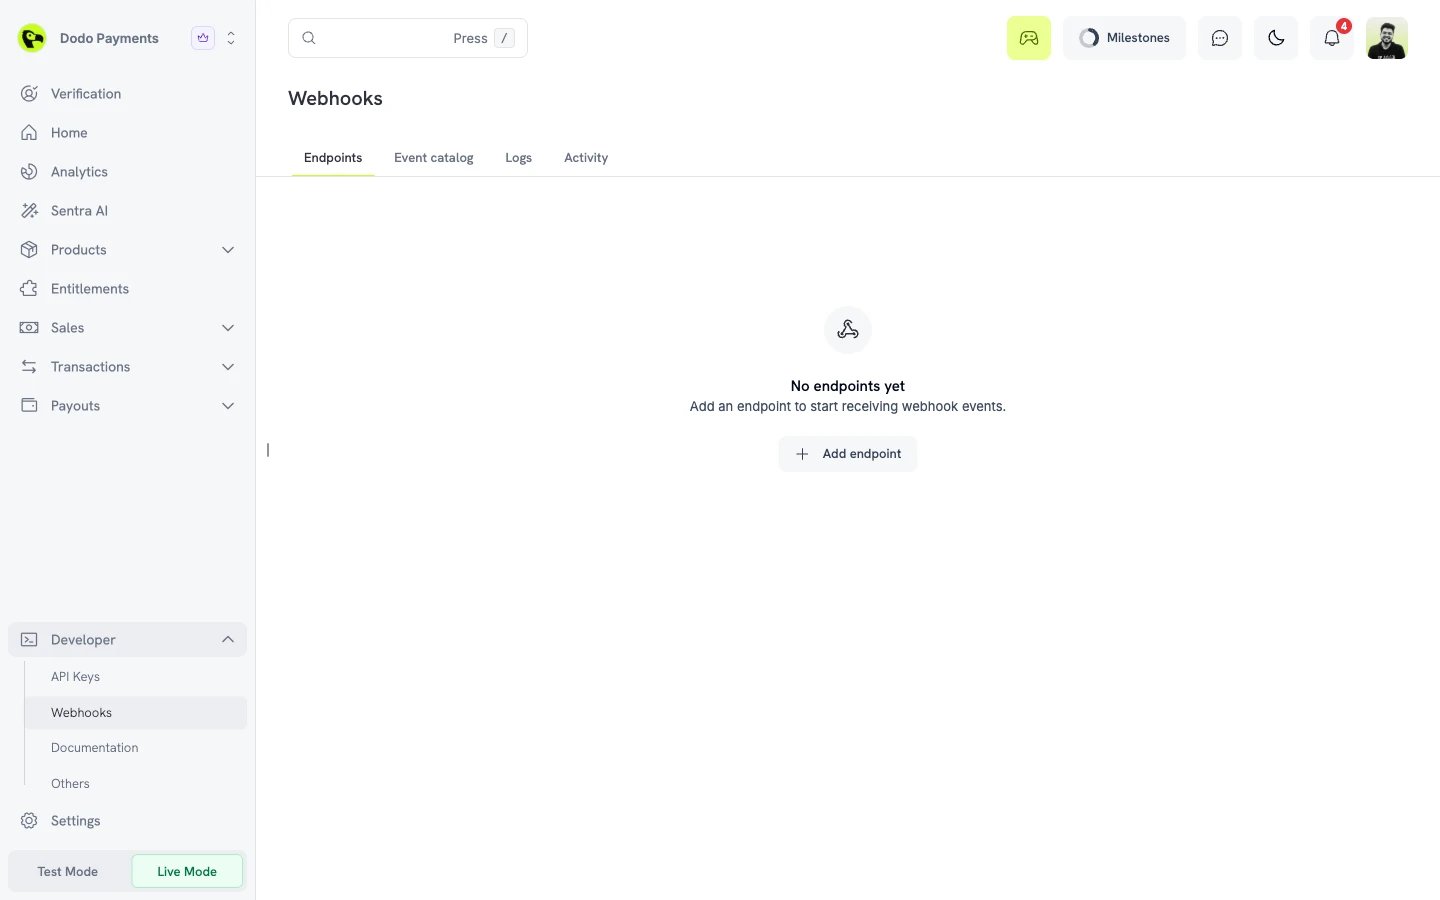
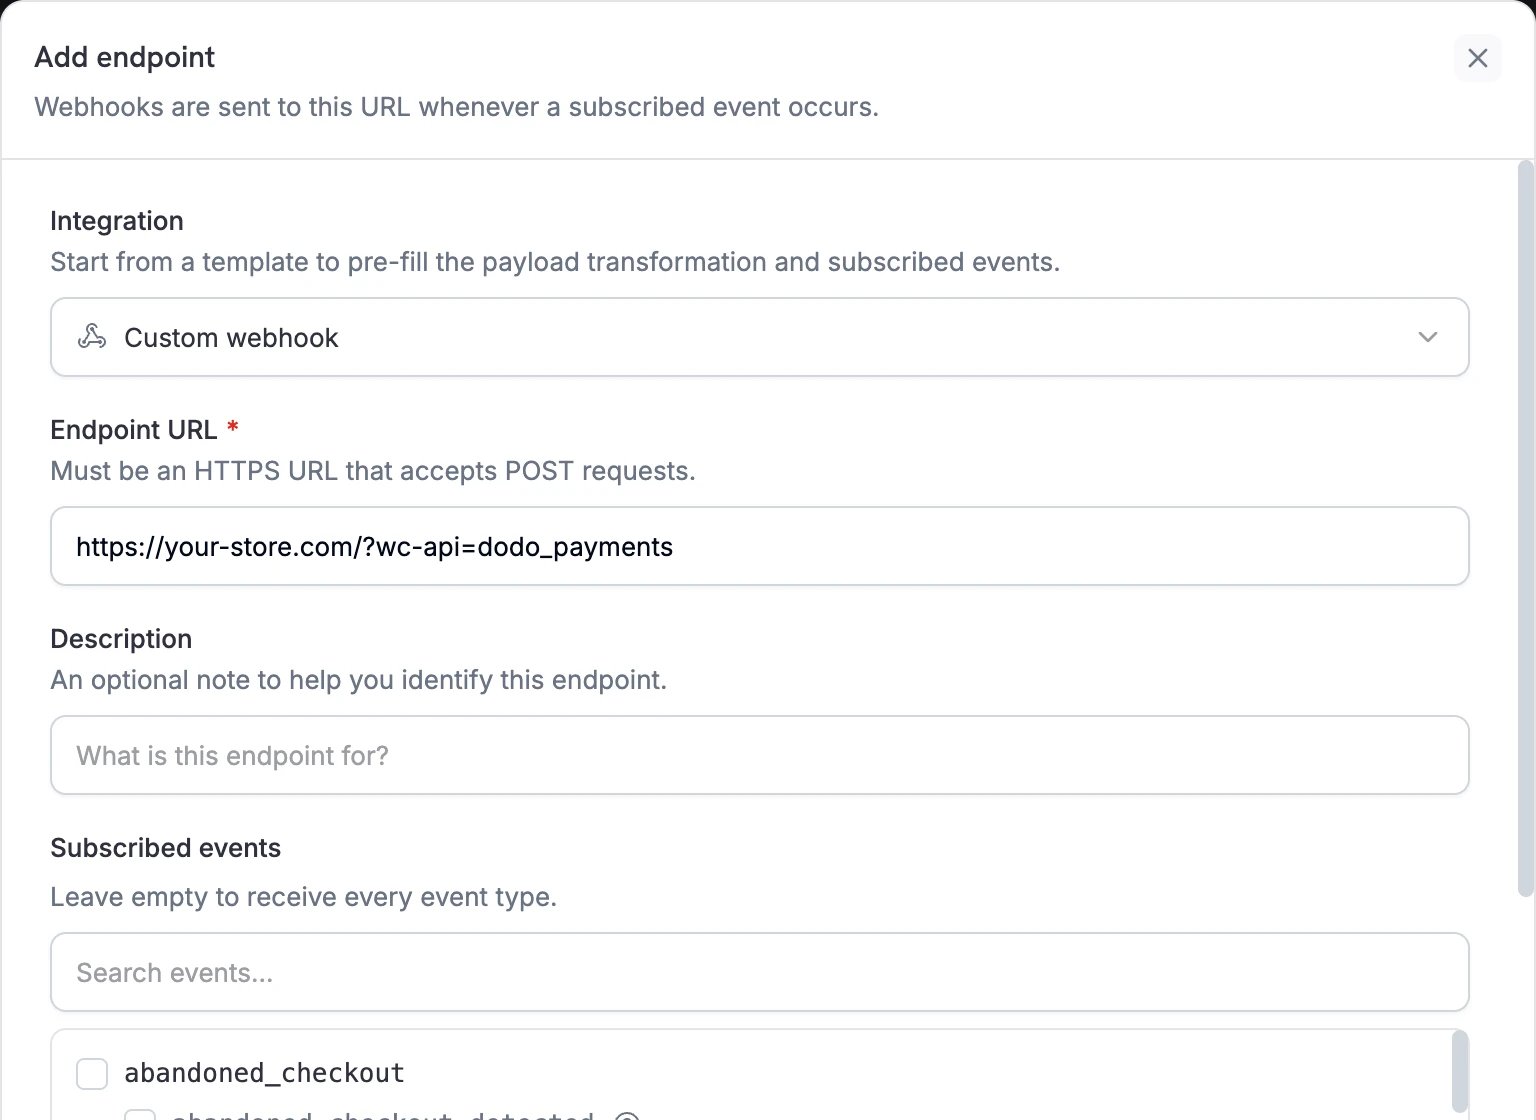
 9. In the Dodo Payments dashboard, still in live mode, go to **Developer → Webhooks** and click **Add endpoint**.
 10. Paste the URL from step 8 into **Endpoint URL**. Leave **Subscribed events** empty to receive every event, or select only the payment, refund, and subscription events, which are the events the plugin handles. Then click **Create endpoint**.
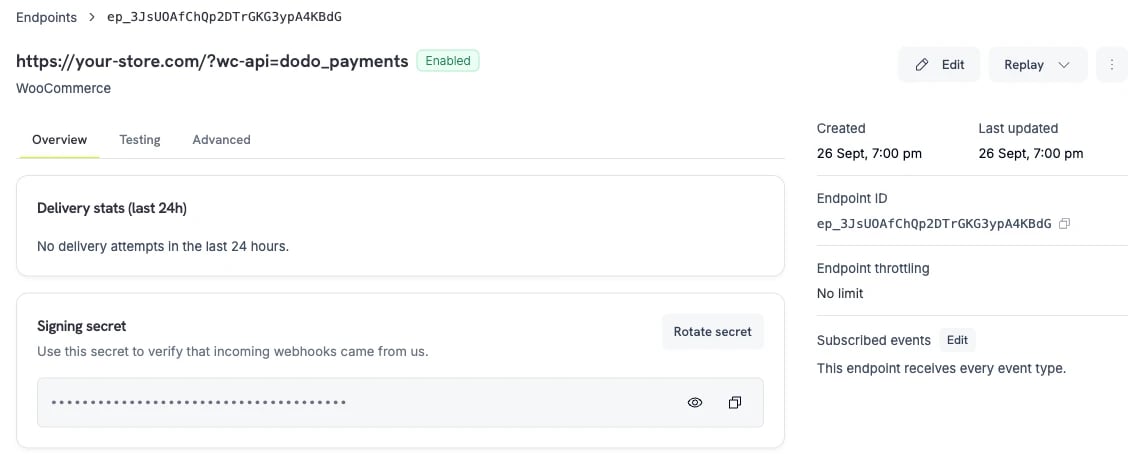
 11. The endpoint's **Overview** tab opens. Under **Signing secret**, click the eye icon to reveal the secret, then click the copy icon.
 12. Paste the secret into **Live Webhook Signing Key** in the plugin settings, then click **Save changes**.
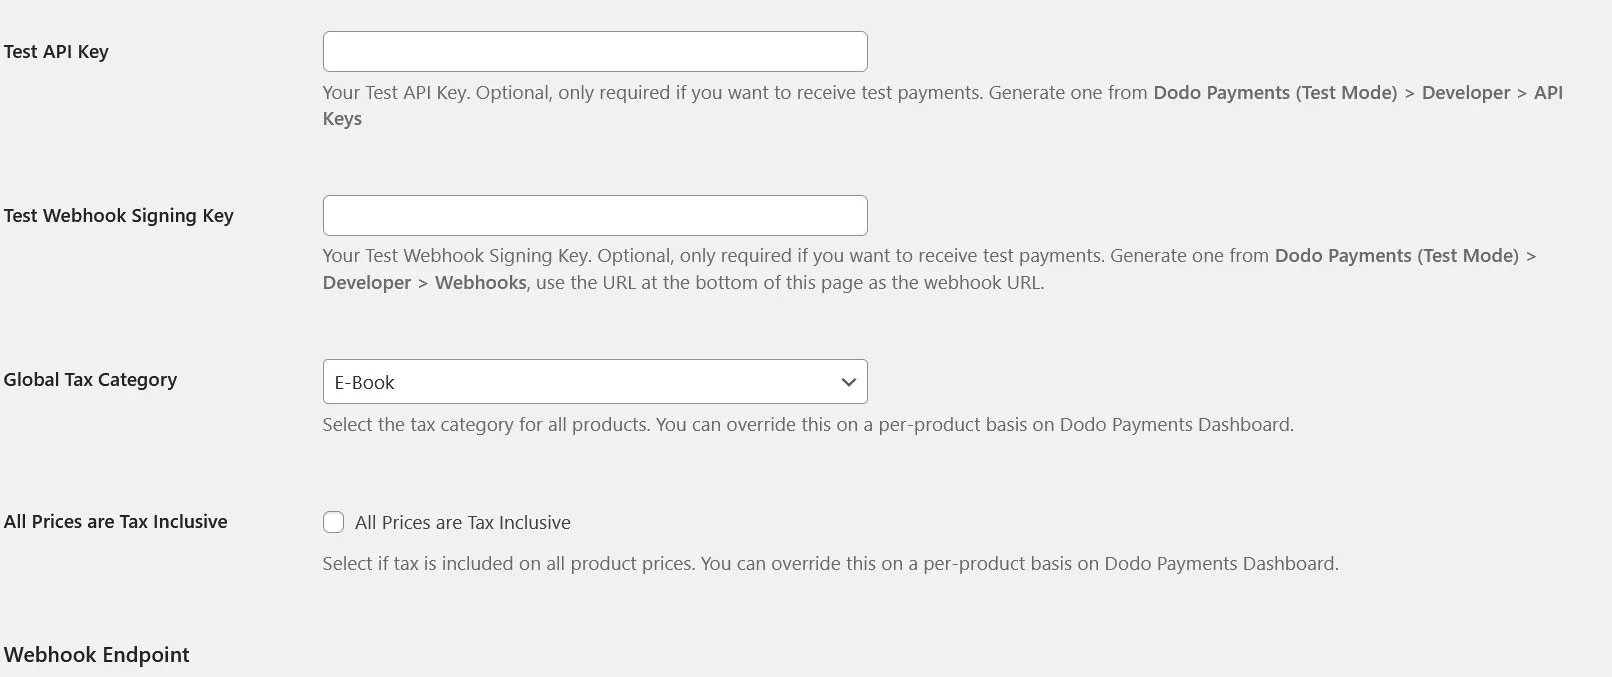
 13. Review **Global Tax Category** and **All Prices are Tax Inclusive**. The plugin applies them when it creates a product in Dodo Payments, which happens the first time a customer checks out with the product. After that, the product keeps the tax settings it has in the Dodo Payments dashboard, where you can change them per product. **Test API Key** and **Test Webhook Signing Key** are needed only for Test Mode.
 Under **Checkout Feature Flags**, you can also control options of the Dodo Payments checkout page, such as **Allow Currency Selection** and **Allow Discount Codes**. A flag left at **Default** isn't sent, so Dodo Payments applies its own default.
To take test payments, turn on **Test Mode** in the plugin settings. The plugin then uses **Test API Key** and **Test Webhook Signing Key**, and connects to the Dodo Payments test environment. Test mode has its own API keys and webhook endpoints. To get them, turn off the **Live Mode** switch in the dashboard, follow steps 4 to 12 in test mode, and paste the values into the test fields. Turn off **Test Mode** before you go live.
## You're All Set!
Customers can now choose Dodo Payments at checkout.
Under **Checkout Feature Flags**, you can also control options of the Dodo Payments checkout page, such as **Allow Currency Selection** and **Allow Discount Codes**. A flag left at **Default** isn't sent, so Dodo Payments applies its own default.
To take test payments, turn on **Test Mode** in the plugin settings. The plugin then uses **Test API Key** and **Test Webhook Signing Key**, and connects to the Dodo Payments test environment. Test mode has its own API keys and webhook endpoints. To get them, turn off the **Live Mode** switch in the dashboard, follow steps 4 to 12 in test mode, and paste the values into the test fields. Turn off **Test Mode** before you go live.
## You're All Set!
Customers can now choose Dodo Payments at checkout.
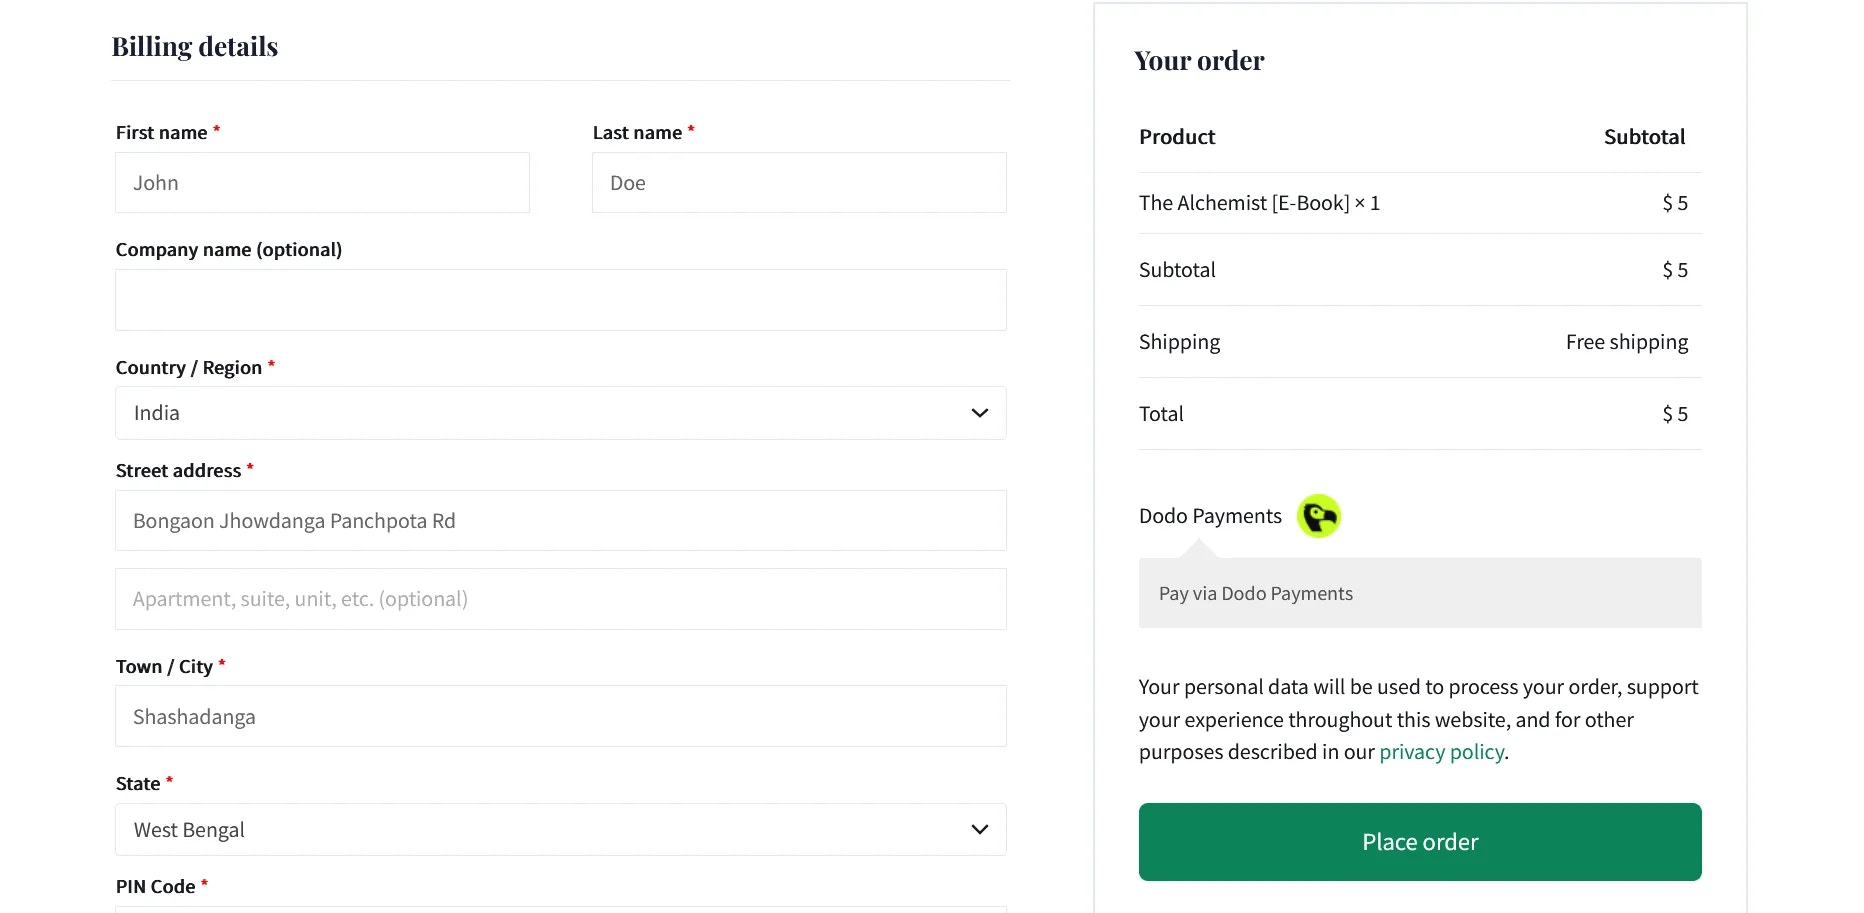 When a customer places an order, the plugin sends them to the Dodo Payments checkout page to pay. After the payment, Dodo Payments sends a webhook, and the plugin updates the order status.
 ## Key Features
* **Hosted Checkout**: Customers pay on a Dodo Payments checkout page, then return to your store's order confirmation page.
* **Multiple Payment Methods**: The checkout shows the [payment methods](/features/payment-methods) available for each customer's location, currency, and device.
* **Order Status Sync**: Webhooks set the order to **Completed**, **Processing**, **Failed**, or **Cancelled** as the payment status changes. Failed and cancelled payments return the items to stock.
* **Refunds**: Issue refunds from the Dodo Payments dashboard. When a refund succeeds, the plugin sets the order to **Refunded**.
* **Subscriptions**: With WooCommerce Subscriptions, status changes sync in both directions, including when a subscription is cancelled, suspended, or reactivated. Changes to subscription dates in WooCommerce aren't synced.
* **Order Notes**: The plugin adds order notes for each checkout session, status change, and error, so you can follow each payment from the order page.
* **Multi-currency Support**: Products sync to Dodo Payments in your WooCommerce store currency. The **Allow Currency Selection** flag controls whether customers can change the currency at checkout.
## Troubleshooting
### Common Issues
1. **Payment Processing Failures**
* Check that the API key matches the plugin mode. With **Test Mode** off, the plugin uses **Live API Key**, which must come from the dashboard in live mode. With **Test Mode** on, it uses **Test API Key**.
* Check the order notes. When the plugin can't create a checkout, it adds a note with the error, such as one that starts with `Dodo Payments Error:`.
* If Dodo Payments doesn't appear at checkout, check that your checkout page uses the classic checkout, not the Checkout block.
* If the order has a discount code, check that it's a single percentage code.
* Live payments start after your account passes [Account Verification](/miscellaneous/verification-process).
2. **Webhook Synchronization Problems**
* Check that **Endpoint URL** is the exact URL under **Webhook Endpoint** in the plugin settings.
* Check that the signing key in the plugin matches the endpoint's **Signing secret**, and that both come from the same mode.
* Check your PHP error log for lines that start with `Dodo Payments:`, such as `Dodo Payments: Could not verify webhook event`. In live mode, the plugin returns `200` even when verification fails, so the Dodo Payments logs show the delivery as successful. In Test Mode, it returns `401`.
* Check that your site has a valid SSL certificate. **Endpoint URL** accepts only HTTPS URLs.
* Check that your server, firewall, and security plugins accept POST requests to the webhook URL from the [Dodo Payments IP addresses](/developer-resources/webhooks#source-ip-addresses).
* Open the **Logs** tab in **Developer → Webhooks** to see each delivery and your site's response.
### Support Resources
For more help:
* Email [support@dodopayments.com](mailto:support@dodopayments.com).
* Read the [Dodo Payments documentation](https://docs.dodopayments.com).
## Maintenance Best Practices
1. Update the plugin when a new version is released, to get security fixes and new features.
2. Test all payment flows in Test Mode before you take live payments.
3. Keep WordPress and WooCommerce up to date.
4. Back up your site regularly.
5. Watch your orders and the Dodo Payments dashboard for unusual activity.
6. Store API keys securely, and never share them publicly.
This documentation is built and hosted on [Mintlify](https://mintlify.com), a developer documentation platform.
## Key Features
* **Hosted Checkout**: Customers pay on a Dodo Payments checkout page, then return to your store's order confirmation page.
* **Multiple Payment Methods**: The checkout shows the [payment methods](/features/payment-methods) available for each customer's location, currency, and device.
* **Order Status Sync**: Webhooks set the order to **Completed**, **Processing**, **Failed**, or **Cancelled** as the payment status changes. Failed and cancelled payments return the items to stock.
* **Refunds**: Issue refunds from the Dodo Payments dashboard. When a refund succeeds, the plugin sets the order to **Refunded**.
* **Subscriptions**: With WooCommerce Subscriptions, status changes sync in both directions, including when a subscription is cancelled, suspended, or reactivated. Changes to subscription dates in WooCommerce aren't synced.
* **Order Notes**: The plugin adds order notes for each checkout session, status change, and error, so you can follow each payment from the order page.
* **Multi-currency Support**: Products sync to Dodo Payments in your WooCommerce store currency. The **Allow Currency Selection** flag controls whether customers can change the currency at checkout.
## Troubleshooting
### Common Issues
1. **Payment Processing Failures**
* Check that the API key matches the plugin mode. With **Test Mode** off, the plugin uses **Live API Key**, which must come from the dashboard in live mode. With **Test Mode** on, it uses **Test API Key**.
* Check the order notes. When the plugin can't create a checkout, it adds a note with the error, such as one that starts with `Dodo Payments Error:`.
* If Dodo Payments doesn't appear at checkout, check that your checkout page uses the classic checkout, not the Checkout block.
* If the order has a discount code, check that it's a single percentage code.
* Live payments start after your account passes [Account Verification](/miscellaneous/verification-process).
2. **Webhook Synchronization Problems**
* Check that **Endpoint URL** is the exact URL under **Webhook Endpoint** in the plugin settings.
* Check that the signing key in the plugin matches the endpoint's **Signing secret**, and that both come from the same mode.
* Check your PHP error log for lines that start with `Dodo Payments:`, such as `Dodo Payments: Could not verify webhook event`. In live mode, the plugin returns `200` even when verification fails, so the Dodo Payments logs show the delivery as successful. In Test Mode, it returns `401`.
* Check that your site has a valid SSL certificate. **Endpoint URL** accepts only HTTPS URLs.
* Check that your server, firewall, and security plugins accept POST requests to the webhook URL from the [Dodo Payments IP addresses](/developer-resources/webhooks#source-ip-addresses).
* Open the **Logs** tab in **Developer → Webhooks** to see each delivery and your site's response.
### Support Resources
For more help:
* Email [support@dodopayments.com](mailto:support@dodopayments.com).
* Read the [Dodo Payments documentation](https://docs.dodopayments.com).
## Maintenance Best Practices
1. Update the plugin when a new version is released, to get security fixes and new features.
2. Test all payment flows in Test Mode before you take live payments.
3. Keep WordPress and WooCommerce up to date.
4. Back up your site regularly.
5. Watch your orders and the Dodo Payments dashboard for unusual activity.
6. Store API keys securely, and never share them publicly.
This documentation is built and hosted on [Mintlify](https://mintlify.com), a developer documentation platform.